Published Permissions

Showing posts with label stencil. Show all posts

Wednesday, 9 August 2017

"Queen Bee"......


Good morning!

I've had a play for the new challenge over at Cards in Envy - their new challenge is insects or bugs so here I am with bees!!!!

I have used a selection of the stamps in the Craft Consortium Tell The Bees set and a honeycomb pattern stencil which I have used gesso through. The queen bee has been stamped, cut out and stuck back on to give her a tiny bit of depth along with her friend to her right.

You will also notice slight hints of a crackle stamp in the background (Chocolate Baroque) and I finished a few of the honeycombs off with a slight touch of Imagination Crafts starlights.

This was quite fun to make and notice how I have moved some of the bee stamps to try and make it look like the wings are moving and fluttering so fast like little bees wings do!

Do go over and join them at Cards in Envy, remember that the card that you produce must be flat enough to fit in an envy envelope.

Hope you like this card,
Thanks for stopping by,
Leanne xx

Monday, 24 July 2017

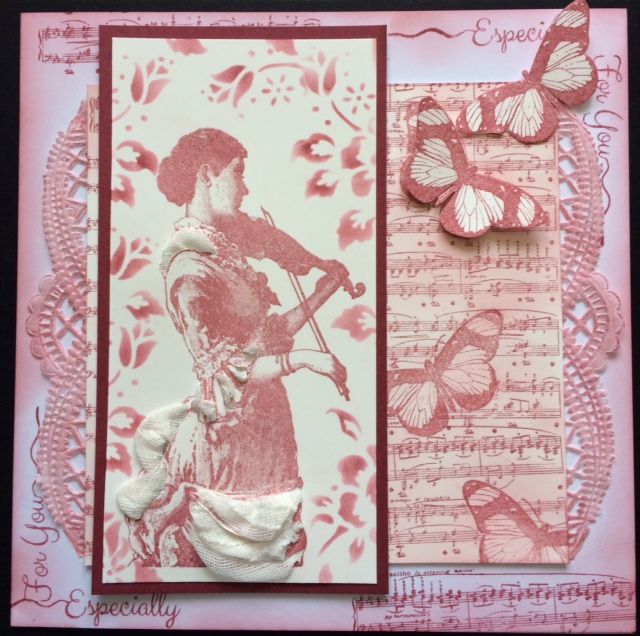
Especially For You.........


Good morning!

Well, as you can see, I went for lovely pale pinks and a wonderful main stamp from Bee Crafty here. I have made this more feminine by adding some fine lace;


So here is my start;


and here is how I envisaged the lace being put through the stamped image - I have cut out where I wanted the lace to be.


Here I have added some musical notes to tie in with the lady playing the violin.


I attached just a simple doily to the back (I had blended some pink ink over it).


Bring it all together and this is what we've got! Two butterflies have been 3'd and that lace makes for a lovely feminine lady.


Thanks for stopping by today,
Leanne x


Wednesday, 12 July 2017

Happy Birthday JJ..........


Good morning!

Fifth scheduled post today while I'm away on holiday.

This share is a card that I made (very quickly I might add) for a school friend of Katie's - typical Katie, I never get much notice when she needs something for a friend!!!!

This was a quick make using the Visible Image Face It set, some distress ink, a stencil to give me two curves for the nose (nothing related to a face!!!) and some circles stamped on there too.

Happy Birthday is also a Visible Image stamp and "J J" was stamped using the Clarity Stamp alphabet set.

A white pen was used to highlight a few eye lashes.

There, a quick make made in about 15 minutes!

This one was well received and very much liked.

Thanks for stopping by today,
Leanne xx


Friday, 7 July 2017

Relax! - and I'm published in this month's Craft Stamper magazine!


Good morning!

Third Scheduled blog for you this morning while I am on holiday.

This card was made as my effort for Craft Stamper magazine for their Raspberry Fizz art call - but I didn't hear anything back on this occasion (for the September edition)so I'm posting it here for you to see! I did however make it in to the magazine for the August edition (available from today) - I've popped a sneaky peak at the end of this post.

My thoughts for Raspberry Fizz were bubbles!!!! I thought raspberries? bubbles - BATHTIME!!!! - See, there is absolutely no explanation of how my mind works is there!!!!!

So I went down the route of "relax" - I thought this card would be great for someone who is feeling poorly, someone who has just been over doing things recently, a mum to be or just a relax, chill out message on someones birthday!

There is lots to see on here and as I'm scheduling lots of posts for you while I'm away I'm leaving it to your own eyes to spot what I have done here!!! Check out the ribbon - I even stamped that too!!!!

I can also reveal that I am published in this months Craft Stamper magazine that is available to buy from today. I am in the Deckchairs By The Sea section! Here is a little peak for you.....


Hope you've enjoyed your visit, thanks for stopping by and sticking with me while I am away,
Leanne xx


Monday, 1 May 2017

Imagine the possibilities........


Good morning!

Here is my entry for the current Chocolate Baroque colour swatch challenge:-

My teal blue is coming out rather blue on the photograph but it is indeed the same teal blue as the sky is but the light is making it lighter!!!!!!

I have used Spectrum Noir Sparkle Pens for this project to make the lovely blended background here.  I then stamped Katya right in the middle and lifted out some colour from her face and her head dress with water.

The silhouette palace 1 stencil was used at the bottom and I sponged some Momento red ink through this and shaded it a bit darker with a Momento brown ink pad.

The sun/moon and clouds have been produced using water again and lifting some of that ink and covering the sun/moon with some of the lifted ink so it gives you that lovely positive/negative effect.

The sentiment is from the Chocolate Baroque words of inspiration stamp set and the little birds are from the serenity set

I finished off by adding some white pen dots around the head dress to pop it a bit and I was very happy with this.  

The example of the challenge swatch made me think of a calmness with a dreamy feeling and so, this is what I tried to produce with the Chocolate Baroque products that I have and the colours for the swatch.

Hope you like what you've seen here today and have enjoyed your visit.

I would like to enter this in to the Chocolate Baroque challenge 34 colour swatch challenge:-

Thanks for stopping by,
Leanne xx

Sunday, 5 March 2017

The Sky Is The Limit.................


Good morning!

A quick post this morning to show you this card that I have made for the Cards In Envy challenge of "Red and Blue".

I started this card with a cloud stencil that I brushed with distress ink and just kept moving the stencil down the page until I got this lovely sky full of clouds.

You will see that about 2/3 down the page I changed so that the landscape became hills but kept to exactly the same colour scheme.

I then stamped my planes (For The Love of Stamps - Enjoy the Journey) and painted them in with distress inks.

Using exactly the same distress ink I stamped my compass twice and the sentiment which are again from the same stamp set.

A few splatters and birds and I was done! - another masculine card - brilliant!

Hope you like it too.

Thanks for stopping by,

I would like to enter this into the Cards In Envy challenge of "Red and Blue":-

Leanne x


Monday, 20 February 2017

Frozen in Time..........


Good morning!

Well, did I get messy doing this one or what?!!!!! I decided to take up the challenge over at Stamps & stencils of "Texture, Crackle and Paint" - well, it's right up my alley isn't it!!!!!

I've taken some photo's along the way so lets take our journey and see how I got there with this one:-


OK, so I started off with a medium mdf tag and covered it in Decoart black texture paste.  I waited for it to form a skin on the surface and then stamped a couple of lots of cogs (PaperArtsy) and another PaperArtsy border stamp along the bottom to give me some texture at this stage. Left to dry naturally.


On some acetate (this was not heat proof but strong construction acetate) I stamped this image from Ken Oliver Crafts on to it using Staz On ink.  (I couldn't make my mind up if this was an image of a doll or of a baby??!).  I then painted a two step crackle on to the front of the acetate. The first step is to put on the step 1 medium, wait for it to dry clear and then apply the step 2 over the top (both Decoart) and wait for this to dry naturally and the cracks to appear.


I then painted Decoart paint on to the acetate and wiped back quite quickly so that the ink remained in the cracks that had formed.  By now, you will realise that I was trying to achieve a crazed look on a dolls face.  I then painted Pebeo paint on the back (reverse painting) and this of course, made the whole thing pop. Cut out the image.


Those cogs have now been painted with DecoArt paints and some Powertex pigment mixed with a little Powertex varnish to make them shine.  The upper part of the tag has been overlaid with some acetate which has had some hearts stencilled on to it and some Andy Skinner industrial elements nuts and bolts (hard board) that have again been painted with Decoart paints to give a rusted effect, mounted on top of each other to look more realistic and attached to the tag.  The doll (in this case!) image has been attached on to all of those antiqued cogs and the sentiment of "Frozen in Time" (again, Ken Oliver Crafts) has been embossed with cream embossing powder to help it pop off of the grunge of the tag. Fabric ribbons tied to the top of the tag.


Well, can you guess the colour of my fingers after making this one!!!!! - well, I made this four days ago and my fingers still look like they are bleeding (they ended up the perfect blood colour all over them!!!!!) - my mother even asked what I had done to myself!!!!!!!

Messy? - OH YES!!!!!!!!

I would like to enter this into the following challenges:-

Try It On Tuesday - "Lets Get Messy!":-

Stamps and Stencils - "Texture, Crackle and Paint":-

Hope you've like the journey today in to my world of inky fingers!!!!

Thanks for stopping by,
Leanne x


Monday, 30 January 2017

Birthday Wishes (with a 60's twist!)....


Good morning!

Well how is this to make you smile first thing in the morning!

Loved making this card for a friend of my daughter Katie. I appreciate it was made for a 16 year old and I have used some of Sheena Douglass' Groovin 60's stamps but hey, it's a "boppy" card so boogie on down!!!!

I must admit to being rather bad at remembering to take photo's as I go along recently but I'll talk you through it as always. I get so engrossed in what I am doing, taking photo's doesn't enter my head - well, not until I've finished that is!!!!

OK, this card started with me sponging some pumice stone distress ink through lace (I love using lace!).  Then I used a Sheena Douglass stencil from her Groovin 60's range and sponged some picked raspberry through it.  

Flowers were stamped in the grey and pink again from Sheena's Groovin 60's range. I decided to use some wow embossing glitter with some of the flowers to give it a sparkle.

Then came the girls dancing stamp - a great stamp and I've used versafine grey ink here to stamp it.  I wanted it to be a bit of a disco atmosphere so was happy for the colours of the flowers and stencils and lace to show through them a bit as they were silhouetted on there.

Used matching stamps to decorate the actual card base and stamped the sentiment twice on the card and once on the actual image.

I love these new stamps by Sheena Douglass and I do stress that I am too young to remember the 60's!!!!! (I'm a 70's baby!!!!!) but I just love the era and all that it brings.


A nice bit of fun today!

Hope you like what you've seen today and thanks for stopping by,

I would like to enter this card in to the Cards In Envy challenge of "Pink and Gray":-

Leanne xx


Monday, 16 January 2017

Memories are our own Time Machine............


Good morning!

I have made this card for a friends birthday next month - had a good play with another of Sheena Douglass' Time Traveller stamp collection.  Forgot to take photo's for this one so I'll explain how I got there.

Started off with a piece of watercolour paper and used Aqua Tints to lay down the background colour.  Stamped the Time Machine but wasn't happy with how much ink I got down on to the paper (it's harder to lay down the ink from the stamp on to watercolour paper, often because of texture and fibres in the paper).  So I knew I had to enhance the stamped image myself (which is great fun).  I have used a combination of Inktense watercolour pencils and Spectrum illustrator markers on the Time Machine.  I couldn't make my mind up if I wanted it travelling over water or clouds so I went for a water look but to me it could still be clouds!!!!?

Finished with a nice big stencil - a big whirl as it travels in time!

Mat and layered.

I think he'll like that!

Thanks for stopping by,

Leanne xx

Friday, 4 November 2016

Quintessentially English....................


Good morning!

The lovely ladies at Indigoblu have asked me to produce a piece of artwork for their challenge  reminder today.  The theme this month is "monochrome" so come on.....have a go, it's a lovely theme - to play with a single colour and see what you can do with it!  Remember to use your Indigoblu stamps and have lots and lots of fun!

Ok, I took lots of photo's of how I made this card so lets take our journey and see how I got there:-


I had decided straight away what stamp I would use for this lovely theme ("Valerie") and that I wanted to show her in a mirror - she looks to me to be gazing in to a mirror don't you think?!

I stamped her out and covered her in masking fluid.  Then I worked on her image in the mirror - I took a piece of mirri card (good quality), inked the stamp well and picked the image up on my brayer then rolled the image out on to the mirri card, releasing the image reversed and sealed it with clear embossing powder.  I then die cut a frame out and blended distress ink around it.  At this stage I also worked out my card layout and how I could have Valerie at right angles to the mirror.

So, while Valerie was masked over, I played around with the background having used a wet baby wipe to blend the distress ink over the card and then I wet my fingers and dripped water on to the card, let it soak in for a while and then lifted off with some paper towel.


I then worked on my mat that would go behind the main artwork - I often do this when I'm waiting for my work to dry more thoroughly!  I sponged the distress ink on to the card and then to add to the effect dragged the card through some distress ink that had been stamped on to my non stick mat and sprayed with water - nice and smokey. I then allowed this to dry naturally.


So, coming back to my main artwork, I used an Indigoblu stencil and spread some clear embossing paste through it, let that dry and once dry I came back in heavier with my distress ink this time and "brought out" the pasted areas.  I also sponged through the stencil on the other side with distress ink and through another stencil with some gesso. Then rubbed away masking fluid from Valerie.


These are the only inks that have been used on this card, the versafine was particularly for fine details when using my stamps.

I blended some distress ink with water and shaded in the image.

Then I assembled everything together making sure that the mirror image was completely level with the original stamped image. The sentiment of "Quintessetially English" was stamped also.


Here you can see how I creased the card so that it was more like Valerie was looking in the mirror.


I was very happy with this card, blue monochrome and very classy don't you think?

Don't forget, get out your Indigoblu stamps and join in their challenge this month - we are all looking forward to seeing all your wonderful ideas!


Thanks for stopping by and good luck in the challenge!

Leanne xx

Friday, 7 October 2016

Wicked......


Good morning!

Well, we are on the "dark side" again! Well, it is October after all - we're allowed to be!!!!

There are lots of creepy challenges out there this month and I personally love something a little "different" and having a choice to get away from cute and cuddly for a while!

I took photo's along the way so lets take a journey this morning shall we?

This card started with a piece of good quality watercolour card stock.


Now, one of my favourite mediums at the moment is drawing ink, I know lots of people shy away from it as with watercolour painting but believe me, it's really quite forgiving, just have the confidence to give it a go and the next time and the next will be better and better!  I soaked my watercolour card and dripped some yellow drawing ink on to it to make it bleed and followed that with some black india drawing ink.  When I was happy that it had spread enough I dabbed with a paper towel and lifted off the excess which lightened it to where I wanted it to be - nice and dirty looking.


Next came my stencil, this one is from Stencilgirl - isn't it fabulous! I thought she looked rather mean and ideal for a bit of a creepy card.  I went through it with black soot distress ink and then diluted some of the distress ink and painted in the right hand side of her face to give it shadow. I then stamped the drips (Designs by Ryn) on her face, neck and from the top of the image and coloured in with distress markers and topped with Glossy Accents (you can just see the tinge of blue at the top here as it wasn't dry when I took the photo).  I then stamped around the edge with some funky foam that had been embossed from a folder (another technique I've mastered recently) and stamped in spiderweb designs around her.


Here is the Sheena Douglass embossing folder that I turned in to a stamp!


I stamped the suitable sentiment "Wicked" - Chocolate Baroque.

To finish I mounted on to black card stock, framed with a gold die cut frame (Sue Wilson Pierced Squares) and mounted that on to a white 8 x 8 card which I blended the black soot distress ink all around.

I didn't want to add anything more as I felt it was complete just the way that it was.

Happy with that and if my 16 year old daughter says it's cool - then I'm happy!!

I would like to enter this in to the following creepy challenges running this month:-

Dream in Darkness - 31 days of Halloween:-

Country View Challenges - All Things Spooky:-

Dark 'n' Daring Challenges - Anything goes :-

Cards in Envy - Frame it:-

Once again, I hope I haven't frightened you off! We have to get in to the spirit don't we!!!!

Thanks for stopping by,
Leanne x


Friday, 9 September 2016

Happy Anniversary Husband......


Good morning!

Todays blog is a card made for my husband James for tomorrow 10th September (no, he's not allowed to look at this blog until tomorrow!!!!) - our 22nd Wedding Anniversary.

James loves his cars so I thought this design was rather sweet, so, started with my usual white piece of card stock.   I've stamped the lovely little old car first (Joy Crafts) then I masked it with masking fluid.

The next stage was to use a heart inkable stencil (Inkylicious) and drag in some distress ink around the edges so that I could see the heart and knew where I was going.  

I filled in the top section of the heart with some blue distress ink to sort of give me a sky and then I stamped some trees and grounded those with the same colour distress ink as I had inked the heart with.

Went straight over the top of my masked off car with the lovely green bushy trees (so that they appeared behind the car when I rubbed off the masking fluid.

Added a couple more trees coming up from behind the green trees.

Painted Glossy Accents on the windows of the car for shiny glass, framed the whole design with a lovely brown leather effect card stock frame cut from Sue Wilsons dies and I was done!

Very happy with this one and I hope that James will be too tomorrow!

"Happy Anniversary James" xxx

I would like to enter this card in to:-

Sweet Stampin Challenge - Weddings/Anniversary/Love.

Country View Challenges - September challenge - Travel.

Thanks for stopping by,
Leanne xx


Monday, 1 August 2016

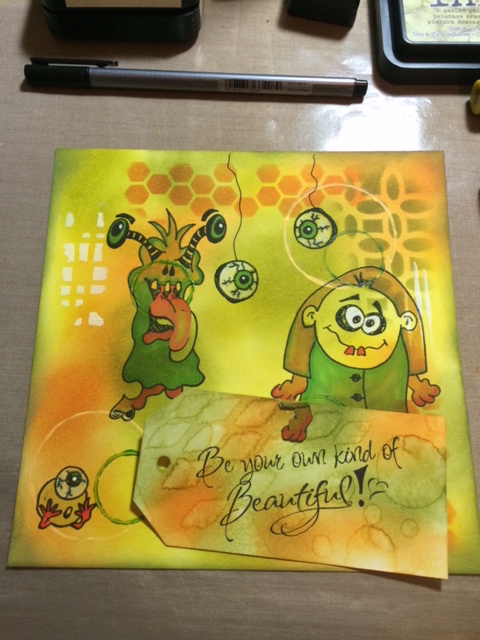
Be your own kind of Beautiful!


Morning! Well I don't mind telling you a little secret.......(this was a bit of a challenge for me!!!! - out of comfort zone here!!!).

As you'll have noticed from my blog, I'm quite a serious crafter, serious subjects and serious colours but monster and or aliens set me a challenge from Moving Along With The Times - I quite enjoyed it actually once I got it straight in my head where I was going with it!


Started with my usual blank white piece of card stock and laid down some distress inks.  Knew that I wanted my aliens to hold the sentiment so inked up a tag in the same colours and stamped the sentiment "Be your own kind of Beautiful!"


Then got out some stencils and using the same colours that I used for the base I inked through those. Used some white acrylic paint to go through a further stencil and an old lid to make some circles. Stamped my alien and monster and the eyes (Dylusions stamps) and gave the eyes a cord to dangle on with a fine liner.  Coloured in with alcohol pens. Note the hand of the monster and tongue of the alien are on here but not stuck down yet (I needed to stamp the hand and tongue twice and colour in twice as I wanted the hand and tongue to be glued on top of the tag).


There, matted the tag on black card to make it pop from the page and stuck the monsters hand and aliens tongue over the top of the tag.

The idea behind this card was to do a card and keep the colours so that it would be suitable for both a child or an adult alike.

Out of my comfort zone here but thoroughly enjoyed the challenge!

I would like to enter this card in to the Moving Along With The Times "Monsters and/or Aliens" challenge.

Thanks for stopping by,

Leanne xx


Monday, 25 July 2016

Christmas in July................


Morning!

Well dare I mention the "C" word in July???? - Of course I do!!!!! I've been inspired to create this card for the My Time to Craft challenge of "Christmas in July".

A lot of stamping involved in this one and all starting with a white piece of card.

Firstly I used the Inkylicious large bauble stencil (which comes with an inney and an outey stencil).  I used the inney stencil and blended some distress ink around it so that I knew where I was going and dropped the stencil down a bit to make the bauble a bit larger than it actually is.  Then I stamped the wood cabin stamp (again from Inkylicious) within the bauble and blended the ink with an almost dry paint brush.  Next came an Inkylicious hills and valleys stencil and I brushed some distress ink from the stencil and gave the cabin some hills behind it and in front of it so starting to make a scene.

A small moon mask was added and ink blended around it to get the nice white moon.

Some small trees were then stamped both inside the bauble and out so that the scene spread wider than the bauble.

The sentiment "Merry Christmas" was stamped in versa fine ink for a nice crisp finish.  I die cut some white snowflakes and used the aperture from the die cuts to sponge some snowflakes directly on to the edge of the background with white color box ink.

Added a small stamped family and a couple of small birds from Card-io and then with a fine liner pen just outlined the bottom half of the bauble so you didn't lose sight of it and sprayed the whole image with Goosebumps texture shimmer spray to give the whole card a shiny, bumpy snowy effect.


Darkened the edges to draw you in better and of course, the texture spray acted as a resist and gave further texture and effects at the edge. Added some iced snow to the top of the bauble and on some of the trees and hills and finished with the die cut snowflakes which have had some spray glue and diamond sprinkles added to them.

Quite different I thought? Happy with that, a beautiful wintry scene card.

I would like to enter this card in to the My Time To Craft challenge "Christmas in July"
Sparkles Christmas Challenges "snowflakes".

Thanks for stopping by,

Leanne xx

Monday, 18 July 2016

A Mustang Happy Birthday..........


Morning!!

Here is what I call a "powerful" card!  Made for my daughters boyfriend - a mechanic and car nut - you wouldn't have guessed it would you!

Lots going on here, started with my usual blank white sheet of card. Stamped out the Mustang cars in black archival ink and covered with masking fluid (I needed the cars to "pop" from the page). Then laid down some brushos in blues and red and spritzed straight over the top.  Where the Brushos hadn't  quite covered all the background area I blended in some blue distress inks and gave it a quick spray with some blue spray ink.

Some white gesso was wiped through a stencil and some black embossing powder applied to the edges to draw you in to the whole thing.

I stamped the number 18 and glittered that up with some chunky dark blue glitters and "Happy Birthday" was stamped as the sentiment and highlighted with a white pen.

Some tyre tracks were stamped across the card - have to have tyre tracks with cars!!!!.

Once all the "messy stuff" was done, I rubbed off the masking fluid from the cars and where I thought they were a bit too stark, I blended over some distress inks to match (to tone the whiteness down a bit!).

My final touch was to cover the cars in Glossy Accents to make them shine through and I was done!

Very happy with that - it's nice when you have an idea in your head and you get it right with the final result!!!

Thanks for stopping by and seeing what I've been up to,

I would like to enter this card in to the following challenges:-

Moving Along With The Times - No Designer Papers
The Craft Stamper - Anything Goes
Sweet Stampin' - wheels

Leanne xx


Saturday, 25 June 2016

Be Your Own Kind Of Beautiful...

Good Morning!  It's the WEEKEND!!!!!!

Here is a card that I have made for the Fashionable Stamping Challenge for June "Beautiful Blooms".

This is a stunning stamp by Sheena Douglass.  I firstly stamped the rose with Distress Inks and then masked the image over with drawing gum.  I then used Aquatints to paint the background straight over the image and the masking fluid.  When dry I placed a stencil over the card and spritzed with water and lifted the stencil immediately.  When it dries you see the lovely image of your stencil come through in a lovely diluted form.  I then rubbed off the masking fluid and with an almost dry paint brush (just damp) I moved the distress ink around on the flower and the leaves and painted in the stem.

Some matching Distress Ink around the edge to give some depth and a stamped sentiment.

A stunning flower and I think the colours here really make the rose "pop" off of the page.

I would like to enter this in to the Fashionable Stamping Challenge for June "Beautiful Blooms".

Happy with that! Hope you like it too.

Leanne xx

Wednesday, 22 June 2016

My first blog entry "Happy Birthday Boys"

Well, this is my first entry for my new blog.  A birthday card made for my two Golden Retrievers - it was their second birthday on 14th June!  Did they open their own card, sure they did!  I opened the envelope and they pulled it out!!!!!

I had fun with this one because I already had the perfect stencil - one of Sheena Douglass's stencils.  I have used Distress Inks for the background rubbed with a smoothie and stamped some foliage around the front for balance.  A simple hill from a piece of ripped paper and a moon added with white colour box ink and given depth with a charcoal pencil when dry.

I love my beautiful boys (sometimes more than my children!!!!!!!) Hope you like this one. Nice to play when it's not intended for a human at all so there was no judgement when it was given!

"Happy Birthday Boys!" Lots of love Mumma xx