Published Permissions

Showing posts with label Aqua Tints. Show all posts

Sunday, 12 March 2017

Modes of Transport...........for Fashionable Stamping Challenges.


Good morning!

Well, here I am with my inspiration DT piece for Fashionable Stamping Challenges and our new theme for this month "Modes of Transport".

I've gone along with the theme by using an Explorer and his hot air balloon!

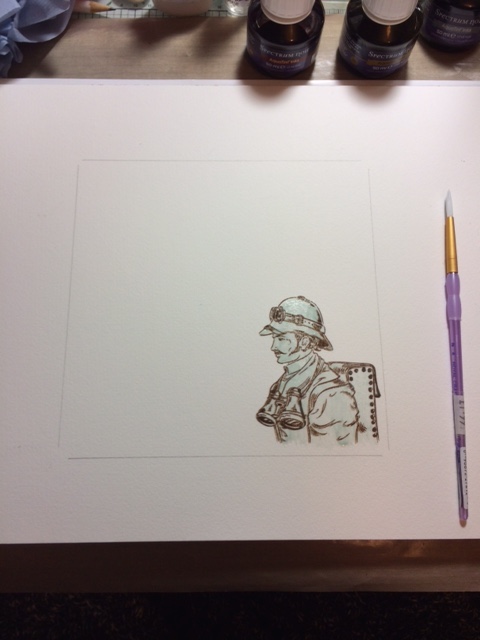
I have started here with watercolour card stock and firstly stamped my explorer ((Kanban Crafts).


I then covered him with drawing gum to mask him off.


Then out with my Aqua Tints!  I swept over the page with the colours and then went for some lovely drips from the top and stamped my hot air balloon.


Here I have added some script on there, a compass and the word explore (Clarity Stamp).


Made those drips a bit deeper in colour and added the words North, East, South and West (Kanban).  Also added the trees in the distance (I think these are Inkylicious) and made some Aqua Tints run a bit so that it looked like those trees were grounded on a hill.

Painted in the explorer at this stage too.


There!  Matted and layered on some newspaper print card stock and I was done.

Please join us over at Fashionable Stamping Challenges.

REMEMBER - the focal point of your artwork must be rubber stamping - no digi stamps.

Thanks for stopping by.
Leanne x


Friday, 24 February 2017

All good things are wild and free...........


Good morning!!!

It's been a long time since I did a farm scene on a card so here is my attempt for the Stamping Sensations challenge of "Animal Magic".

Lets take our journey and see how I built this one up and got to my final design:-


Gosh, it even shocks me sometimes how little there is on the page when you first get going!!!
So, I started by stamping my cow and the lamb and then masking them off with drawing gum. All of the animal and farmyard stamps that you will see today are by Joy! Crafts.


There, that's looking a bit more like it!  OK, the barn has been stamped right on top of the masked off cow.  The sheep has been stamped right on top of the masked off lamb.  This will enable it to look like the cow is standing in front of the barn and the lamb in front of the sheep, the lamb has very nearly disappeared altogether at the moment!  I have added a couple of milk churns, the chickens and have masked off the barn and stamped the trees behind (Inkylicious) and have built up the field scene with the use of the Joy! Crafts hay bales and a separate fence stamp.  A couple more trees have been added on that horizon line too. It's all coming together!


Doesn't it make a difference once you start adding colour?  OK, the masking fluid is still in place at this stage so that I could "swipe" Aquatints across to make the farmyard brown.  I wanted more than just a flat colour here so I also used some distress ink on an ink duster, sprayed the ink duster with water and took the brush across the page to leave me some darker patches.  The sky has been coloured using just some old blue ink that was already on my smoothie and a sky stencil that you keep moving to form the clouds and I've used momento ink and a smoothie to colour in the field.


All masking fluid has now been rubbed off and there is the little lamb!!! Everyone is looking very white so out came my polychromo pencils.


That's better!  I added some patches to make my cow more realistic (I'm not good on my cow breeds I'm afraid), gave the sheep some colour and the chickens and added some depth to the milk churns.  Completed the barn and added some birds (Inkylicious).  

There, animal magic! and as the sentiment says "all good things are wild and free"

Hope you've enjoyed our journey today and how I built up this scene from a blank page.
Here you can see the stamps that I've used.


I would like to enter this in to the Stamping Sensations challenge - "Animal Magic":-

Thanks for stopping by today,
Leanne x


Friday, 3 February 2017

Fuchsias and Friendship......


Good morning!

Bright and cheerful card for the end of the week!

This card has been created using the Clarity Stamp Fuchsia stamp set.  I took photo's along the way so lets take our usual journey to see how I got there shall we?

The background has been created with one of my favourite techniques and products - Aquatints.


I started on a lovely watercolour block pad, marked the size that I wanted it to be with pencil and then washed the Aquatints across the page.  Then I began to stamp the fuchsias.


Here they come! Stamping and covering with masking fluid as I went.


I decided to fade the fuchsias on the right by using a pale embossing powder and then bring the one on the left completely forward by embossing that one in black embossing powder.  I then dribbled some bleach on there to. I have coloured the flowers in using the same Aquatints and some chalk paint.


I added the sentiment of "Friendship" from Clarity Stamp and some of the fuchsia buds from the same set at the top.

Mat and layered on to some Angelina Fibres in the same colour scheme.

I was pleased with this one. Hope you like it too.

Thanks for stopping by,
Leanne x


Monday, 16 January 2017

Memories are our own Time Machine............


Good morning!

I have made this card for a friends birthday next month - had a good play with another of Sheena Douglass' Time Traveller stamp collection.  Forgot to take photo's for this one so I'll explain how I got there.

Started off with a piece of watercolour paper and used Aqua Tints to lay down the background colour.  Stamped the Time Machine but wasn't happy with how much ink I got down on to the paper (it's harder to lay down the ink from the stamp on to watercolour paper, often because of texture and fibres in the paper).  So I knew I had to enhance the stamped image myself (which is great fun).  I have used a combination of Inktense watercolour pencils and Spectrum illustrator markers on the Time Machine.  I couldn't make my mind up if I wanted it travelling over water or clouds so I went for a water look but to me it could still be clouds!!!!?

Finished with a nice big stencil - a big whirl as it travels in time!

Mat and layered.

I think he'll like that!

Thanks for stopping by,

Leanne xx

Friday, 13 January 2017

Take time for all things.........


Good morning!

Thanks for popping in.  I have been having a play with a new Sheena Douglass stamp from her Time Traveller collection.  A whopper of a stamp but stamps beautifully.  I've done a step by step on this one so shall we take a crafty journey today? - Come with me.....


I started with a watercolour block pad (love a professional pad where the edges of the paper are sealed - the paper can't move no matter how much water to throw at it!).  I pencilled in a 7 x 7 square - this just gives me a loose idea of where I am with my design.

OK, I got out my Aqua Tints this time, three colours and using plenty of water, blended them as I went down the page and allowed this to dry naturally so that I didn't lose any of the colour tones.

I then stamped my man using a rocker block (it's such a big stamp, I find a rocker block helps).  I then lifted some colour back off of his face with water.


So, using the same Aqua Tint colours as the background, I enhanced his features slightly, and his hair and brought in a little chalk paint to highlight his face.


I have now added some background detail with an Andy Skinner stencil and used the chalk paints to enhance a  leaf Clarity Stamp stencil. (If you are wondering what on earth is going on in the bottom right hand corner - this is simply where I've used the wet chalk paints on the watercolour paper as a palette but to avoid putting my arm in the wet paint, I simply cut it away! What you can see is a scrap piece of paper to stop me marking the rest of the watercolour pad beneath this one!).


There we go - finished with a Sheena Douglass die cut of a pocket watch and chain.

Mat and layered.

I wanted to bring his face right out of the page and I think I achieved this - pleased with this one!

I would like to enter this in to the Stamping Sensations challenge "Coffee and cream":-

Thanks for stopping by.

Leanne xx


Friday, 16 December 2016

Sweets For My Sweet......


Good morning!

Right, well, I've been having a play with some Darkroom Door stamps for a challenge over at Cards in Envy that I wanted to join in with "Wouldn't that be sweet" - well is this bright enough for you!!!!?

Personally I can't stand Liquorice Allsorts but boy, does this look jolly!

I have done a step by step so you'll be able to see how I got there so lets take our usual journey :-


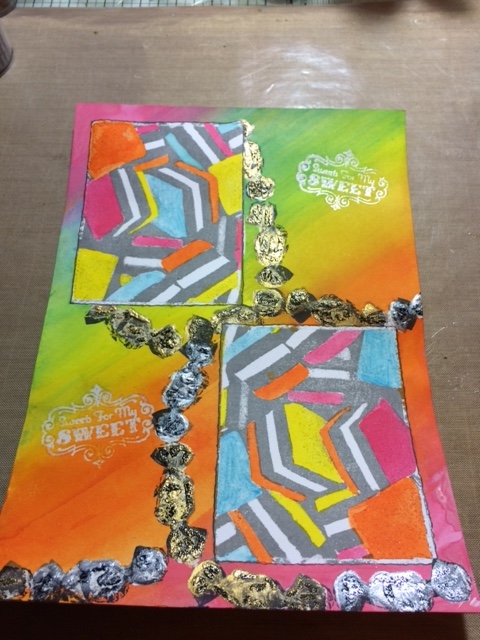
OK, I started with my blank piece of card and stamped the Allsorts image twice in two different directions. I also stamps some sweeties (also from the same Darkroom Door stamp set).  I also clear embossed the sentiment "Sweets For My Sweet" twice (but you'll notice that I wasn't happy with it twice so I changed that towards the end!). You can see that I have also covered all the images with masking fluid at this stage.


Lots of colour going on now! - and it went all over me and no, I wasn't wearing an apron!
So, I used Aquatints for the background and went straight over the masked off images.  Once happy, I rubbed away all the masking fluid and using the same aquatints, I coloured in the Allsorts and used some Decoart metallic paints to colour in the sweeties. The sweeties were then embossed using either gold or silver embossing powder to give them some depth.  The clear embossed sentiments resisted the Aquatints and popped through.  


I have restamped Staz On ink and the sweetie stamp straight over the top of the sweets - this was experimental to see if I could make them look like they were in cello wrappers and it worked a treat!


Now it was coming together -  I then had to make the Liquorice Allsorts pop off the page so they were coloured in with a black alcohol pen.  I stamped the word "yum" on there too! The sweeties had some glossy accents added to make them shine like a true sweetie wrapper!


I edged around the two Liquorice Allsorts panels with a black pen and I wasn't happy with the two embossed sentiments so I restamped it in black embossing powder on to a piece of card that had been painted with two of the Aquatint colours and die cut it and attached.

Mat and layered and I was done! 

It's a very flat image from the work that I usually produce but that's the name of the game with this stamp - the challenge asked for something sweet so we got sweets!!!!

Hope you've enjoyed this bright and colourful journey - I didn't find this the easiest set of stamps to work with but the final result couldn't be more jolly!!!! (even if I don't like liquorice!!!!).....

I would like to enter this in to Cards in Envy "Wouldn't that be "sweet" card challenge":-

Thanks for stopping by,
Leanne xx


Friday, 2 December 2016

With Love & Thanks.......


Good morning!

Here's something a bit sweet don't you think? Zinouk du jardin by Carabelle-Studio.

I took a couple of photo's so I'll talk you through it, lets take our journey....


Right, I started with a piece of Sheena stamping card and painted a couple of colours of aquatints on to an acrylic block, mixed the colours up a bit and then laid the stamping card on to the block - aquatints cover so well.  I had a couple of runs but that's fine, I like those! and left it to dry (doesn't take long at all).

I then sprinkled some water from my finger tips, let it soak for a moment and mopped up some of the paint.

Then I stamped all the images from this stamp set and coloured them with alcohol pens and the flowers with sparkle pens too.

I then stamped some bubbles (from old pot lids) and highlighted with a white pen and a charcoal pencil then finished with glossy accents so that they looked like real bubbles.

Added Zinouk and a couple of sentiments "Dream" and "With Love & Thanks" - both Inkylicious - the "& Thanks" are Sentimentally Yours by Phil Martin.


Matted and layered in lovely bright yellow and orange - very happy with that! Nice and sweet and jolly!

Also check out some really lovely new stamps that Crafty Individuals have launched here - well worth a look:-

I would like to enter this in to the Cards in Envy challenge "Thank you":-

Thanks for stopping by,
Leanne x

Monday, 28 November 2016

Art Depends Not On Who Creates It......


Good morning!

Well, I think I've gone a bit mixed media for me but I've had a fantastic time!!!!

I've taken photo's along the way so let's take our usual journey shall we?

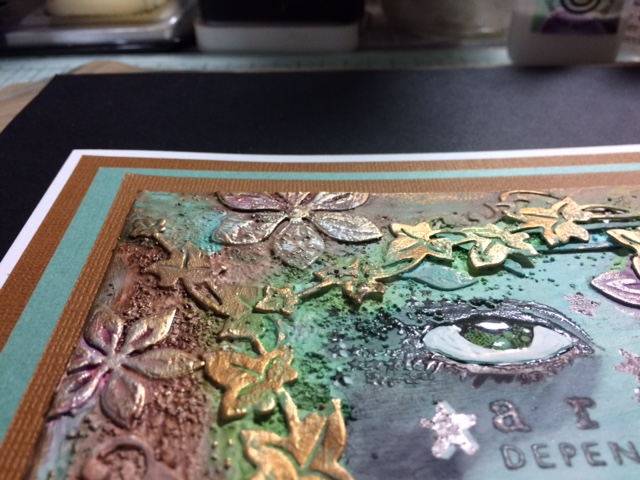
This card started life as a piece of greyboard and I applied 2 coats of gesso to it.

I cut some die cuts (Sue Wilson trailing ivy, JustRite floral dies, Couture Creations scrolled tomentosa) and stuck those down always remembering to leave some nice blank space in the middle for stamping on to.  I applied some Pebeo sand texture paste and some pebeo normal texture paste, left it all to dry and painted a further layer of gesso over the top so that my paints had a good surface to sit on.


All looks a bit "white" but that will change!! (Infact, I quite like the white look - ummmm, food for thought, watch this space!!!!!).

Aquatints were used to colour. - I just looooove aquatints!!!!


Pebeo gilding wax was then rubbed on to highlight - perfect!


Now we're getting there!!!!


My sentiment was stamped and the eye (both Carabelle Studio).  I worked further on the eye to enhance it with white pen and glossy accents.  Although stars appear on the eye stamp, I added more!


Mat and layered up in matching card stock - voila! 

Quite a modern and up to date card, this would even keep the younger girls interested- my daughter liked it!

Hope you like what you've seen,

I would like to enter this in to the current Country View Challenge of "Stars":-

Thanks for stopping by,
Leanne xx


Sunday, 13 November 2016

"Tis The Season".....


Good morning!

It's a new challenge over at Fashionable Stamping Challenges and this time it's "Tis The Season" - could be Autumn or Winter.

As you can see, I've gone for winter and a rather Christmassy scene!

I've done a step by step for you so lets take our usual journey....


I started with my usual piece of Sheena stamping card and stamped my lovely little car (Joy! Crafts). I masked the car off with masking fluid.


I had great fun with aquatints for the sky.  I knew I wanted to have snow so I needed a wintry, moody sky.  I then used an Inkylicious stencil to sponge in my hills.


I then stamped all of the trees- in the distance first (Clarity Stamp) and then the closer trees (Inkylicious).  I highlighted the hill tops with some diluted gesso and some tree branches.  The masking fluid was then rubbed off of the car. Now the fun started!  I used fine modelling paste to put my snow on the ground.  I made the tyre tracks with a lolly stick and painting some of it on to the trees and car.


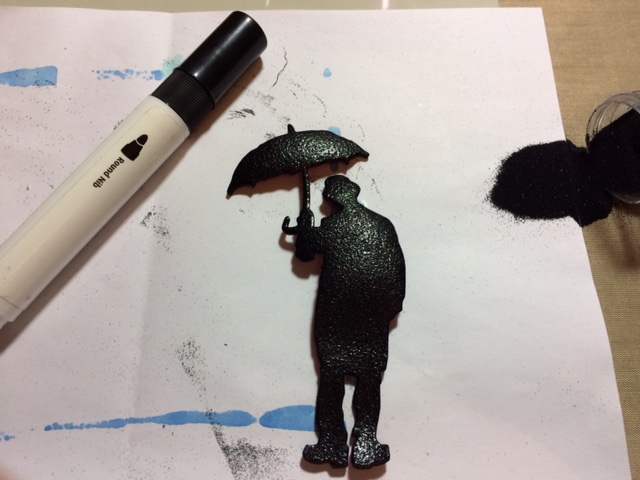
I die cut my little man but didn't have black funky foam, so in true Leanne style I embossed him with black embossing powder!!!


Ta dah!!! Didn't come out too badly did he!!!!


When the modelling paste had dried, I ran some paint in the tyre tracks (diluted black soot distress ink) and toned down the snow on the ground a bit.

My snow flakes are simply the wrong end (non brush end) of my paintbrush dipped in gesso!

I added some modelling paste to the shoulders and umbrella of my man and sprinkled on some Pinflair snow dust to him and on to the car.

Mat and layered and added some snow to the mans feet too.

Lastly added the sentiment "Tis The Season" and that was another Christmas card done!! Hooray!!!

Do pop over to the Fashionable Stamping Challenge and join in with this months challenge
(Tis The Season - Autumn or Winter) - we look forward to seeing all your lovely creativity!

I would like to enter this in to the Stamping Sensations challenge "Christmas Greetings":-

Thanks for stopping by,
Leanne xx


Monday, 7 November 2016

Those Who Don't Believe In Magic................


Good morning!

Well, I'm getting in to that Christmas spirit early!!!!

This is a card that I have prepared for the current Lavinia Stamp challenge of "Let it snow".

Now, I have to admit, I got so engrossed when I was making this that I actually forgot to take photo's along the way!! - I did remember but when I did, it was a bit too late!!!! So, although we can't take our usual journey, I can talk you through how I got there.

I started with my usual piece of Sheena stamping card and gave it a coat of gesso.

I then die cut the snowflakes and different flourishes (these are all Sue Wilson and Courture Creations  dies).  They were then stuck on to the gesso'd card and another coat of gesso was applied over the top.

A small moon mask was stuck down.

Out came my aquatints and I have used a shade of light pink and light blue on this one and when dry I've applied a light covering of silver gilding wax to bring those images right out. The moon mask was then removed.

All the stamps (trees and stag) are Lavinia Stamps.  I stamped the stag in black versa fine ink and clear embossed him to set.  I then stamped all the other trees.  The sentiment was stamped on (also Lavinia Stamps) and I applied Cosmic Shimmer glacier ice and diamond sprinkles on the trees and around the ground and some for falling snow too.

How pretty is that?!!! Rather mixed media this one - quite different with Lavinia stamps I thought with quite a lot of depth to it -


I would like to enter this card in to the current Lavinia Stamps challenge "Let it snow":-

Fussy and Fancy challenge "Ice/Snow"


Hope you like it!

Thanks for stopping by,
Leanne xx