Published Permissions

Showing posts with label die cutting. Show all posts

Monday, 23 January 2017

Five Christmas Cards for January!!!!!!!


Good morning!

Look at me!!! I'm off to a wonderful start with my new years resolution of 5 Christmas cards a month for 2017!!!!

As promised, I will share on one blog each month my 5 Christmas cards for each month and here we are with January's makes.

I haven't got a step by step on these but I have taken individual photo's of each one for you so that you get a closer look at each of them.

Each card being slightly different I shall try to explain the basics to these.  

I have really enjoyed playing with lace through 2016 so I thought it would be super to start my Christmas card adventure using some lace - not very Christmassy? - that depends on how you use it! I believe that most things can become Christmassy if you put your mind to it!

These cards started with a piece of lace being placed over my Sheena Stamping card and sponging through some distress ink.  I didn't stick the lace down, if you are careful you can just hold it and dab gently for a lovely loose effect.  I then used a Woodware poinsettia stamp, some of these are stamped with Archival watering can and others have been embossed with clear embossing powder over it (where I was going to use water colour within the image). I have added some foliage from Clarity Stamp too.

The sentiment is from Clarity Stamp.

OK, let me see if I can tell you one by one how I've coloured the Poinsettias:-


Water coloured with Inktense pencils and die cut into and layered on a fibre mat. Finished with sparkle pens.


Intense pencils here but using them as colouring pencils without water this time and matted on to plain card stock, finished with sparkle pens.


Inktense water colour pencils here and die cut into with bright red mat.  Finished with sparkle pens.


Inktense water colour pencils, bright red mat, no die cutting this time and finished with sparkle pens.


Oh yes, my favourite! Good old Polychromo pencils, look at the intensity of colour that builds up here.  Matted on to a fibre mat and finished with sparkle pens.


I know that the sparkle pens can't be seen on the photo's but look - a super close up shot - it's there..... honest!!!!!


So, there you go, month 1 - mission complete!

Thanks for stopping by,
Leanne xx


Friday, 14 October 2016

Happy Birthday Daughter.........


Good morning!

This card is what it says - Happy Birthday Daughter.  I made this card for my daughter Hayley, she was 18 on 28th September, the week she left for Durham University! I hadn't had a "slot" yet for it on the blog and saw the current Chocolate Baroque challenge and colour swatch and it matched perfectly!

I took some photo's along the way so come with me, we'll take a journey......


I started with my usual blank piece of white card stock, stamped my image (Chocolate Baroque) and then covered that with masking fluid. I went for the shaving foam technique for the background which again, tied in beautifully with the current Chocolate baroque challenge inspirational photo (the ocean) and goes so well with the colour swatch.  When the background was dry I rubbed away the masking fluid.


My next task was to colour in the image and then work on my background papers.


As you can see, I inked my own background card with Adirondack stream colour, two layers of stream and a white in between.


I added glitter to the tail and wings, die cut some number 18's and covered those in glitter too (Hayley likes "shiny"!), inked through a couple of stencils (I particularly liked the idea of enhancing that beautiful tail with the extra stencilling around it).  I stamped "Congratulations" and "Happy Birthday Daughter" and finished with a bow of two tones of ribbon and assembled on the mats and layers.

I'll let you into a secret, Hayley actually set me the challenge of this, her birthday card.  She actually asked for these colours, glitter and a ribbon! She did seem pleased when she received it!

This card fits in perfectly with the current Chocolate Baroque challenge 27, the inspirational photo and colour swatch so I would like to enter this card in to it.

and into Cards 4 Galz - use at least one die cut.

Hope you like what you see, I was pleased with it, nice and fresh colours,

Thanks for stopping by,
Leanne xx


Wednesday, 31 August 2016

With Love.............


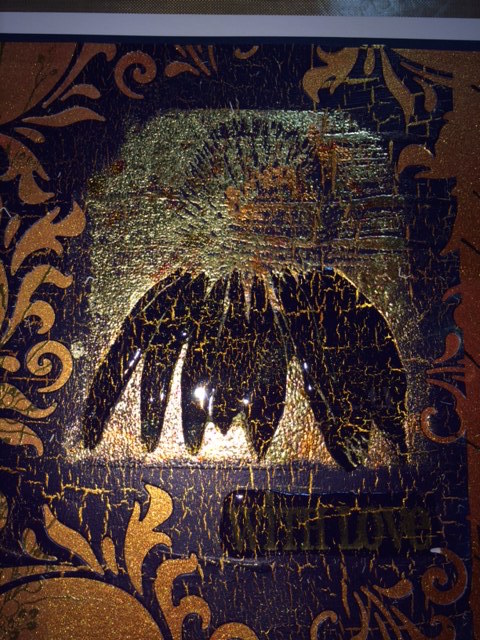
Good Morning!!! I had lots of fun making this card inspired by the That's Crafty Challenge "Get Cracking!".

I took some photo's along the way for you with this one so lets make a start!:-


I painted a piece of white card stock with two colours of Imagination Crafts starlights (really bright and shiny!) Then, when that was dry I painted one coat of Creative Expressions crackle glaze and left that to completely dry.  Over the top of those two coats came a layer of navy blue acrylic paint and I waited for the magic to happen.......BEAUTIFUL cracking revealing the golden starlights beneath.


I stamped my flower image (Imagination Crafts) with sticky embossing powder and covered in gilding flakes.


Then covered the flower petals in Glossy Accents and left to dry.


This shows you the stamp that I was working with.  I used a Sizzix die to put pattern to the edge of the cracked card and layered this on to a further sheet of card that I had painted the starlights on to using my brayer.  I also added some floral stamping (Chocolate Baroque) to both sides, one side in bright gold embossing, the other in blue Versafine ink and clear embossed over the top.


Here you can see the beautiful Glossy Accents over the flower petals and sentiment.


A good look at the amazing crackle that has come through.


Nice and super shiny - very happy with that one!

I would like to enter this card in to the Thats Crafty "Get Cracking" challenge.


 Thanks for stopping by,
Leanne xx