Published Permissions

Showing posts with label artistry ink. Show all posts

Monday, 19 December 2016

Follow your heart and believe in your dreams..............


Good morning!

Another of my efforts when just "having a play"! I have taken photo's so let's take our journey to see how I got there.


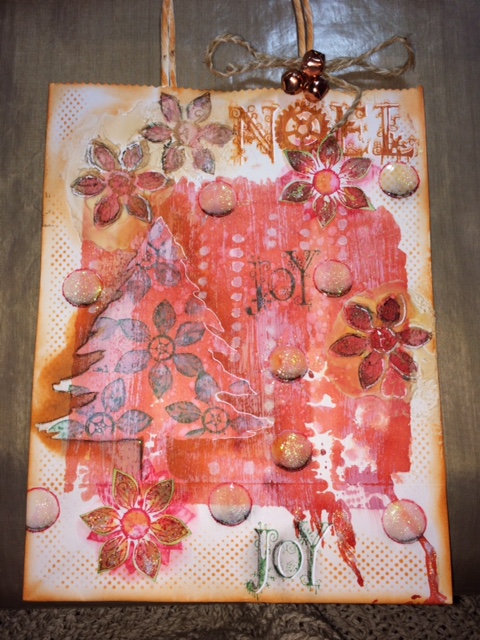
OK, this card started life as my usual piece of Sheena Stamping card with three different colours of artistry ink dabbed down with a sponge applicator.  Then I used some gesso to dab on some lighter colours giving us that sort of bokeh effect.


I've stamped my images (flowers and sentiment - Leonie Pujol) and the little fairy come sort of bumble bee fairy I have no idea of it's maker! I have taken a photograph for you which I'll pop on here but I've had this set for some time and it doesn't state a maker?


Now, this was more effective that I thought it would be to be perfectly honest! Don't you just love those little happy accidents that come out better than planned!!!!  I decided to used neat household bleach to take out some of the colour to bring those lovely stamped images to the forefront but didn't realise that it would look so nice and effective!


This is the mystery stamp set that I have used!


So I finished off by stamping some of the flowers just with water and lifting off some of the colour and with a few drifts of bleach across the piece and a few dots of gesso using the handle end of my paintbrush I was done.

Mat and layered.

I thought this looked rather care free and happy, suitable for someone perhaps starting a new job, takings exams or even moving home / relocating and flying off to dreams a new.

Hope you like what you've seen and enjoyed the journey today.

I'd like to enter this card in to the Stamping Sensations challenge - Floral Fancies:-

Thanks for stopping by,
Leanne xx


Wednesday, 30 November 2016

Lets get wrapping!!


Good morning!

Well, this is different for me!  I had an evening to myself and got out a plain white paper bag (a large bag - this measures 10" x 8") and went a bit grungy with it! - I wanted an "old fashioned, quite worn look" and was pleased with this.  didn't take photo's - completely forgot but I'll talk you through how I got there.

Started by finding my largest acrylic block and applied some fired brick distress re-inker to it, then spritzed with water and laid the bag on top of it. This gave me a base on which to start.  It ran a little at the bottom but I always like a run so that could stay.

I then swept some white gesso downwards from the top with a brush to tone it down a bit.

Then I used a stencil - the mask section (Christmas tree by Clarity stamp) and sponged some orange Artistry Ink around the edge to darken.

Some white embossing paste was applied to a couple of areas and left to harden slightly.  Once I was happy that it had started to go off, I stamped my flowers (Chocolate Baroque) in to it and washed my stamp immediately.

The same flowers were stamped in Artistry Ink (Blaze red) a couple of times on top of each other and smudged with a brush and some water and left to dry.

Again, using the same Christmas flower stamp, I used the actual stencil part of the Christmas stencil and laid that over the already highlighted tree and stamped in Artistry Ink (emerald green) the flowers to fill the tree area.

Two flowers were stamped on to water colour card with the blaze artisty ink and painted in with water and some of the green and orange inks. I also painted in to the now dried embossing paste to give the images some colour within the texture.

The words "Joy" and "Noel" both Chocolate Baroque were stamped on to the bag.

The tree was given some definition with a charcoal pencil and white pen and some lovely bubbles or snow falling was added using old pot lids to stamp with, painted in with diluted gesso, charcoal work to give depth and then covered in glossy accents with some glitter sprinkled on while still wet.


Here you can see the texture going on and the cut out flowers have been stuck on at this point too.

I added a string bow with three rose brass bells and sponged some ink to the handle. I added a little glitter texture paste here and there to give a flash of sparkle to some areas.


Traditional in it's colours with a grungy twist!

There, that will help wrap someones gift won't it and it's unique and very me!!!!

I would like to enter this bag in to the following challenges:-

Chocolate Baroque colour challenge:-

Stamps and Stencils challenge "Tags, bags and boxes":-

Thanks for stopping by,
Leanne x


Friday, 18 November 2016

I'm Grateful............


Good morning!

Well I have to admit, this card is a "train journey card" - (meaning that I did most of it while on my train journey up to Durham to see my daughter Hayley at uni!!!) - oh yes, have craft goodies.....can travel!!!!!! - It actually made the journey pass very quickly along with working on my laptop scheduling my blog! (My husband banned all paints so yours truly packed Spectrum Aqua markers and a water brush, along with pencils an acrylic block to mix the colours on, kitchen towel etc etc!!!!).

I took some photo's along the way so lets take our journey and see how I got there shall we?


The first thing that I did was inked up a mini gelli plate and stamped through a normal, pretty paper doily with artistry ink.  I stamped it four times to cover the Sheena stamping card underneath.


There, quite pretty and a good starting point for my stamping.


Right, we were ready to go on the train!!!  (I prepared it to the stage at home!).  I diluted some of the artistry ink on my work mat and just dipped the edges of the card in it and "swooshed" it about in it.  I then stamped my lovely poppies (Woodware) in Archival watering can and we were ready to go!


All the colouring here was done on the train - Spectrum Aqua markers diluted / mixed on my acrylic block and my Spectrum Noir colouring pencils too.  When I got home I highlighted some outer edging with a white pen and the darker side I opted to work with a charcoal pencil.  The sentiment of "I'm grateful" was then stamped in Archival watering can (Chocolate Baroque). Some modelling paste was swept over the same paper doily (I figured that this would have been far too messy on the train and I'd have been asked to get off at the next stop!!!!!!) and some circles were printed with the artistry ink with old bottle lids.


Matted and layered having sponged the same artistry ink on to the outer layer to match the whole colour scheme.

Very happy with that and really pretty! (and was I happy to see my little girl again after six weeks of missing her dreadfully).


A private peek for you (especially those of you that so kindly follow me and pass on such wonderful and kind comments each week - it makes it all so worthwhile).


Myself and Hayley - we went to Lumley Castle for Sunday lunch.


One side of Durham Cathedral - it's enormous!!! A beautiful city if you get the chance to visit.

I would like to enter this piece in to The Craft Barn two weekly challenge of "Poppy":-

Thanks for stopping by,
Leanne xx