Published Permissions

Showing posts with label distress oxide inks. Show all posts

Wednesday, 27 September 2017

Five Christmas cards for September!!!


Good morning!!!

Here I am as promised every month with my five Christmas cards for this month!!! - Oh it's all going so well!!!

 I've popped them in three photo's so that you can see that each one is slightly different to the next one.

So, I have used the lovely Poinsettia by Woodware for these cards and the Seasons Greetings sentiment is also from that same set.  The Wishing you A Magical Christmas is from Stamps by Chloe.

I have stamped each flower with a perfect medium ink pad and heat embossed with white powder. I also used the same technique for all the sentiments.

These took me a little longer than usual for batch making as they have been painted in with lovely bright Brusho's and finished off in the centres with aqua markers applied undiluted.  The backgrounds have been done by masking off each flower first with masking fluid (this took a while!) and then mixing a couple of Distress Oxides and adding some filler stamps and stencils.  A tiny touch of white pen and I was done!

There you go! Month nine - mission complete - I'm nearly there with my news years resolution!!!

Hope you like them! Thanks for stopping by,
Leanne xxx


Monday, 4 September 2017

"Dream Together" for Rubber Dance.............


Good morning!!

Wow, I've been so very busy with my design team work recently so I thought it was about time that I supported my favourite stamp companies and their challenges while I'm in the lull between art calls.

I've created this card for the Rubber Dance colour challenge of cream, yellow and pink


I have used the Mama Owl and the Snazzy Squirrel stamp sets along with the Dream sentiment - I had to add "together" by hand as I wanted this to be suitable for an anniversary card, or engagement or even just a card of love - where two people become one.

I have reversed the tree from the Snazzy Squirrel set to give me the opposite branch to sit the second owl on and I have completely removed the squirrel from the branch and of course, replaced it with the owls!

Easier to show you!:-

 See, the squirrel went and the owls appeared!!!

When I had finished with the stamping, I masked off a large heart over the two owls and created my background using Distress Oxides - Antique Linen, Fossilised Amber and Candied Apple. I then removed the heart mask and just tinted the heart with a very small amount of the Candied Apple Distress Oxide ink.


Added some further stamping from the Mama Owl filler stamps and some black and white leaves and acorns - just because the squirrel isn't there doesn't mean that the owls can't sit in his tree!!!!

Added the sentiment and mat and layered in white and black.

I thought this was very sweet and the stamps are beautiful to use.

I hope you like it!
Thanks for stopping by today.
Leanne xx

I will be entering this in to the Rubber Dance colour challenge - cream, yellow and pink:-


Monday, 14 August 2017

Remember the past, Live for today, Dream of tomorrow........


Hi there, well, this one's a bit striking don't you think?!!!!!  I love it!!!!!

OK, where on earth did I start with this one, oh yes, with an old dictionary page, a very old dictionary page - rather tatty and fusty!!!!

The first thing that I did was to blend some Spectrum Noir sparkle pens down the page (I've used the vintage hues set here) so I went from a rustic red, through an olive green down to a biscuit colour and dried it with a heat tool.

I then stamped Buddha in black versafine and clear embossed over the top.

Having stamped the image again on a masking sheet and cut around it, I covered Buddha with the masking piece.

I then stamped lots of falling leaves around the head and stamped the sentiment at the bottom in versafine ink.  A stencil has been used with some gesso for the white leaves that you see behind Buddha.

Removed the masking sheet from the face and darkened the edges with fired brick distress oxide ink. The edges of the page were already torn and tatty so I wasn't worried about making this worse when I darkened the edges with my blending tool - it just added to the effect!!!

Attached to a black mat.

I thought that the image popped rather well and although I wanted to "lose" a lot of the dictionary page around the main image, it has remained well on the face.

Hope you like this one, a bit different!
Thanks for stopping by,
Leanne xx

Tuesday, 1 August 2017

Hello there! - Guest Designer for Rubber Dance Stamps!!!!


Good morning to you! Hope you're having a good week?

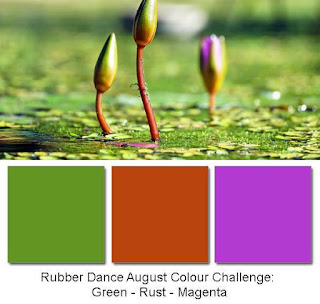
I was chosen as the DT's pick last month over at Rubber Dance Challenges and was very kindly asked by Susanne to be their Guest Designer for the start of their new colour challenge today which is  a photo inspiration and colour challenge of green, rust and magenta.


Please join us at Rubber Dance challenges for your chance to win some fantastic Rubber Dance stamps! - I did it, and I won - so you can too!!!!!

OK, this is the piece of artwork that I came up with for my Guest Designer spot.  I had great fun with this one and the quality of the rubber stamps is superb.

I have used the "Hello There" stamp set and I have used the giraffe head three times (in line with the photo inspiration of the challenge), I have placed them at the same height and placing as the three closed water lilies on the photograph.

I stamped the giraffe head in black onyx versafine and then covered them in drawing gum to protect them while I made my usual inky mess!!!!

The basis of the background is distress stains (rusty hinge and peeled paint) which I have diluted on to my glass mat and swiped the card through.  

I have then used a combination of Rubber Dance stamps from the Antique Botanicals set behind the giraffes.  These were stamped in coffee and fern green Archival inks, versafine imperial purple and have been coloured in using distress inks and a white pen.

I have also used a stencil with distress oxide (wilted violet) on there too.

Three flowers from the Antique Botanicals were stamped and cut out, coloured in and placed at the front to give me some depth.

 A bit of doodling with a fine black pen and matt and layered on white and deep plum card stock - I have smudged some wilted violet distress ink on to the white layer.


I hope that you like what I've produced for Rubber Dance - I adore their stamp range and often join in with their challenges - why don't you give it a go - you could win yourself some Rubber Dance stamps and produce lovely pieces of artwork too!!!!

Good luck!!!

I would like to express my thanks for the entire Rubber Dance team for choosing me as their pick last month, to Susanne and Bibi partularly for being so helpful.

Thanks for stopping by,
Leanne xx

Saturday, 29 July 2017

young MIND, wild HEART, free SOUL...........


Good morning!! Hope you've got off to a good start this weekend?

I had a play with my Visible Image stamps this week and my new John Lockwood media plates so I'm sharing my make with you today.

Working straight on to Sheena Stamping card I stamped the central oval using my oval media plate which I had inked up with broken china and faded jeans distress oxide inks.

I then stamped the ballerina from the Visible Image Born To Perform set in to the centre of the oval in cornflower blue archival ink with a touch of broken china distress oxide down the side.

Having got my main focal image sorted, I covered the oval with a piece of masking sheet and dusted the background with ordinary broken china distress ink but only dusted half way down the page so that the bottom half was a tad lighter than the top. When I was happy with this I just brushed more ink outwards off of the oval to darken the edges a little bit.

With the mask still in place, I have stamped the large feather from the Visible Image angels are near set and the small feather and birds from the Visible Image free your imagination set.  

I removed the mask and stamped the sentiment straight over the top, this is the Visible Image free soul stamp.

Darkened the edges with distress ink and mat and layered in white and black and I have just touched the white mat with a little bit of the distress ink.

Hope you like this one,
Thanks for stopping by,
Leanne xx

I will share this one with my friends over on the Visible Image Facebook page:-


Friday, 28 July 2017

Five Christmas Cards for July!


Good morning to you!

Well, here I am as promised with my offering of five Christmas cards for July.

In line with my new years resolution - I am producing five Christmas cards a month!

This time I've chosen this lovely stamp from Crafty Individuals (Winter Wonderland).

I have taken some photographs in pairs so that you can see that each one is a little different in colour and design:-


I have stamped the main image first and then covered it with a piece of masking sheet and then gone to town with distress oxides around the edges - each one having used slightly different colours.

These were coloured in using diluted distress inks and I have added fluffy stuff to a couple of them too.

Matt and layered using matching colours to the artwork and some mirri card on three of them.

There, month 7, mission complete!!!! (I'm building up a nice stash of Christmas cards now!!).

Thanks for stopping by,
Leanne xx


Saturday, 15 July 2017

Reveal yourself and.........Stay Curious........


Good morning!!

Here is another make of mine using Visible Image stamps.  This time I've primarily used the Curious Cats set - he's definitely looking at you isn't he?!!!!!!

This card started life with the eyes being stamped in red versafine ink and the nose and mouth with black versafine ink and both were covered with clear embossing powder and heated to set.

I then covered the eyes and the nose with drawing gum and went to town on the background!!! Do you know, I have no idea sometimes how my hands ever go back to the right colour!!!!

So, I have used distress oxides to create that background and I have dripped diluted oxides from the bottom upwards  (have turned the card upside down and ran the ink up the page). 

I dripped some water on to that background to lift some "splodges" and then stamped the Visible Image large tall grass in different colours.

The sentiment is a mixed one again, "reveal" is from the "reveal your true colours", the "yourself" is from the "create yourself", the "and" is from the "bold and beautiful"- all from the Own It! set and the "Stay Curious" is from the Curious Cats set - don't be afraid to make your stamps work for you!

Now with everything in place I had to get a face shape of a cat on there! As I've mentioned in previous posts, don't be afraid to go for it at this stage!  Yes, you've got a lovely piece of artwork and yes, it "could" go horribly wrong at the last minute but hey, it's a piece of card at the end of the day, you can always start again or tweak it a bit to hide a mistake with a butterfly or something?

I have used the stencil from the Face Shape set here and I've just smoothed some distress ink around it - getting the stencil in the right position is really the hardest part here.

I finally rubbed away the drawing gum from the eyes and nose and coloured the eyes in with diluted oxides and a little bit of an aqua pen and blended in.


Mat and layered in a lovely matching mint green, white and black.

I'll share this with my friends on the Visible Image Facebook page.

I do hope that I've given you some inspiration with these stamps and inks and that you've enjoyed your visit today.
Thanks for stopping by,
Leanne xx

Saturday, 1 July 2017

Express Yourself with Art ............


Good morning and a very happy weekend!

I've had a play with my Visible Image stamps again and as usual, I've put my "twist" on things!  Well, either that or the bowler hat man is having a rather bad day!!!!!!!!

I have recently made a piece of artwork with the bowler hat man from the Ahead Of Our Time set from Visible Image so I've mixed things up a bit and changed the head for Mr bone jangles (also Visible Image) !!!!

Now, this wasn't the easiest card to do, particularly because there is no paper piecing or attached pieces, it's all on the one layer so I'll talk you through how I got there.....

The first thing that I had to get right was Mr bone jangles skull face.  I stamped him in watering can Archival ink and then stamped him again over the top with a slate coloured Spectrum Noir aqua pen to give me a two tone face (you can see that his face has the blue tint to it but this was added later on).

I then masked off the skull face with drawing gum so that was nice and safely covered.  I then stamped the "shoulders" of the bowler hat man being extremely careful to get them in the right place and I then masked those off too.  So with a head and shoulders I stamped just the bowler hat with black versafine ink and again, then masked that off as well. So, by this stage I had all three main components stamped and masked off.

Then the nice, messy, inky bit came!!!!  The background has been done using distress oxides, I just love them!  Both for backgrounds, for stamping and indeed for diluting and painting with - so versatile.

So, I got the main background done and then added some drippy stamps from the Visible Image drag and drip set which were stamped using the same distress oxides.

The sentiment of express yourself with Art is from the Visible Image never grow up set and I have split the "Art" away from the rest of the sentiment (I didn't literally split it, I just inked up "express yourself with", stamped it, cleaned the stamp and then stamped "Art" three times separate to the rest.


All the masking fluid was rubbed away and I shaded in the skull face and the shoulders and popped some yellow on the bowler hat to match everything else.

The birds were stamped (also in the Ahead of Our Time set) and the two tumbling figures were stamped in black versafine to look like the man was jumping off of the hat and the lady is swinging from the Art sentiment - it does get a bit nerve wracking when you've done so much and you are hoping that you don't mess up the stamping right at the very end!!!! So if you ever feel that way, panic not, I've been stamping for almost 20 years now and I still get a bit "edgy" when I get that last sentiment or image on there!!! Trust your ability and go for it!

I did a bit of highlighting with a white pen around "Art" and the skull face.

Mat and layered in white and black.

I'll share this with my friends on the Visible Image Facebook page.

Thanks for stopping by today, I hope I've inspired you to get a bit more out of your rubber stamps?

Leanne xx


Wednesday, 21 June 2017

Happy Father's Day Husband...........


Good morning!

I'm sharing a make with you today that I made for my husband James for last Sunday (Father's Day).

James has a love of old American trucks (but he was quick to point out that this is a right hand drive truck????😕!!!!!). - I never noticed when I was working with it???!!!!!

Although this looks layered, this card is indeed a one layer card (all on one piece of card stock and mat and layered at the end of the make).

I started by stamping the lovely truck (Darkroom Door) and I have coloured that in with diluted distress inks. When I was happy with this middle section and it was completely dry, I masked it off with a masking sheet and then worked on the background with distress oxides.

This card is a perfect example for you to see the transparency of distress inks compared to the opaqueness of distress oxides, you can really nicely see the difference between the two - ( and how nicely they work together on a project).

I removed the masking sheet from the truck section and stamped my sentiment and "Husband" on there.


Mat and layered in black and white.

James loved it (even though he did notice it was a right hand drive truck!!!!).

Thanks for stopping by today, hope you've enjoyed your visit,
Leanne xx


Saturday, 17 June 2017

From The Past..........To The Future with Visible Image........


Good morning!

I'm sharing a make that I had great fun with using the new Ahead Of Our Time stamp set at Visible Image.

I have taken some photo's along the way for you to see how it came together gradually.


The masked image of the black hat man. (At this stage I had coloured the other side of the card stock with distress oxides - hence the nice big splodge at the top! - I wasn't worried about this as I knew it wouldn't be there when I had finished!


Distress inks added and the inner part of the black hat man now stamped up and shaded.


Nothing like ripping up your artwork!!!!


Tumbling figures stamped and set with clear embossing powder.  I then fussy cut them out.


Mat and layered in black and white and all elements attached.

Hope you've enjoyed your visit today and that I've inspired you with further ideas of how you can use your Visible Image Stamps!

Thanks for stopping by,
Leanne xx


Friday, 26 May 2017

"Hello There".............


Good morning!

I've had a go for the current Rubber Dance challenge of "Rule of Three". 

I didn't take photo's for this one so I'll talk you through how I got there.

Firstly I stamped the three flowers with sparkle pens and them restamped over the top with black ink using my misti and masked them over with drawing gum.

The background was next and has been created using the new distress oxide inks leaving some white space open.

I have then played with some different stencils and stamps and doodled around the background.  I'm loving greys at the moment!!!

Rubbed off the drawing gum, highlighted the lovely dragonfly stencil and some of the stencilling and stamped my sentiment of "Hello There".

Stamped the three butterflies on to old book pages and covered in glossy accents and attached to the card.

Mat and layered.


Finished! - Happy with that!


I would like to enter this piece in to the Rubber Dance current challenge of "Rule of Three":-

Thanks for stopping by today,
Leanne xx


Saturday, 22 April 2017

Brown Paper Packages tied with Strings and Whiskers on Kittens for Fashionable Stamping Challenges.....


 Good morning!

Here I am with two inspirational pieces for our current theme over at Fashionable Stamping Challenges of "The Sound of Music" or "Your Favourite Things".


This first piece came to mind very quickly as I am a lover of brown paper at Christmastime, especially with nice bright red ribbon and perhaps a few fir cones on the top and some berries. So brown paper packages just shouted Christmas to me!  I've stamped some lovely spruce branches (Stamps by Chloe) in green and then overlaid those with some further spruce branches which have been embossed in white. The brown parcels were stamped (these were a freebee from a magazine) and then I tied the little string bows and attached all the strings to the parcels.  These parcels were simply painted in with diluted distress ink.  The background has been done using the new Tim Holtz distress oxide inks. The sentiment is also from Stamps by Chloe.

That's another Christmas card done and perfect for our theme this month!


Isn't this little puss adorable?  Here we are with my piece for "Whiskers on kittens" and you could join in with any kitten or cat stamp that you have at home or even just your favourite stamp!

I firstly stamped my kitten (which is an old wooden mounted stamp and the maker has actually rubbed off of the wooden block so I'm unsure of it's maker).

This background started off with brushos and I softened the edges with some distress ink.

I found the lovely little kitten toys on one of Sheena Douglass's stamp sets and they went perfectly with this little kitten stamp. I painted those in with diluted distress inks.

Finally I just popped a ledge in to make it look like the kitten was resting on something and poking the toy over the top.

This sentiment WHICH I LOVE is another from the Sheena Douglass stamp set.

Hope this has given you some inspiration for our current theme at Fashionable Stamping Challenges, remember, if you haven't got a stamp to match the theme exactly, it's wide open for you to use a favourite stamp or to stamp something that's your favourite thing!

Thanks for stopping by,
Leanne xx


Monday, 3 April 2017

For You...........Fly HIGH.


Good morning!

Well, this one kept me busy! Lots of interest and certainly lots of colour going on here!!

This is my efforts for the Stamps and Stencils challenge theme of "Chirpy Chirpy Cheep Cheep!".  I don't do "cutie" cards and I like to bring my art right in to my work so I've taken lots of photo's along the way with this one so lets take our journey and see just how I got there with this one - hold on tight it's quite a long journey today!


OK, we start with a piece of Bockingford hot pressed card stock (BRILLIANT STUFF). I've stamped the image of the hibiscus flowers and the hummingbird (both by Sheena Douglass) in Archival watering can.


Here I have just covered the stamped images with Pebeo Drawing Gum to mask them off.


A new discovery for me and a new purchase - the new Distress Oxide ink pads! - They are fantastic! They allow you to continue to layer up one colour on top of the other without creating "mud".  You must allow each colour layer to dry though before applying the next layer of colour.  Water must be used to obtain the best effects too.

Here I have smooshed the ink pad on to my glass mat and spritzed with water and then dabbed my card stock in to the colour, sprayed again with water from a spritzer bottle and then heat set with my heat gun. All will become clearer so don't panic!


Woo hooo! Look at this coming!!!! Here comes another colour, this is peeled paint on the first layer and then I have done exactly the same as before but used broken china.  Smooshed the ink pad on the glass mat, spritzed with water and then wiped the card stock in to it - instead of blending in to the peeled paint, it sits on the top of it.  Spray with water and then heat set again with the heat gun.


Exactly the same done again, this time I've used fossilised amber.


OK, with the background set I then went in with some Sheena Douglass stencils and the normal peeled paint distress ink.  I have also stamped the sentiment here too in black archival.


Hibiscus coloured in with spiced marmalade normal distress ink diluted and then I have used a sparkle pen to enhance the centres of the flowers.  The hummingbird has also started to be coloured in using the lovely sparkle pens.


That's got it!  Glossy Accents went over the hummingbird but to bring those wings to life a bit more I have walked a cocktail stick through the Glossy Accents with a couple of shades of drawing ink on it. Some Nuvo drops have also been applied to the stamens and highlights to the sentiments. Some darker leaves were also stencilled on.


Look at that bird glow!

A further two Hibiscus flowers from another set of Sheena Douglass stamps were cut out and coloured in the same way and applied to give depth.


There, told you it was a bit of a long tutorial today! Well, we got there safely and I do hope that you enjoyed the journey.  Nice and bright and jolly.

I would like to enter this in to the Stamps and Stencils challenge "Chirpy, Chirpy, Cheep, Cheep":-

Hope you've enjoyed your visit today,
Thanks for stopping by,
Leanne xx