Published Permissions

Showing posts with label Imagination Crafts. Show all posts

Friday, 12 May 2017

Love Makes The Wildest Spirit Tame.............


Good morning!

Well here we are with a card that I've made for the current Cards in Envy challenge of "Motherly Love".

Having had Mother's Day here in the UK back in March I chose to put a twist on this theme and use a wonderful Imagination Crafts art stamp of a Mummy elephant with her two babies - well, it's Motherly Love isn't it?!!!!

I started with a blank piece of watercolour card and swept some of the new distress oxides (diluted) across and down the page.  This gave me a nice, calm colour on which to build my elephants colours on to.

I then stamped the main image with perfect medium and heat embossed with black detail embossing powder.

I then used distress oxide ink (again, diluted) to paint in what I needed on the elephants to give them some depth and shadow.

The hills were produced from torn copy paper and a couple of Momento inks and the sun was lifted out with water, as too, were the clouds.

The foliage was stamped in one of the Momento inks at the front (Bee Crafty) and the bird was added at the top and shaded in and the sentiment stamped ( both Pollyanna Pickering).

Mat and layered. 

I would like to enter this in to the current Cards in Envy challenge "Motherly Love":-

Thanks for stopping by today,
Leanne x


Sunday, 7 May 2017

Bold and Beautiful............


Good morning! Hope you are having a lovely weekend?

Here I am with an extra blog for you for this week.  I am having SO MUCH FUN with the new Visible Image "Face It!" stamp set, I can hardly put it down at the moment!  (I shall be sharing another make with this same stamp tomorrow, it's very clever - well, I think so anyway!!!) So look out for that one.  Infact, I shall be sharing three makes with you this week, Monday, Wednesday and Friday so I hope that you will look forward to those and I can keep you inspired and that mojo up!!!

A new technique has been used here and boy, did I have lots of fun and don't ask about the mess I got in to!!!!!!  I was at my happiest but it took a while to clean up after this one!!!!!

So, I took my time with this one, took lots of photo's for you along the way so lets take our journey and see how I got there shall we, climb aboard, here we go!


I started with a piece of watercolour card stock, you will notice that I have mounted it here on just a normal piece of white copy paper and then on to a further piece of the same watercolour card stock - it will become clear why I did this as we go along .....well, have to keep your mind ticking over don't I!!!!  The "Face It" set by Visible Image has been stamped here in black Archival ink.


I masked the eyes and mouth off with Pebeo Drawing Gum.


OK, I then stamped two flowers from Imagination Crafts with Archival Tiger Lily ink (you will notice that the left flower has over ran the card stock and part of it has come out on the outer layer behind - intended!  I then masked these flowers off with drawing gum.  

THEN THE EXCITING BIT HAPPENED!!!!! I tried the technique of bubble printing - gosh, I remember doing this as a child (and getting in to a mess then!!!!!) but why can't I bring it in to my artwork now? ABSOLUTELY I CAN!!!! So, in three shallow dishes / or deep plates I placed acrylic paint - I have used Pebeo Decocreme orange and indian pink and Americana calico red in each of my dishes. To each dish I added a small amount of water to dilute the thick acrylic paint a little and a good "dollop" of washing up liquid (dish soap).  Give each dish a good mix, each dish with it's own paint brush!  I then took three drinking straws, tilted the dish towards me so that I'd got a deeper amount of the paint mixture and blew in it with my straw to form a mountain of bubbles!!!!! See, I'm 45 (but really, lose the 5, I'm about 4 years old in my head!!!!!!!!!).   Once you've got the mound of bubbles, swipe you card across them and allow each colour to dry before attempting to move on to the next colour.  You can see here, that I've got the orange, red and rose colours done both on the front card and the backing piece.


So here I have moved on.  Unfortunately you do lose a few of the bubbles when you fill in the background a bit but this can't be helped and just ensure that you leave some of them for the cool effect and also on the backing piece.  Here I have used distress ink (worn lipstick) to give shade and depth to the face and distress ink carved pumpkin around the outside of the face.

Visible Image stamps of the flower from the Thank You set and Flower Inkognito set have also been stamped on there and the drawing gum has been removed. You can see the definition of the face coming through now.

The next step was to paint in the flowers and lips with the distress inks and I have used a sparkle pen (Harvest moon - a lovely orange) on the flower over the right eye.  The eyes I went the whole hog and coloured in with a deep red alcohol pen and highlighted with a white pen.


Please don't think that I work any tidier than anyone else - can you see why I lose things along the way?!!!!!!


Here are some shots of the bubbles more close up for you.....


So, here you go, the copy paper was in-between for a reason - did you get it?  Yes, that's right, it acted as the black mat that you see here on the finished piece - it just got replaced when mounting it all up - well done!

Finally I stamped my sentiment again, Visible Image and from the "Own It!" set this time and stamped in juicy Versafine black onyx.

There, a different technique and as my friend Sandra would say - "a breath of fresh air" on this one.  Thoroughly enjoyed it, lots to see and lots of different steps and stages but I was really pleased with this one.

Well, bus stops here I'm afraid for today but it returns tomorrow  so make sure you are at that bus stop to hop on board and take a journey with me.

Thanks for stopping by,
Leanne xx

I would like to enter this card in to the following challenges:-

Rubber Dance Colour Challenge:

Craft Stamper - Take It Make It May Challenge:

Artistic Stamper Challenge - Floral Fantasy:

Country View Challenges - Flower Power:

That's Crafty - Bright:

Time Out Challenges - Flowers with optional twist of kissing technique:

Visible Image monthly show and tell:


Friday, 30 December 2016

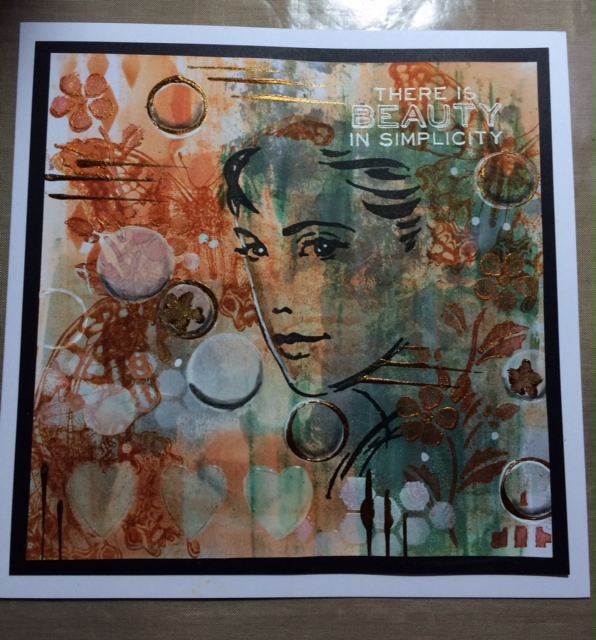
There is beauty in simplicity......


Good morning!  Hope you've had a lovely Christmas.

As it's rather a busy time at the moment I thought we'd take a look at a piece of artwork that I did a month or so ago using what I call "brayer clean up" card - yes, you've got it, when I'm creating a piece of artwork with a brayer, I clean off the brayer on to another piece of card stock!


Now, the only photograph I have of the background to this card is with another brayer clean up piece so I tell you what I'll do - I'll blog the second piece (the green/yellow one) on Monday and you can see where that one went too (sound like a plan?).  OK, lets take our journey with the one at the bottom this time.


Now I have to confess, there wasn't many photo's taken but here you can see where I was going with it.  I have started to layer up with the use of several stencils.  Gesso has been used and some Imagination Crafts Starlights paints for some shimmer on there too.  In the bottom left hand corner I have used some clear paste through a heart stencil, left it to dry and then sponged on some colour (similar to what was already there) to bring out those hearts.

A few circles with white acrylic paint using old lids.


Woohoo! Look at those starlights shine!!!


A bit of enhancement of the bubbles and the sentiment stamped in perfect medium and finished in white embossing powder and it was done.

Not bad from a piece of "waste" card!!! Clever brayer!!!!

Hope that's given you some inspiration to think about how one project can bounce off of the back of another?

Look out for the other brayer clean up piece on Monday.

Wishing you all a very happy new year - enjoy yourselves and most importantly, keep safe.

Thanks for stopping by,
Leanne xx


Tuesday, 22 November 2016

"Art Sisters"


Good morning!

Well, following the Try it on Tuesday challenge "sun, moon, stars" - I achieved a top 5 place and Avril kindly asked if I would do a guest designer spot for them for their new challenge "Layer it up" which goes live today - so here is my inspiration with lots of layers!!!!

Please go over to the Try it on Tuesday challenge blog and have a go and show them what you can do  - it's so great to see your wonderful efforts and how each and every one of us comes up with something so completely different!

I have done a full step by step so lets take our journey shall we?


I started with my usual piece of sheena stamping card and sponged on some distress inks (shabby shutters, crushed olive and peeled paint).


I stamped my central image and using a Sue Wilson pierced square die, cut that out and worked out the largest die from this set that I would need and just put a pencil line around the outside so that I knew the space that I had got to play with!.


Ok, then I had some fun using the same distress inks and some lovely stencils, from Stencilgirl, Clarity Stamp and Imagination crafts.


So here I have laid down my Sue Wilson pierced square dies and taped them in to position.  To have your dies so close to each other like this isn't always advised as they can jump in your die cutting machine and damage each other but I find that if you are careful it's usually ok and if it's not, then you've only got yourself to blame!!


So you can see what is happening now (from the other side).


Here we are, the right side facing us and all the layers perfectly cut.


OK, I've worked through the "art sisters" sentiment on to the actual card blank so that when it is all placed and assembled on my card, it all looks right! I have also at this stage backed each layer on to sturdy craft card as it would have been tricky to get those layers together. Some highlighting has been done around the images too.


Waahaaay!!!! That's what I call layering it up!!!!
Foam tape has been applied behind each layer.


There, the end of todays journey, bus stops here!

Well, art sisters is what we are isn't it?

Hope you enjoyed the journey, don't forget to go over to the Try it on Tuesday challenge blog and show us what you can do with our new challenge of "layer it up" we all look forward to seeing your creativity and good luck!!!!

Thanks for stopping by,
Leanne xx


Monday, 24 October 2016

For a gentleman......


Good morning!

This was a card made while I was messing about and doing a bit of experimenting really!

Lets take our usual journey.....


I started with my blank piece of Sheena stamping card and stamped the image of the man (Viva Decor) and covered him in masking fluid.


Then I decided to experiment a bit with Gelato's so I had a scribble with three different colours (one was gold) and applied water with a paintbrush and blended them completely together and allowed them to dry naturally.

Then I brought in another of my favourite techniques which is the use of drawing inks.  So I blended some drawing ink across the page VERY DILUTED which looked good so I thought, what will happen if I apply bleach with some drawing ink (because as we know, gelato's are permanent once mixed with water and dry) well, the result was a bit of a shock - a nice one at that!  - The drawing ink split! Hence you will see what looks like ageing on the background and black marking specks but thats the drawing ink in the bleach which didn't lift any of the gelato's because they were permanently fixed!!! That was something new for me anyway!!!

So I continued stamping, the lightbulb (again Viva Decor) with the chain which is actually the watch chain from the same stamp set as the man. I stamped the numbers which I think are visible image, the splats which are also Visible Image I think and the words and borders which are again Viva Decor.

I painted the lightbulb in with Imagination Crafts gold starlights which is perfect for the glisten that I needed and some circles from old bottle lids.

The sentiment was stamped "for a gentleman.....Golden Memories" - Viva Decor.

I added some Sizzix die cut cogs from brown card stock and applied those.


What a vintage look! I think that drawing ink in the bleach was brilliant and aged it very well indeed!

Hope you like what you see,

Thanks for stopping by,
Leanne xx


Monday, 3 October 2016

A hook at one end, an optimist at the other...............


Good morning!

Something rather more tranquil this morning.  I was inspired to make this card for the Try it on Tuesday current challenge of "Sun, Moon, Stars.....".

I really like this fisherman stamp from Inkylicious and popping him under a lovely full moon, fishing at night just seemed absolutely ideal (where I'd like to be sometimes, on my own and away from the usual chaos - yes, I could sit in that boat there in that picture!!!!!).

OK, didn't take photo's as I went along this time but I can talk you through it just the same so lets take our journey.

Started with a piece of watercolour card stock (you can just about see the texture on there) and made a start with the sky.  I simply dragged distress ink across the page VERY LIGHTLY avoiding the central area where I was to work on my moon.  I didn't actually use a stencil of any type for the moon, I simply painted the moon on with very watered down gesso, then, using a charcoal pencil enhanced the underneath of the moon to give is a bit of shadow under there. Then, as I had the gesso squirted on my mat already, I decided to use that thinned down again to wipe some clouds in the sky (this left some of the nice darkness behind which looked quite effective) and went over the top two corners again as I felt these were a bit too dark at this point too.

So, next I had to work on the lower half of the artwork.  For the effect of the water I used an Inkylicious ink duster with black soot distress ink again and I spritzed the ink duster very lightly with water and swept that across the page avoiding the very front of the picture - I wanted this to "feel still - almost pond like" - it is after all, night time.

So, I had a horizon line which was good, so I stamped the trees and bank on it (again from Inkylicious) and added my fisherman.

The reeds were stamped, the pond birds and the sentiment "A fishing line has a hook at one end and an optimist at the other" by Inkylicious - but I felt something was missing?

The light from that moon! So out came a lovely Imagination crafts starlight paint and I highlighted that water up quite heavily to bring light to the whole picture.


You can see from this photograph just how reflective starlight paints are when light hits them!


Matted and Layered and "extended" the artwork by stamping more reeds and pond birds on to the actual white card outside the matting and layering.

There, happy with that, a bit on the dark and spooky side but how tranquil and peaceful does that look!

I would like to enter this in to the Try it on Tuesday challenge - Sun, Moon, Stars....

Hope you liked the journey, have a good week, 

Thanks for stopping by,
Leanne xx


Wednesday, 31 August 2016

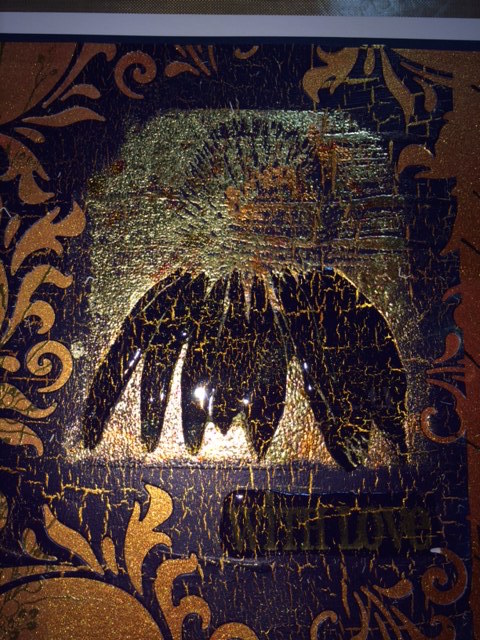
With Love.............


Good Morning!!! I had lots of fun making this card inspired by the That's Crafty Challenge "Get Cracking!".

I took some photo's along the way for you with this one so lets make a start!:-


I painted a piece of white card stock with two colours of Imagination Crafts starlights (really bright and shiny!) Then, when that was dry I painted one coat of Creative Expressions crackle glaze and left that to completely dry.  Over the top of those two coats came a layer of navy blue acrylic paint and I waited for the magic to happen.......BEAUTIFUL cracking revealing the golden starlights beneath.


I stamped my flower image (Imagination Crafts) with sticky embossing powder and covered in gilding flakes.


Then covered the flower petals in Glossy Accents and left to dry.


This shows you the stamp that I was working with.  I used a Sizzix die to put pattern to the edge of the cracked card and layered this on to a further sheet of card that I had painted the starlights on to using my brayer.  I also added some floral stamping (Chocolate Baroque) to both sides, one side in bright gold embossing, the other in blue Versafine ink and clear embossed over the top.


Here you can see the beautiful Glossy Accents over the flower petals and sentiment.


A good look at the amazing crackle that has come through.


Nice and super shiny - very happy with that one!

I would like to enter this card in to the Thats Crafty "Get Cracking" challenge.


 Thanks for stopping by,
Leanne xx


Thursday, 25 August 2016

Beautiful.....


Good morning! Got in a right painty mess with this one!!!!  Inspired by Allsorts Challenge "Fabulous Florals" I set out on a bit of an adventure!!!

I knew the stamp I wanted, I knew the effect I wanted - it was just a matter of how I got there, but get there I did and I'll show you how......


I started with my usual white piece of card and sprayed some yellow and red inks on it.  Then I stamped my rose image in perfect medium and embossed with matt clear embossing powder. I also at this stage added some stencilled leaves and stamped the "beautiful" sentiment in Archival ink.


I had to start to make that rose stand out so I started to darken behind it with some Distress Ink.


It needed to be darker still so I added more......


Then one of my favourite techniques, - bleach!!!!  I needed to remove and lighten between the embossing.


Now comes the magic.  By adding acrylic paints the rose started to come to life!!! I have also added some stencil work at this stage too.


I took this photo for you to see the stamp that I was working with from Imagination Crafts.


I made the very bottom of the stamp very dark to bring the rose out a bit more.....

Happy with that!

I would like to enter this in to the Allsorts Challenge - "Fabulous Florals".

Thanks for stopping by,
Leanne xxx

Sunday, 7 August 2016

No Matter Where You Go In Life..........

Morning!!

I have made this card for Stamping Sensations this month as my contribution as their guest designer for August for the theme "Anything Goes".

Well, I thought, it's the summer so lets go to the summer heat in the Serengeti!!!!

I loved experimenting with this one (I love to experiment all the time and to see what different effects I can get from my products in my stash).

OK, so, I started this card as usual with a blank sheet of card and painted the background with some lovely warm Aqua Tints. Then I stamped in black versa fine ink some foliage and some Serengeti trees at the edges.  Then the rubber stamp comes in to play - this time Elephants from Imagination Crafts Art Stamp range.


Now, this stamp stamps out the background and leaves the main image unstamped so that you can so easily stamp over many mediums and your colours show through - looove these!!!!!!

So, next step was to stamp it on to the background with perfect medium and clear MATT embossing powder.  So no shine and basically no image to be seen at this stage either!!!!!  The elephants are of course not inked when stamping so the background becomes a resist with the matt embossing powder giving you an easy surface to in this case use diluted bleach and bring those beautiful beasts to life.

I added a couple of black frames and some die cut black foliage and the sentiment "No matter where you go in life, it's who you have beside you that makes the journey worthwhile" - in this case, it's a mothers love with her two infants.

Finished with four Creative Expressions black glue dots in each corner.

I thank all at Stamping Sensations for choosing me as the winner of their "Feature a Creature" challenge and their request for me to be a guest designer this month - it has been a pleasure and great fun - thank you all!!!

I would like to enter this card in to :-

Country View Challenges - Hot Summer Days Challenge.
Artistic Stamper - Anything Goes Challenge.
Thats Crafty - Zesty Zing Challenge.

Hope you like this creation, and thanks for stopping by,

Leanne xx