Published Permissions

Showing posts with label Pebeo gilding wax. Show all posts

Thursday, 19 January 2017

Dream canvas.


Good morning!

Well, this is indeed a more complex piece of artwork but I had a ball with it!!!!!  I let my creative side just take over!

I am very grateful Cec and all the team at Stamps and Stencils challenges
stampsandstencils@blogspot.co.uk for asking me to be their Guest Designer this month.  Their new theme is "swirls, whirls and flourishes" - it's a brilliant theme and there is lots of scope there to include a swirl, a whirl or a flourish on your piece.

As you will see, I went the whole hog and got swirls, whirls and flourishes on here so shall we take our usual journey and see how I got there?


OK, I started off with a piece of tissue paper (gift tissue) and with some cut n dry foam applied some Archival watering can ink through the stencilgirl stencil.


Then it started to get messy (my favourite place!!!) I stuck the tissue paper to a 12 x 12 inch canvas using Powertex napkin glue and allowed that to completely dry. Then I applied some modelling paste through two stencils - a swirl and a whirl!.


Here I have sprayed some yellow Powertex Bister Spray to start the background colour.


Now we have some drama on that background, I've used green and yellow Bister Sprays now, I added some lace that I've applied with Mod Podge and sprayed with the ink sprays too.  The flourishes are Sue Wilson Dies and the small paper flowers I have had in my crafty stash for so long, I have no idea where they originally came from!

Now, the problem I saw was that the girls face was too lost on the canvas and I needed to bring her completely forward so I made a start on completely enhancing her face and her hair.


There! What fun I had!  I used the modelling paste to change her hair to bring her forward and the face I enhanced to bring out that nose and mouth and particularly the eyes. I have used Pebeo gilding wax (silver) to highlight all of the swirls and flourishes and gold gilding wax to highlight her hair.

I stamped the sentiment of "Dream" from Clarity Stamp on there and I was very happy with this.

If nothing else, this project shows you how you can adapt your stencils in to anything you wish them to be.  Use your stencil to start your piece off and build on it from there as I have in this piece.


This is all the ingredients apart from the stencilgirl stencil which you can see in the first photo.


Hope you like what you see and that you have enjoyed our crafty journey today.

Don't forget to pop along to Stamps and Stencils and join in their new challenge of "Swirls, whirls and flourishes".

I would like to enter this piece in to current That's Crafty challenge of "Silver and Gold":-

Thanks for stopping by,
Leanne xx


Sunday, 11 December 2016

Happy Christmas........


Good morning!

It's a new challenge over at Fashionable Stamping Challenges today with the theme "Anything Goes" - (well, I had to do Christmas then didn't I?!!!!). Come and join us, with such an "open" theme it's easy to have lots of fun and show us what you can create!

http://www.fashionablestampingchallenges.com/2016/12/11/challenge-118-anything-goes/

OK, lets take our journey shall we.....


Isn't this a stunner of a stamp? It's the Impression Obsession J7042 Santa Horses stamp.

I started with my usual plain white Sheena stamping card and stamped the horses in Archival watering can.  I coloured their hats in with Spectrum Noir colouring pencils (you will see this on the next photo).  I then pressed some perfect medium through a stars stencil and embossed with clear embossing powder.

I then blended the background with distress ink (weathered wood) to show the white stars more clearly.

I cut two black mats and a silver one and passed the black mats through my Platinum machine with an embossing folder that looked like snow falling by Leonie Pujol. (I had to pass them through twice as my card was wider than the 5 x 7 embossing folder so I hotched the folder over a bit and ran it through again!).

I then stroked the embossed card with a tiny bit of Pebeo silver gilding wax to highlight the snow falling - it looks so metallic!

The sentiment was stamped "Happy Christmas" (Bee Crafty) and edged with the weathered wood distress ink and matted on to black card stock.


Here I was playing with the idea of a nice red ribbon? - Yes, I think that works well!!!


There, who said that you can't do monochrome for Christmas?!!!!

Matted and layered up and red felt ribbon and bow to finish with some die cut ivy leaves (Sue Wilson - Creative Expressions) which I also finished with a touch of silver gilding wax.

I thought this was really classy! I shall choose someone special to receive this one I think!

Do come along and join us at Fashionable Stamping Challenges with our new theme of 
"Anything Goes".

May I wish all at Fashionable Stamping Challenges, the Design Team and all you out there who enter and make the challenges such fun for us all a very Merry Christmas!

I would like to enter this in to The Artistic Stamper Creative Team blog challenge "Christmas":-

Thanks for stopping by,
Leanne x


Monday, 28 November 2016

Art Depends Not On Who Creates It......


Good morning!

Well, I think I've gone a bit mixed media for me but I've had a fantastic time!!!!

I've taken photo's along the way so let's take our usual journey shall we?

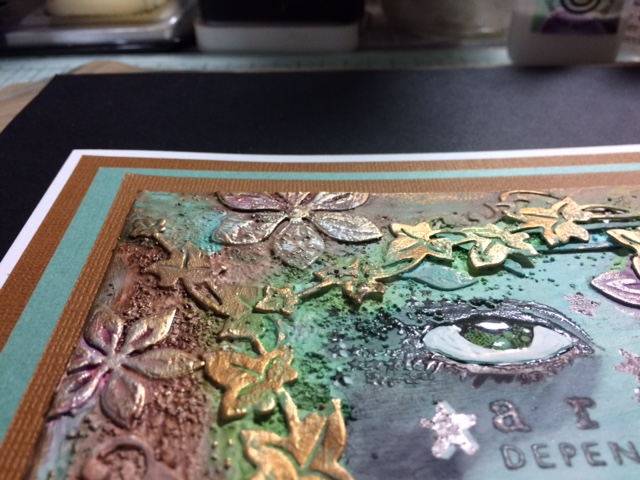
This card started life as a piece of greyboard and I applied 2 coats of gesso to it.

I cut some die cuts (Sue Wilson trailing ivy, JustRite floral dies, Couture Creations scrolled tomentosa) and stuck those down always remembering to leave some nice blank space in the middle for stamping on to.  I applied some Pebeo sand texture paste and some pebeo normal texture paste, left it all to dry and painted a further layer of gesso over the top so that my paints had a good surface to sit on.


All looks a bit "white" but that will change!! (Infact, I quite like the white look - ummmm, food for thought, watch this space!!!!!).

Aquatints were used to colour. - I just looooove aquatints!!!!


Pebeo gilding wax was then rubbed on to highlight - perfect!


Now we're getting there!!!!


My sentiment was stamped and the eye (both Carabelle Studio).  I worked further on the eye to enhance it with white pen and glossy accents.  Although stars appear on the eye stamp, I added more!


Mat and layered up in matching card stock - voila! 

Quite a modern and up to date card, this would even keep the younger girls interested- my daughter liked it!

Hope you like what you've seen,

I would like to enter this in to the current Country View Challenge of "Stars":-

Thanks for stopping by,
Leanne xx


Monday, 7 November 2016

Those Who Don't Believe In Magic................


Good morning!

Well, I'm getting in to that Christmas spirit early!!!!

This is a card that I have prepared for the current Lavinia Stamp challenge of "Let it snow".

Now, I have to admit, I got so engrossed when I was making this that I actually forgot to take photo's along the way!! - I did remember but when I did, it was a bit too late!!!! So, although we can't take our usual journey, I can talk you through how I got there.

I started with my usual piece of Sheena stamping card and gave it a coat of gesso.

I then die cut the snowflakes and different flourishes (these are all Sue Wilson and Courture Creations  dies).  They were then stuck on to the gesso'd card and another coat of gesso was applied over the top.

A small moon mask was stuck down.

Out came my aquatints and I have used a shade of light pink and light blue on this one and when dry I've applied a light covering of silver gilding wax to bring those images right out. The moon mask was then removed.

All the stamps (trees and stag) are Lavinia Stamps.  I stamped the stag in black versa fine ink and clear embossed him to set.  I then stamped all the other trees.  The sentiment was stamped on (also Lavinia Stamps) and I applied Cosmic Shimmer glacier ice and diamond sprinkles on the trees and around the ground and some for falling snow too.

How pretty is that?!!! Rather mixed media this one - quite different with Lavinia stamps I thought with quite a lot of depth to it -


I would like to enter this card in to the current Lavinia Stamps challenge "Let it snow":-

Fussy and Fancy challenge "Ice/Snow"


Hope you like it!

Thanks for stopping by,
Leanne xx