Published Permissions

Showing posts with label lace. Show all posts

Monday, 24 July 2017

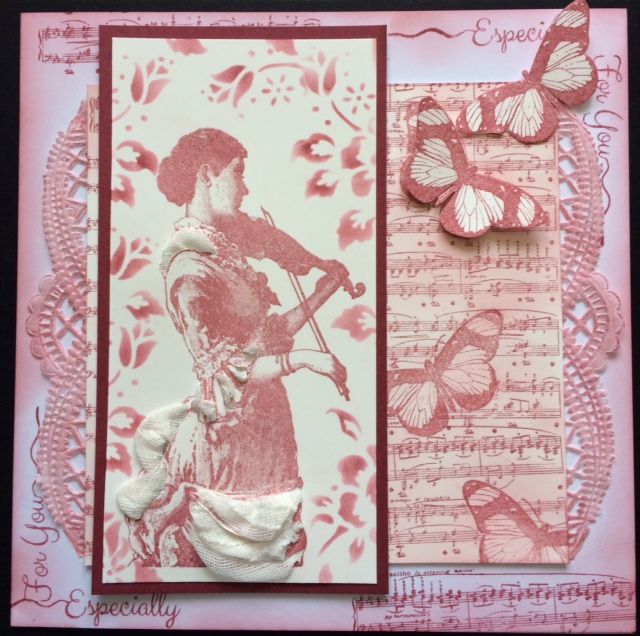
Especially For You.........


Good morning!

Well, as you can see, I went for lovely pale pinks and a wonderful main stamp from Bee Crafty here. I have made this more feminine by adding some fine lace;


So here is my start;


and here is how I envisaged the lace being put through the stamped image - I have cut out where I wanted the lace to be.


Here I have added some musical notes to tie in with the lady playing the violin.


I attached just a simple doily to the back (I had blended some pink ink over it).


Bring it all together and this is what we've got! Two butterflies have been 3'd and that lace makes for a lovely feminine lady.


Thanks for stopping by today,
Leanne x


Wednesday, 19 July 2017

Thinking of You.................Lavender and Lace at Allsorts Challenges........


Good morning!

Sharing a card that I've made to join in the fun over at the Allsorts Challenge this week. The theme is Lavender and Lace.

I started this piece with just one colour of distress oxide (wilted violet) and then came in with Lulu Lavender Memento ink - just swiping it across the page very lightly.

I then stamped the lovely lady (Bee Crafty) using my misti (stamping it once with the distress oxide ink (wilted violet) and then over the top with milled lavender distress ink to give me some definition. I have cut out sections of her dress so that I could pop some beautiful lavender coloured lace through it to enhance her dress and "bring her to life".

I have sponged the milled lavender distress ink through several stencils to build up that background and I have also used the wilted violet oxide through some of them too.

Thinking of you has ben stamped in the same way using the two inks.

Some Rubber Dance stamps are on there too and have been coloured in with a white pen.

Mat and layered and have added some lace trim down one edge, the back mat I have coloured with the lulu lavender Memento ink and a sponge.

All mounted on to an 8 x 8 white card blank to give it a clean feeling for lavender and lace.

I hope you like this piece. I have actually produced two pieces with this stamp, similar in design so I'll share the other one with you next week - you'll have to wait 'til then!


Thanks for stopping by today,
Leanne xx

I would like to enter this in to the Allsorts Challenge of "Lavender and Lace":-


Friday, 14 July 2017

Paris...............


Good morning,

Sixth scheduled post today for you while I am away.

This one is a bit different, it's a bit of napkin art for you!

I made this a good month or so ago, was just having a play with a paper napkin that I picked up at a local craft shop.  I decided to put it together with this Carabelle Studio C'est La Vie stamp set - perfect!

The napkin has been applied using decoupage glue over on the left hand side and the right hand side has the details of the C'est La Vie stamp.  I have pressed some ink through some lace to give me some texture on the right hand side to simulate rain and the use of a stencil too.

I added some lace to keep it feminine and French and matted and layered on red and black mats.

Oh, nearly forgot, PARIS has been stencilled on there and highlighted with gold paint.

Hope you like this, a bit different!
Thanks for stopping by,
Leanne x

Monday, 24 April 2017

Dance like no one's watching.............


Good morning!

Well, this one is a bit different for me in both it's colour scheme and the mediums used!

I had fun with this one as I made it for the Cards in Envy current challenge of "Pretty Pastels".  Not always an easy challenge but it's great when you get it right!!!

OK, I took one photo along the way (sorry, I get so engrossed with what I'm doing I usually forget to take the photo's and indeed, lose the phone under all the chaos on the table!!!!).


So, this piece of artwork started out as a piece of Sheena Stamping card and a piece of lace.  I then pushed some Pan Pastels through the lace to try and pick up the pattern.  Not an easy technique and not a very clean one either!!!  Didn't know if this was going to work but hey presto - I got a pretty cool result!  I knew that it would be a really soft effect with the Pan Pastels but I was convinced that the pretty pastel colours and the actual pastels themselves would work ok. I had to seal this at that point with some Pebeo Fixatif spray and allowed to quickly dry.


Right, so having got the background where I wanted it I brought in this brilliant stamp by De Stempelwinkel.  I have used perfect medium to stamp the image out with and then using an extremely light brush, dusted some of the Pan Pastels over the stamped image to make the pastels stick to it varying the colours as I went.  

The rest of the stamps used are from the Born To Perform stamp set by Visible Image and I have done exactly the same, stamped with perfect medium and dusted with the Pan Pastels.  I then sprayed the Pebeo Fixitif spray to seal the whole piece.

Mat and layered in two matching pastel colours.

That's pretty and it's in pastels - both in colour and medium!!!

I would like to enter this in to the following challenges:-

Cards in Envy - Pretty Pastels:-

Craft Stamper - Anything Goes:-

Hope you've enjoyed your visit today and I've inspired you to have a experiment with Pan Pastels.

Thanks for stopping by,
Leanne xx


Monday, 30 January 2017

Birthday Wishes (with a 60's twist!)....


Good morning!

Well how is this to make you smile first thing in the morning!

Loved making this card for a friend of my daughter Katie. I appreciate it was made for a 16 year old and I have used some of Sheena Douglass' Groovin 60's stamps but hey, it's a "boppy" card so boogie on down!!!!

I must admit to being rather bad at remembering to take photo's as I go along recently but I'll talk you through it as always. I get so engrossed in what I am doing, taking photo's doesn't enter my head - well, not until I've finished that is!!!!

OK, this card started with me sponging some pumice stone distress ink through lace (I love using lace!).  Then I used a Sheena Douglass stencil from her Groovin 60's range and sponged some picked raspberry through it.  

Flowers were stamped in the grey and pink again from Sheena's Groovin 60's range. I decided to use some wow embossing glitter with some of the flowers to give it a sparkle.

Then came the girls dancing stamp - a great stamp and I've used versafine grey ink here to stamp it.  I wanted it to be a bit of a disco atmosphere so was happy for the colours of the flowers and stencils and lace to show through them a bit as they were silhouetted on there.

Used matching stamps to decorate the actual card base and stamped the sentiment twice on the card and once on the actual image.

I love these new stamps by Sheena Douglass and I do stress that I am too young to remember the 60's!!!!! (I'm a 70's baby!!!!!) but I just love the era and all that it brings.


A nice bit of fun today!

Hope you like what you've seen today and thanks for stopping by,

I would like to enter this card in to the Cards In Envy challenge of "Pink and Gray":-

Leanne xx


Monday, 23 January 2017

Five Christmas Cards for January!!!!!!!


Good morning!

Look at me!!! I'm off to a wonderful start with my new years resolution of 5 Christmas cards a month for 2017!!!!

As promised, I will share on one blog each month my 5 Christmas cards for each month and here we are with January's makes.

I haven't got a step by step on these but I have taken individual photo's of each one for you so that you get a closer look at each of them.

Each card being slightly different I shall try to explain the basics to these.  

I have really enjoyed playing with lace through 2016 so I thought it would be super to start my Christmas card adventure using some lace - not very Christmassy? - that depends on how you use it! I believe that most things can become Christmassy if you put your mind to it!

These cards started with a piece of lace being placed over my Sheena Stamping card and sponging through some distress ink.  I didn't stick the lace down, if you are careful you can just hold it and dab gently for a lovely loose effect.  I then used a Woodware poinsettia stamp, some of these are stamped with Archival watering can and others have been embossed with clear embossing powder over it (where I was going to use water colour within the image). I have added some foliage from Clarity Stamp too.

The sentiment is from Clarity Stamp.

OK, let me see if I can tell you one by one how I've coloured the Poinsettias:-


Water coloured with Inktense pencils and die cut into and layered on a fibre mat. Finished with sparkle pens.


Intense pencils here but using them as colouring pencils without water this time and matted on to plain card stock, finished with sparkle pens.


Inktense water colour pencils here and die cut into with bright red mat.  Finished with sparkle pens.


Inktense water colour pencils, bright red mat, no die cutting this time and finished with sparkle pens.


Oh yes, my favourite! Good old Polychromo pencils, look at the intensity of colour that builds up here.  Matted on to a fibre mat and finished with sparkle pens.


I know that the sparkle pens can't be seen on the photo's but look - a super close up shot - it's there..... honest!!!!!


So, there you go, month 1 - mission complete!

Thanks for stopping by,
Leanne xx


Thursday, 19 January 2017

Dream canvas.


Good morning!

Well, this is indeed a more complex piece of artwork but I had a ball with it!!!!!  I let my creative side just take over!

I am very grateful Cec and all the team at Stamps and Stencils challenges
stampsandstencils@blogspot.co.uk for asking me to be their Guest Designer this month.  Their new theme is "swirls, whirls and flourishes" - it's a brilliant theme and there is lots of scope there to include a swirl, a whirl or a flourish on your piece.

As you will see, I went the whole hog and got swirls, whirls and flourishes on here so shall we take our usual journey and see how I got there?


OK, I started off with a piece of tissue paper (gift tissue) and with some cut n dry foam applied some Archival watering can ink through the stencilgirl stencil.


Then it started to get messy (my favourite place!!!) I stuck the tissue paper to a 12 x 12 inch canvas using Powertex napkin glue and allowed that to completely dry. Then I applied some modelling paste through two stencils - a swirl and a whirl!.


Here I have sprayed some yellow Powertex Bister Spray to start the background colour.


Now we have some drama on that background, I've used green and yellow Bister Sprays now, I added some lace that I've applied with Mod Podge and sprayed with the ink sprays too.  The flourishes are Sue Wilson Dies and the small paper flowers I have had in my crafty stash for so long, I have no idea where they originally came from!

Now, the problem I saw was that the girls face was too lost on the canvas and I needed to bring her completely forward so I made a start on completely enhancing her face and her hair.


There! What fun I had!  I used the modelling paste to change her hair to bring her forward and the face I enhanced to bring out that nose and mouth and particularly the eyes. I have used Pebeo gilding wax (silver) to highlight all of the swirls and flourishes and gold gilding wax to highlight her hair.

I stamped the sentiment of "Dream" from Clarity Stamp on there and I was very happy with this.

If nothing else, this project shows you how you can adapt your stencils in to anything you wish them to be.  Use your stencil to start your piece off and build on it from there as I have in this piece.


This is all the ingredients apart from the stencilgirl stencil which you can see in the first photo.


Hope you like what you see and that you have enjoyed our crafty journey today.

Don't forget to pop along to Stamps and Stencils and join in their new challenge of "Swirls, whirls and flourishes".

I would like to enter this piece in to current That's Crafty challenge of "Silver and Gold":-

Thanks for stopping by,
Leanne xx


Friday, 25 November 2016

A Strong Woman believes.......Season's Greetings


Good morning!

Well, I thoroughly enjoyed making this card!  It wasn't the fastest card I've ever made but I was really "deep in to it" every step of the way - have you ever been there?!!!

Somehow, I did remember to stop every now and then and take photo's along the way so lets take our usual journey shall we?


Ok, started with my usual piece of Sheena stamping card and stamped the main image - time traveller steampunk woman by Sheena Douglass.  I then stamped the propeller from Sheenas' voyage of discovery stamp set - these were all stamped with Archival watering can ink.  I then masked off the woman and the propellers with masking fluid and started to fill the open space with holly and ivy stamps by Clarity Stamp.  The drawing gum was then rubbed away.


I laid some lace over the top and sprayed through with some Cosmic Shimmer spray mist.


I then set to colouring in the holly and ivy and woman with Spectrum Noir colouring pencils and I finished the pine cones and berries with alcohol pens.

It was coming together!!

I painted in some diluted spectrum aqua pen ink around the woman to "pop" her out.

I then decided to stamp the sentiment from this same stamp set "A Strong Woman believes she can do anything and she does" at the bottom and stamped "Seasons Greetings" out and die cut round it and attached it to one of the lovely bunches of holly. Sponged distress ink around both sentiments and attached.

Mat and layered.


What a card to give to a strong woman - or just someone special that you feel deserves to know that you think that they are strong and inspirational - you know, I know exactly who I am going to give this card to this Christmas.....

Hope you've enjoyed the journey today and that you like what you see, let me know with a kind comment, I love to read your views on my work - it makes it all worthwhile!,

I would like to enter Moving Along With The Times challenge of "Anything Goes.....with Christmas":-
http://movingalongwiththetimes.blogspot.co.uk/2016/11/34-anything-goes-with-christmas.html

Thanks for stopping by,

Leanne xx