Published Permissions

Showing posts with label momento. Show all posts

Tuesday, 13 September 2016

Butterfly Butterfly.......


Good morning!

This card turned out soooo pretty!!! Here goes with a step by step.

I started with my usual white piece of card stock.  I stamped the butterflies (unlabelled but I've got a feeling they are a Sheena Douglass stamp collection) and masked them over with drawing gum.

I decided to emboss some wax paper with a beautiful rose pattern embossing folder and once embossed I ironed it on to my card stock, straight over the top of the butterflies and blended over peacock feathers distress ink and dandelion momento ink to show it coming through.


I then rubbed off the masking fluid and coloured the butterflies in with distress inks and a water brush.

The sentiment was stamped - it is a Visible Image one "Butterfly Butterfly, flutter in to the sky".


I then decided that I wanted to enhance the butterflies and pretty things up a bit with some glitter so I stamped two butterflies on to heat resistant acetate with perfect medium and embossed with Wow totally teal embossing glitter. I cut them out and attached them just down their spines.

I also stamped some small bees (clarity stamps) on to the acetate with versa fine ink and clear embossed them over, then cut around those and attached them also.


Very happy with the beautiful colours and how pretty this card looked, it will also of course keep very flat as the acetate butterflies just flatten completely to go inside a nice envy envelope and pop back out when opened! - happy with that!

I would like to enter this card in to the following challenges:-

Moving Along With The Times - All Kinds of Everything.

Cards in Envy - For the kids.

Thanks for stopping by,
Leanne x


Monday, 12 September 2016

I don't exercise ........


Good morning!! I've been playing with Indigoblu stamps this week and thought this one turned out rather well (dramatic eye).

I started with my usual white piece of stamping card and blended two colours of momento ink and Adirondack eggplant to form the base colour.  I then laid down an Indigoblu stencil and spritzed water through it which lifted the colours beautifully and left the stencil pattern.  Then from that same stencil I inked through some momento to give us the lovely bright spots.

The main dramatic eye was then stamped in the centre with black versafine ink - then I went off on a different journey with MDF!!

I coated this lovely MDF heart with white gesso and left it to dry.  Then blended the same inks that I had used for the background on to it so that it tied in with the main background.  Gave it a quick set with the heat gun and stamped the dramatic eye on to it making sure that I had got the main eyeball part of the stamp clearly on the heart.  I must admit, I didn't want any smudging of any kind so walked away and left it overnight to dry well.  

I highlighted a couple of parts of the eye and some of the background with a white pen and then pressed the heart in to some perfect medium and covered with clear embossing powder and set that.

The heart was added to where it sat perfectly over the original stamped image to make that eye pop that bit more and the sentiment was stamped "I don't exercise, if God had wanted me to bend over, he would have put diamonds on the floor!!" - brilliant!!!!! To this theme, I added clear gems to simulate diamonds around the eye! To finish, I added some round circles to keep it "modern and funky" by simply dipping an old pot lid in the gesso.

Pleased with that!

I would like to enter this in to Indigoblu challenge - Bright & Beautiful.

Thanks for stopping by,
Leanne xx


Friday, 15 July 2016

A Heart That Loves Is Forever Young......


Morning!

I was inspired to make this tag for the Crafty Individuals July "mini's" challenge.

Love making tags and this one is such a sweet stamp.

I firstly die cut my tag and stamped the sentiment "A Heart that Loves is Forever Young" on it.  Covered that sentiment with masking fluid and then stamped the main image which is Crafty Individuals stamp CI - 402.  Then sponged some Momento inks around the background and edges and rubbed off the masking fluid.

Added some watercolour pencils to colour in and then brayered some perfect medium straight over the top and added clear embossing powder to give the whole thing a shine.

Finally added some archival hearts around them and I was done - a nice "mini" piece of artwork.

I would like to enter this in to the Crafty Individuals July Challenge "Mini's".

Thanks for stopping by,

Leanne xx


Monday, 11 July 2016

May A Gentle Breeze Blow Your Way........


Morning! Had great fun making this card, lots of different stages and I've given you a step - by - step of how I got there!

I was inspired by the My Time To Craft Challenge Blog to do a triple stamped card and it just developed from there really - found myself once again in that little world where time forgot me, forgot the dinner, forgot the dogs..........!!!!!!

I started by cutting my three pieces of white card stock and then sponged on to all three Momento Bamboo Leaves and Pear Tart (wonderful colours).

I attached all three layers together using removable tape at the back.

With Archival Watering Can ink pad I stamped the face from Stampers Anonymous Classics SCF005 across all three layers and the bird from the Stampers Anonymous Bird Feather CMS180 set. I stamped the bird again and made a mask of it and covered it over.

Masking fluid was painted over the eyes, nose and mouth of the face and the Stampendous Tree Poem was stamped straight over the top of the face, then the masking fluid rubbed away to show the clear eyes, nose and mouth. A few birds were also stamped around the large bird and an Inkylicious sentiment of "May a gentle breeze blow your way and bring with it a Special Day" was added.


I made a further mask and covered the whole face (as you can see, it has been used before!) and added some colour box white circles with a round applicator tool.


Removed all the masks and added some charcoal pencil to the circles for depth.


Separated the layers (looks a bit different now!!! - don't panic at this stage!!!!).


Mounted each layer on a piece of dark green card stock and attached with mounting foam for dimension. Wrapped some seam binding ribbon around the middle layer and attached a ribbon bow.


Happy with that!  Came together very nicely indeed!

Thanks for stopping by,

I'd like to enter this card in to the following challenges:-

My Time To Craft Challenge - Triple Stamping
Country View Challenges - Have Fun With Circles
Stamping Sensations Challenge - Anything Goes with A Stamp and Ribbons.

Leanne x


Friday, 8 July 2016

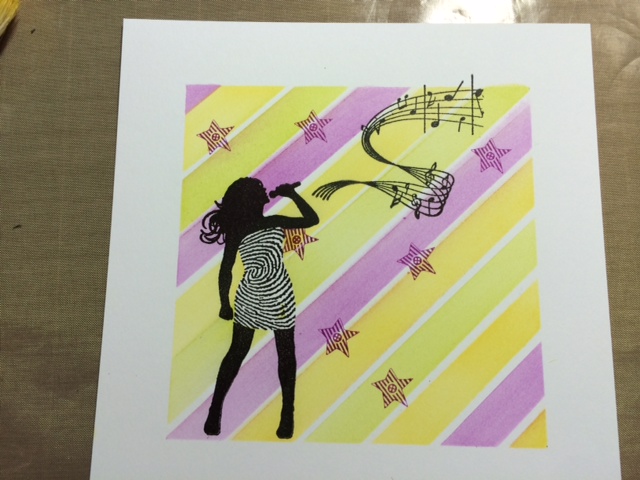
Sing With Stripes!


 Morning!  Well, I got so engrossed with this one I completely lost track of time, the kids dinner, the dogs dinner, the cats dinner - have you ever been there - it's a wonderful place!!!!!!

I was inspired to make this card for the Cards In Envy latest challenge "Stripes".

I remembered to take photo's of this technique as I went along (that's good for me!) so that I could explain what I've done with pictures to help you see.  Cards in Envy have to be no more than 1/4" thick so as to fit in an American Envy envelope i.e no bulk - no ribbons, buttons, excessive layering etc - so what you see here is an optical illusion and is all on ONE PIECE OF CARD with one single backing of rich plum card - I impressed myself with this one I have to admit!!!!!

Ok, here we go with my step by step:-


Firstly I stamped the Visible Image Stamp of the woman singing and some Visible Image musical notes. I masked her dress only with masking fluid. Then masked around the edge to fit her into a nice square with the notes and applied removable tape in stripes across. 

I used Momento inks with Inkylicious ink dusters to apply colour between the strips of removable tape.

Then removed the strips of tape and reapplied them over the inked areas - with me so far? This left again, white strips.

Then inked these areas too and removed all the tape and stamped some stars to jazz it up a bit.

Now I had to work on the background (I had an image in my head - just needed to sort it in my head!!!!). So I masked off the whole inner square area with a cut down masking sheet and applied the removable tape in the opposite direction - keeping up with me?

Then inked in-between the tape.

Moved the tape to cover the inked areas (as in the third photograph) and inked in-between again. Then removed all the removable tape. This picture shows the tape removed just leaving the masking sheet in place so that you can see the great reveal coming.

Ta Dah!!!!!  This made me really happy to see that it had worked well!  I rubbed off the masking fluid from the girls dress to reveal nice white stripes on her dress.


The final reveal!  To finish off and to make that centre "pop" without giving the card any depth - I edged around the centre square with a ruler and a fine liner black pen. Stamped the sentiment "sing" again from Visible Image.  Mounted the whole piece of card on to some lovely Creative Expressions Rich Plum card stock and mounted on to the 8 x 8 card.

VERY happy with that!

I would like to enter this card in to the current Cards In Envy "Stripes" challenge.

Thanks for stopping by,
Leanne x


Monday, 27 June 2016

Happy Birthday Poppy.....


Good morning!

This creation was made for the birthday of one of my daughters school friends.  My orders were for it to be bright and to include the birthday girls name "Poppy"!

So, with this in mind I set out by stamping out the letter boxes from Clarity Stamp and completing with the stamped letters inside - all from the Clarity Stamp letter box range.

I then covered each box with the stick on masks from Clarity.

Knowing the boxes were nice and covered I set to with my Inkylicious ink duster brushes and brushed on some inks (I think I've used a combination of Adirondak here and Momento inks).

Then stamped (again straight over the top of the masked off letter boxes) in onyx black Versafine some of Sheena Douglass's rubber stamps and in two of the corners.  Then to jazz things up a bit I stamped over the round circle images again using the same stamps but this time dipped in Pebeo gede mixtion relief glue - when just dry I then laid over the gede foils in different colours to give me a raised shiny foiling effect.


Removed the masks from the letter boxes and lightly dusted over them with matching colours so that part of the boxes still remained lighter than the background.

Hand drawn barbed wire around the edge and a few blue pearls on there as well left a job well done!!

Bright and included Poppy's name - happy with that!!! (and so was she yesterday when it was given to her!).

Thanks for stopping by,
Leanne x