Published Permissions

Showing posts with label stampendous. Show all posts

Tuesday, 4 April 2017

It's far better to be "we" than "me".........


Good morning!

I've popped this post on as an extra this week so that I can get it entered in to a couple of challenges.

I must admit, I got totally engrossed in this one and REALLY enjoyed it as it developed.  I have taken photo's of some of the products that I have used so I'll pop those at the end of this post but for now, I'll talk you through where my mind was going when I was doing this piece of artwork.

This is an amazing stencil from That's Crafty - loved it the minute I saw in on their website and just knew that I had to have it! So many possibilities with it....

The stencil is called "Butterfly Wings" but of course is the shape of a man and a womans face outlines so I was going to follow the theme for this months Rubber Dance colour swatch challenge which is dark brown, light blue and white - brilliant colour combination and there is an inspirational photograph to help you with your creation too.

So, I started by sponging distress ink through the main stencil which gave me two beautiful blue wings (or face outlines).  I then had to turn my thoughts in to making those wings not only symmetrical but also looking like two faces.  So, I used the Stampendous stamp called "chilling" but only used the eyes - you see, I needed a stamp with two eyes, a left and a right to make this work.

Here is the stencil.
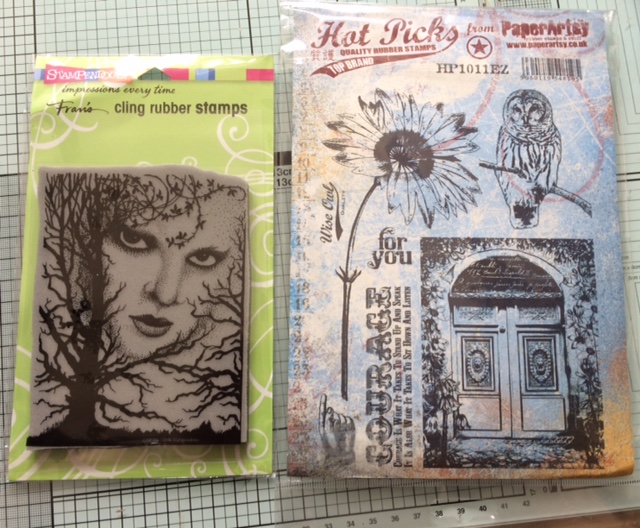


Here are the stamps used.


So, back to the artwork, the eyes were stamped on by just adding ink to the eye areas only on the Stampendous stamp and hoping that I got them in the right place and inked up correctly - not an easy thing to do!  I then stamped in distress ink (walnut stain) the flowers bending the stalk in opposite directions on each stamping and I decided to use some of this creepy looking tree branches on that stamp around the neck and chin areas of each face/wing.  I wanted to get some texture on there so I passed some structure paste through a stencil to put leaves across the faces (this was also to make the wings look more symmetrical - I didn't want to veer too much away from the fact that this is also a butterfly).  I also added eye brows by painting with the structure paste.

So, I had my main images stamped I then needed to complete the background and to fit in with The Butterfly Challenge this had to be a night sky with "R" to repeat - I have repeated the stamping of the flowers, the branches and the eyes and the stencil work on both wings to ensure the symmetry .  So I blended three different colours of distress ink from darkest at the top, to lightest at the bottom to give me a night sky and I added some stars with white gesso and then topped those with some lovely glitter.

The next task was to make those wings stand out from the background so I placed the masks of the faces back on and used a clarity brush to brush the walnut stain outwards all around the wings.

I needed the perfect sentiment for this card, as it is rather unusual! So the Sheena Douglass "It's far better to be "we" than "me" was superb - not just a single butterfly but a couple.

Now, I had a slight moment of genius I think as I came across these scissor embellishments in a drawer and I thought, if I just clip the fingers rings I could make these in to a butterfly body and stain them gold with gilding wax!

Finally I wanted to bring this design closer to the inspirational photo for Rubber Dance so I used some glue and some white glass beads on the flowers heads, and dotted some black momento ink on them, went over the black dots with a white pen to highlight and then over the top again with glossy accents to look like water droplets as in the inspirational photo.

I will also enter this in to the That's Crafty challenge "Foliage and Flowers" as it shows off their stencil superbly and another favourite of mine, good "ole" Stamping Sensations and "Anything Goes".

Mat and layered in white and navy.


I was pleased with this artwork, very different but very me!

I hope that you have enjoyed how I got there with this piece, I did it over two days.

Thanks for stopping by, I'll pop my next post on Friday as usual for you,
Leanne xx

I would like to enter this in to The Butterfly Challenge:-

Rubber Dance - colour swatch and inspiration photo challenge, dark brown, light blue and white:-

Stamping Sensations - Anything Goes:-

That's Crafty "Foliage and Flowers":-


Wednesday, 29 March 2017

On Mother's Day Mum - This time it was to my Mum!


Good morning!

Here I am with my second make for Mothering Sunday - this time it's the card that I made for my Mum!

This card came together really well, I started with an A4 piece of Sheena Stamping card that I had coloured with distress inks and some Archival re-inkers.  Due to the card stock being very porous though, the re-inkers didn't travel, they just sank straight in to the card leaving splodges of colour in places. I then cut this A4 sheet in to a 6 x 6 inch square (to work on) and two smaller pieces that you can see that I have used in my mats and layers behind.

Ok, now the main image was stamped (Stampendous - Classic Roses).  This was stamped in blue Versafine ink and then painted in with some Distress Ink and finished off with some chalk paint. 

Some stencils were used next with some Distress Ink and then a couple of other stencils with some clear embossing paste so that they didn't detract anything from that main image.

As with the Mother's Day card on Monday, I have used the Clarity Stamp alphabet stamps for the sentiments.  This time I stamped them on to vellum and set with clear embossing powder again.

An organza bow and some mats and layers to the main artwork and then I just added a mat to that backing piece as well.


Took this photo to show you the lovely glisten of the clear embossing paste.


So here was the card that I made from me and James .........


....... and here is the card that went to Nan from my daughter Katie! - now this is VERY UP MY MOTHER'S STREET!!!!!!! This is of course with one of my all time favourite craft manufacturers - Sheena Douglass stamps and stencil.

Needless to say, she loved them both !!!!!

Hope you've enjoyed my Mother's Day makes over this post and on Monday.

Thanks for stopping by,
Leanne xxxx


Monday, 11 July 2016

May A Gentle Breeze Blow Your Way........


Morning! Had great fun making this card, lots of different stages and I've given you a step - by - step of how I got there!

I was inspired by the My Time To Craft Challenge Blog to do a triple stamped card and it just developed from there really - found myself once again in that little world where time forgot me, forgot the dinner, forgot the dogs..........!!!!!!

I started by cutting my three pieces of white card stock and then sponged on to all three Momento Bamboo Leaves and Pear Tart (wonderful colours).

I attached all three layers together using removable tape at the back.

With Archival Watering Can ink pad I stamped the face from Stampers Anonymous Classics SCF005 across all three layers and the bird from the Stampers Anonymous Bird Feather CMS180 set. I stamped the bird again and made a mask of it and covered it over.

Masking fluid was painted over the eyes, nose and mouth of the face and the Stampendous Tree Poem was stamped straight over the top of the face, then the masking fluid rubbed away to show the clear eyes, nose and mouth. A few birds were also stamped around the large bird and an Inkylicious sentiment of "May a gentle breeze blow your way and bring with it a Special Day" was added.


I made a further mask and covered the whole face (as you can see, it has been used before!) and added some colour box white circles with a round applicator tool.


Removed all the masks and added some charcoal pencil to the circles for depth.


Separated the layers (looks a bit different now!!! - don't panic at this stage!!!!).


Mounted each layer on a piece of dark green card stock and attached with mounting foam for dimension. Wrapped some seam binding ribbon around the middle layer and attached a ribbon bow.


Happy with that!  Came together very nicely indeed!

Thanks for stopping by,

I'd like to enter this card in to the following challenges:-

My Time To Craft Challenge - Triple Stamping
Country View Challenges - Have Fun With Circles
Stamping Sensations Challenge - Anything Goes with A Stamp and Ribbons.

Leanne x


Monday, 4 July 2016

Phantom of the Opera Theme........In Dreams He Came........

Morning!!!  This is a card that I made for my daughters birthday.  Last year she won a major school singing competition (music theatre) having sang the theme from Phantom of the Opera - a superb evening and so I set to on a birthday with this theme!

Now, thinking back I knew that it had to be dark and very classical so the background is a Stampendous stamp of a cobwebbed candelabra embossed in gold. I coloured the candles with a white gel pen. Layered on top of that is a further black mat mounted on gold mirri card which is again gold embossed with musical notes this time (this was a very old wooden mounted stamp that I had tucked away).

I tore a piece of plain copier paper with a computer generated "In Dreams He Came" on it then (swiped some gold ink across it). The reason for having In Dreams He Came on it was because her Godmother had made her a birthday cake with the opening line of "In sleep he sang to me" so I continued with the second line on my card! - are you all singing along?!!!


Right, where was I , oh yes, the card!!!!!

A stamped rose in red and green card was added and then if you look closely a bowed acetate layer was applied domed right over the top - you can just see it if you look carefully at the top.

I added a daughter stamped sentiment embossed in gold and then finished the whole thing off with phantoms' mask stuck to the acetate on the top so that it looked like it was floating there.

Hayley was thrilled with both her card and her cake (equally impressive) as was we with her singing performance along with her singing partner Richard.


A bit of a private peek but it helps explain the reason for the making of the card. It was quite a challenge but I think I got there as well as I was ever going to!

Thanks for stopping by,

Leanne xx


Tuesday, 28 June 2016

Make A Wish......


Good morning!

This is another creation done for another of my daughters school friends recently.

Ok, this started as a plain white piece of card and probably looks more complicated than it actually was!  I firstly stamped some spots on the card with perfect medium and clear embossed them so that they would resist any ink and always be there. Then I gave it a very pale blue colouring of Distress Ink all over.  Then stamped the main image -I think this is an absolutely stunning stamp!) - "La femme aux oiseaux" from Carabelle Studio.  Then wanting to lift her face slightly and having used Distress Inks, I lightly painted some water on to her face and patted the ink back off with a paper towel - perfect, brought her right out of the page!

Some further stamping of dandelion clocks of various kinds and a stamped sentiment of "Make A Wish" followed by a darker blue Distress Ink border.

Just to finish it off I sprinkled on some Stampendous frantage embossing powder straight over the top (just laid in on, not stuck on with anything at all) and heated from underneath so that I didn't blow it off of the page!

Came together really well, was happy with that and so was she!

Thanks for stopping by,
Leanne x