Published Permissions

Showing posts with label Sheena Douglass. Show all posts

Friday, 16 June 2017

The Country Life...........


Good morning!

I'm sharing a make with you this morning that I have made for a friends birthday and yes...... he is a farmer!!!!!! (It just had to have a tractor on it!!!!).

I just love this stamp set by Sheena Douglass (The Country Life set).

I have started with a square of Sheena Stamping card and I used stencil tape to mark off the area in which I wanted to work (to leave a nice clean top and bottom of card).

First thing was to stamp that lovely tractor in black archival ink.  I didn't mask it as I didn't feel that I needed to.  I then put in those hills at the back with some green Momento ink and then a blue adirondack applied with a nice soft brush for the sky.

I then took my time painting in the tractor with diluted Spectrum Noir Aqua Pens.  

Now, Philip won't mind me saying this but he's not the tidiest farmer and so I wanted this tractor to look like it was an old one, just left in the yard like a lot of his old engines are!!!!!!! So I have stamped flowers and weeds all around it looking like they are growing through it!!!! He'll know what I've done!!!!!

Finished by stamping Happy Birthday and The Country Life underneath.

Mat and layered.


I think he'll like this!

Thanks for stopping by today,
Leanne x

I would like to enter this in to the My Time To Craft Challenge of "Down on the Farm":-


Monday, 15 May 2017

Winner of Sheena's Ink-ettes silhouette challenge!


Good morning!

Just thought I'd share some good news with you all - On Sunday morning my card, (featured on this blog on Wednesday 10th May), won the Sheena's Ink-ettes Facebook challenge of Silhouettes and backgrounds - and I'm thrilled to bits!

Sheena Douglass products have long been a favourite of mine and how wonderful to have won this challenge using lots of them.

I'm even more happy because I loved this piece of artwork as it looks so like "my boys" - my two Golden Retrievers Bobbi and Lucky.

I would like to thank all the team for choosing my artwork as the winner - I'm really grateful.


Good morning everyone! Time to announce the winner of the Inky Inkette Challenge for Silhouette/Background! Thankyou to everyone who entered and believe me when I say this was no easy task with so many fantastic entries to choose from, the talent in this group is just amazing! Leanne C Harris your card was chosen as the winner! Fantastic card and a well deserved winner. We just love how you captured the playfulness of the 2 dogs and your background is ace! Congratulations! :) xx Over to Jo Oliverfor the next challenge! I cant seem to tag Leanne in this message but hope someone can :) xx

Friday, 5 May 2017

Colour Life Like A Rainbow - Published In Todays Craft Stamper Magazine!!!!!!


                              Good morning!!! Well HOW EXCITED AM I TODAY?!!!!!!!

Todays project for you is published in todays Craft Stamper Magazine on page 59.


You can obtain your copy of Craft Stamper Magazine via  www.craftstamper.com to buy subscriptions , www.mags-uk.com for single print copies or

 Digital copies from www.pocketmags.co.uk 
Thanks for stopping by,
Leanne xxxx


Saturday, 22 April 2017

Brown Paper Packages tied with Strings and Whiskers on Kittens for Fashionable Stamping Challenges.....


 Good morning!

Here I am with two inspirational pieces for our current theme over at Fashionable Stamping Challenges of "The Sound of Music" or "Your Favourite Things".


This first piece came to mind very quickly as I am a lover of brown paper at Christmastime, especially with nice bright red ribbon and perhaps a few fir cones on the top and some berries. So brown paper packages just shouted Christmas to me!  I've stamped some lovely spruce branches (Stamps by Chloe) in green and then overlaid those with some further spruce branches which have been embossed in white. The brown parcels were stamped (these were a freebee from a magazine) and then I tied the little string bows and attached all the strings to the parcels.  These parcels were simply painted in with diluted distress ink.  The background has been done using the new Tim Holtz distress oxide inks. The sentiment is also from Stamps by Chloe.

That's another Christmas card done and perfect for our theme this month!


Isn't this little puss adorable?  Here we are with my piece for "Whiskers on kittens" and you could join in with any kitten or cat stamp that you have at home or even just your favourite stamp!

I firstly stamped my kitten (which is an old wooden mounted stamp and the maker has actually rubbed off of the wooden block so I'm unsure of it's maker).

This background started off with brushos and I softened the edges with some distress ink.

I found the lovely little kitten toys on one of Sheena Douglass's stamp sets and they went perfectly with this little kitten stamp. I painted those in with diluted distress inks.

Finally I just popped a ledge in to make it look like the kitten was resting on something and poking the toy over the top.

This sentiment WHICH I LOVE is another from the Sheena Douglass stamp set.

Hope this has given you some inspiration for our current theme at Fashionable Stamping Challenges, remember, if you haven't got a stamp to match the theme exactly, it's wide open for you to use a favourite stamp or to stamp something that's your favourite thing!

Thanks for stopping by,
Leanne xx


Sunday, 9 April 2017

New Challenge at Fashionable Stamping Challenges.......


Good morning!

Well, it's a new challenge today over at Fashionable Stamping Challenges and the new challenge is my choice this time which is from one of my favourite films - The Sound Of Music.  You have the choice to follow the first verse from the theme song:-


Raindrops on roses
And whiskers on kittens
Bright copper kettles and warm woollen mittens
Brown paper packages tied up with strings

These are a few of my favorite things 

Or you can just go with "my favourite things"! - perfect!

I have gone with the choice of Raindrops on Roses!

I have used my favourite rose stamp - the everyday rose by Sheena Douglass. First by stamping the rose and masking with masking fluid and then stencilling all around it with different stencils and distress ink.

I used a mixture of Spectrum Aqua markers and diluted Distress Inks to colour my rose and it's leaves.

The magic had to come when I put those raindrops on the rose!  I have used Glossy Accents for most of the raindrops, there is also some glitter on some of them and I have ringed round a couple with a white pen to highlight. I also added a couple of rather large raindrops on to that background again with the Glossy Accents.


Here is a view taken from the side to see that texture that the droplets have on the petals.


Hope you can join in with this very happy and pleasant theme this month - PLEASE REMEMBER THAT THE MAIN FOCAL POINT OF YOUR ARTWORK MUST BE SEEN TO BE RUBBER STAMPING.

Thanks for stopping by and good luck in the challenge!

Leanne xx


Tuesday, 4 April 2017

It's far better to be "we" than "me".........


Good morning!

I've popped this post on as an extra this week so that I can get it entered in to a couple of challenges.

I must admit, I got totally engrossed in this one and REALLY enjoyed it as it developed.  I have taken photo's of some of the products that I have used so I'll pop those at the end of this post but for now, I'll talk you through where my mind was going when I was doing this piece of artwork.

This is an amazing stencil from That's Crafty - loved it the minute I saw in on their website and just knew that I had to have it! So many possibilities with it....

The stencil is called "Butterfly Wings" but of course is the shape of a man and a womans face outlines so I was going to follow the theme for this months Rubber Dance colour swatch challenge which is dark brown, light blue and white - brilliant colour combination and there is an inspirational photograph to help you with your creation too.

So, I started by sponging distress ink through the main stencil which gave me two beautiful blue wings (or face outlines).  I then had to turn my thoughts in to making those wings not only symmetrical but also looking like two faces.  So, I used the Stampendous stamp called "chilling" but only used the eyes - you see, I needed a stamp with two eyes, a left and a right to make this work.

Here is the stencil.


Here are the stamps used.


So, back to the artwork, the eyes were stamped on by just adding ink to the eye areas only on the Stampendous stamp and hoping that I got them in the right place and inked up correctly - not an easy thing to do!  I then stamped in distress ink (walnut stain) the flowers bending the stalk in opposite directions on each stamping and I decided to use some of this creepy looking tree branches on that stamp around the neck and chin areas of each face/wing.  I wanted to get some texture on there so I passed some structure paste through a stencil to put leaves across the faces (this was also to make the wings look more symmetrical - I didn't want to veer too much away from the fact that this is also a butterfly).  I also added eye brows by painting with the structure paste.

So, I had my main images stamped I then needed to complete the background and to fit in with The Butterfly Challenge this had to be a night sky with "R" to repeat - I have repeated the stamping of the flowers, the branches and the eyes and the stencil work on both wings to ensure the symmetry .  So I blended three different colours of distress ink from darkest at the top, to lightest at the bottom to give me a night sky and I added some stars with white gesso and then topped those with some lovely glitter.

The next task was to make those wings stand out from the background so I placed the masks of the faces back on and used a clarity brush to brush the walnut stain outwards all around the wings.

I needed the perfect sentiment for this card, as it is rather unusual! So the Sheena Douglass "It's far better to be "we" than "me" was superb - not just a single butterfly but a couple.

Now, I had a slight moment of genius I think as I came across these scissor embellishments in a drawer and I thought, if I just clip the fingers rings I could make these in to a butterfly body and stain them gold with gilding wax!

Finally I wanted to bring this design closer to the inspirational photo for Rubber Dance so I used some glue and some white glass beads on the flowers heads, and dotted some black momento ink on them, went over the black dots with a white pen to highlight and then over the top again with glossy accents to look like water droplets as in the inspirational photo.

I will also enter this in to the That's Crafty challenge "Foliage and Flowers" as it shows off their stencil superbly and another favourite of mine, good "ole" Stamping Sensations and "Anything Goes".

Mat and layered in white and navy.


I was pleased with this artwork, very different but very me!

I hope that you have enjoyed how I got there with this piece, I did it over two days.

Thanks for stopping by, I'll pop my next post on Friday as usual for you,
Leanne xx

I would like to enter this in to The Butterfly Challenge:-

Rubber Dance - colour swatch and inspiration photo challenge, dark brown, light blue and white:-

Stamping Sensations - Anything Goes:-

That's Crafty "Foliage and Flowers":-


Monday, 3 April 2017

For You...........Fly HIGH.


Good morning!

Well, this one kept me busy! Lots of interest and certainly lots of colour going on here!!

This is my efforts for the Stamps and Stencils challenge theme of "Chirpy Chirpy Cheep Cheep!".  I don't do "cutie" cards and I like to bring my art right in to my work so I've taken lots of photo's along the way with this one so lets take our journey and see just how I got there with this one - hold on tight it's quite a long journey today!


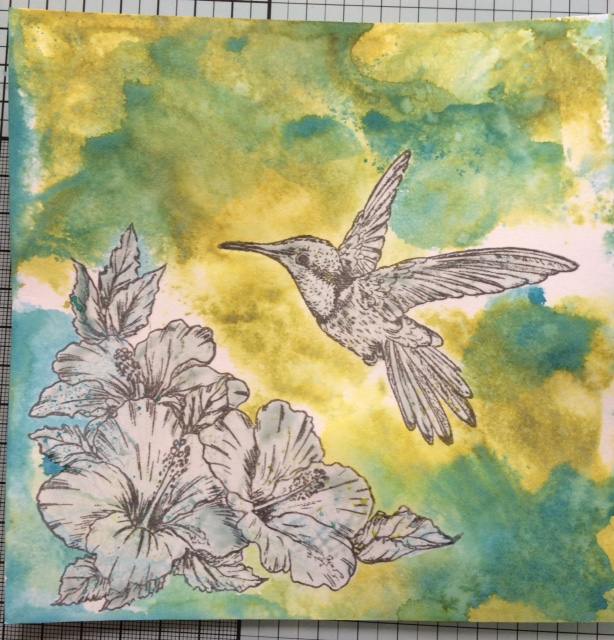
OK, we start with a piece of Bockingford hot pressed card stock (BRILLIANT STUFF). I've stamped the image of the hibiscus flowers and the hummingbird (both by Sheena Douglass) in Archival watering can.


Here I have just covered the stamped images with Pebeo Drawing Gum to mask them off.


A new discovery for me and a new purchase - the new Distress Oxide ink pads! - They are fantastic! They allow you to continue to layer up one colour on top of the other without creating "mud".  You must allow each colour layer to dry though before applying the next layer of colour.  Water must be used to obtain the best effects too.

Here I have smooshed the ink pad on to my glass mat and spritzed with water and then dabbed my card stock in to the colour, sprayed again with water from a spritzer bottle and then heat set with my heat gun. All will become clearer so don't panic!


Woo hooo! Look at this coming!!!! Here comes another colour, this is peeled paint on the first layer and then I have done exactly the same as before but used broken china.  Smooshed the ink pad on the glass mat, spritzed with water and then wiped the card stock in to it - instead of blending in to the peeled paint, it sits on the top of it.  Spray with water and then heat set again with the heat gun.


Exactly the same done again, this time I've used fossilised amber.


OK, with the background set I then went in with some Sheena Douglass stencils and the normal peeled paint distress ink.  I have also stamped the sentiment here too in black archival.


Hibiscus coloured in with spiced marmalade normal distress ink diluted and then I have used a sparkle pen to enhance the centres of the flowers.  The hummingbird has also started to be coloured in using the lovely sparkle pens.


That's got it!  Glossy Accents went over the hummingbird but to bring those wings to life a bit more I have walked a cocktail stick through the Glossy Accents with a couple of shades of drawing ink on it. Some Nuvo drops have also been applied to the stamens and highlights to the sentiments. Some darker leaves were also stencilled on.


Look at that bird glow!

A further two Hibiscus flowers from another set of Sheena Douglass stamps were cut out and coloured in the same way and applied to give depth.


There, told you it was a bit of a long tutorial today! Well, we got there safely and I do hope that you enjoyed the journey.  Nice and bright and jolly.

I would like to enter this in to the Stamps and Stencils challenge "Chirpy, Chirpy, Cheep, Cheep":-

Hope you've enjoyed your visit today,
Thanks for stopping by,
Leanne xx


Wednesday, 29 March 2017

On Mother's Day Mum - This time it was to my Mum!


Good morning!

Here I am with my second make for Mothering Sunday - this time it's the card that I made for my Mum!

This card came together really well, I started with an A4 piece of Sheena Stamping card that I had coloured with distress inks and some Archival re-inkers.  Due to the card stock being very porous though, the re-inkers didn't travel, they just sank straight in to the card leaving splodges of colour in places. I then cut this A4 sheet in to a 6 x 6 inch square (to work on) and two smaller pieces that you can see that I have used in my mats and layers behind.

Ok, now the main image was stamped (Stampendous - Classic Roses).  This was stamped in blue Versafine ink and then painted in with some Distress Ink and finished off with some chalk paint. 

Some stencils were used next with some Distress Ink and then a couple of other stencils with some clear embossing paste so that they didn't detract anything from that main image.

As with the Mother's Day card on Monday, I have used the Clarity Stamp alphabet stamps for the sentiments.  This time I stamped them on to vellum and set with clear embossing powder again.

An organza bow and some mats and layers to the main artwork and then I just added a mat to that backing piece as well.


Took this photo to show you the lovely glisten of the clear embossing paste.


So here was the card that I made from me and James .........


....... and here is the card that went to Nan from my daughter Katie! - now this is VERY UP MY MOTHER'S STREET!!!!!!! This is of course with one of my all time favourite craft manufacturers - Sheena Douglass stamps and stencil.

Needless to say, she loved them both !!!!!

Hope you've enjoyed my Mother's Day makes over this post and on Monday.

Thanks for stopping by,
Leanne xxxx


Tuesday, 14 March 2017

Flowers Whisper What Words Cannot Say............


Good morning!

I've created this card using watercolour pencils - had a whole lot of fun so lets see how I got there....

Spring is in the air don't you think?!!!


Instead of taking photo's along the way I've taken one of how I get there with watercolour pencils - and I'll explain!

I first marked out my square which in this case is 7 x 7 inches in pencil. I am working on a watercolour block pad (the pages are sealed to help with minimal movement of the paper).

Now, to get that wonderful light background I have actually used three colours of Inktense watercolour pencils and have shaved off some of the pencil tips using a craft knife.  You don't need that much of the pencil tip shavings to create your lovely "loose" background.  So, once you've got your shavings on there just spritz gently with water and see it move!

I stamped my image (Sheena Douglass Magnolia stamp) first of course and have then gone in with the pencils with the three colours from the challenge swatch.  The joy of having such a lovely watercolour pad and the large page size is that you can always use the rest of the page as your testing palette.  Here you can see how I experimented with the pencils and tried them out first before putting them on the actual design.

The sentiment (which I think was a Justrite one) has been stamped using Spectrum Aqua Markers direct to the stamp, spritzed gently and then stamped - it gives you this lovely watercolour effect to the sentiment.

I have added some flowers that also came in the same Sheena Douglass Magnolia stamp set - again, you can see how I've tested those on the page before going direct to the artwork.

When I was happy with the water colouring, I added Glossy Accents to the petals of the flowers.


You can see the Glossy Accents a bit closer here.


Matted and layered on to two mats which have been coloured with Spectrum Aqua Markers in matching colours. Oh, and I doodled some of my own designs on there too!!!!

I thought this shouted Spring or even Easter?

Hope you like this one and particularly how I work with watercolours and test before adding to the final result.

Thanks for stopping by today,
Leanne xx

I would like to enter this in to the following challenges:-

Rubber Dance March Colour Challenge:-

Artistic Stamper - Springtime:-

The Flower Challenge - Anything Goes:-

Stamplorations - Sketch and Stamp - Stamps and Spring:-


Monday, 27 February 2017

Five Christmas cards for February!!


Good morning to you!

Well, keeping with my New Years Resolution of 5 Christmas cards a month - as promised, here is February's offering!

Now, although each of these cards is slightly different, in order for me to churn out five cards each month they do have to be pretty much a batch make so I'm happy that although they are very similar, each one is very slightly different.

I can't really do a step by step covering all five cards so I've taken individual photo's for you of each of them below:-


The adorable little robin on his branch and the sentiment are by Sheena Douglass and I've added some snow on to that branch for him to sit in. All cards have been coloured with the help of Aqua Markers and distress ink and matted and layered in various coordinating coloured card stock.

There, that's 10 done now - Month 2 - mission complete!!!

I'll be back towards the end of next month with my offering of Christmas card makes for March.

Thanks for stopping by,
Leanne x


Friday, 17 February 2017

What a bloke!


Good morning!

Well, this is the card that I made for my husband James for Valentine's Day.  I haven't got a step by step on this one so I'll talk you through how I got there.....

I started with my Sheena stamping card and used a heart stencil that had an "inney" and an "outey" section.  I popped the outey section on the card first and smoothed distress ink around that heart so that I knew where I was starting and where I was heading!

Having placed the inney part of the stencil over the heart to mask it, I laid down some distress ink all around it from reds, light brown and orange. Keeping that inney part of the stencil firmly on that heart I stamped my Sheena Douglass Everyday Rose stamp over the top and the small hearts that you see in the top right hand corner.  I also stamped the same hearts in white colorbox ink in the top left hand corner so that they would show over that lovely rich red.

Next, I removed the stencil from the heart and using normal household bleach I took some of the colour out of the roses.  

The outer part of the stencil went back on and I enriched the red within the heart.

When I was happy with the colours I stamped the man and the sentiments (both Sheena Douglass) in versafine black onyx - a great stamp!- love it!

I stamped "My Husband, My Valentine" (Clarity Stamp alphabet) on to parchment paper in versafine ink and set it by adding clear embossing powder then attached to the card.

Mat and layered.


I was pleased with this one and James seemed to be too!

Hope you like it.

I would like to enter this in to the Cards In Envy challenge of "Be My Valentine":-

Artistic Stamper - "Love Hearts":-
Thanks for stopping by today,
Leanne xx


Monday, 30 January 2017

Birthday Wishes (with a 60's twist!)....


Good morning!

Well how is this to make you smile first thing in the morning!

Loved making this card for a friend of my daughter Katie. I appreciate it was made for a 16 year old and I have used some of Sheena Douglass' Groovin 60's stamps but hey, it's a "boppy" card so boogie on down!!!!

I must admit to being rather bad at remembering to take photo's as I go along recently but I'll talk you through it as always. I get so engrossed in what I am doing, taking photo's doesn't enter my head - well, not until I've finished that is!!!!

OK, this card started with me sponging some pumice stone distress ink through lace (I love using lace!).  Then I used a Sheena Douglass stencil from her Groovin 60's range and sponged some picked raspberry through it.  

Flowers were stamped in the grey and pink again from Sheena's Groovin 60's range. I decided to use some wow embossing glitter with some of the flowers to give it a sparkle.

Then came the girls dancing stamp - a great stamp and I've used versafine grey ink here to stamp it.  I wanted it to be a bit of a disco atmosphere so was happy for the colours of the flowers and stencils and lace to show through them a bit as they were silhouetted on there.

Used matching stamps to decorate the actual card base and stamped the sentiment twice on the card and once on the actual image.

I love these new stamps by Sheena Douglass and I do stress that I am too young to remember the 60's!!!!! (I'm a 70's baby!!!!!) but I just love the era and all that it brings.


A nice bit of fun today!

Hope you like what you've seen today and thanks for stopping by,

I would like to enter this card in to the Cards In Envy challenge of "Pink and Gray":-

Leanne xx


Monday, 16 January 2017

Memories are our own Time Machine............


Good morning!

I have made this card for a friends birthday next month - had a good play with another of Sheena Douglass' Time Traveller stamp collection.  Forgot to take photo's for this one so I'll explain how I got there.

Started off with a piece of watercolour paper and used Aqua Tints to lay down the background colour.  Stamped the Time Machine but wasn't happy with how much ink I got down on to the paper (it's harder to lay down the ink from the stamp on to watercolour paper, often because of texture and fibres in the paper).  So I knew I had to enhance the stamped image myself (which is great fun).  I have used a combination of Inktense watercolour pencils and Spectrum illustrator markers on the Time Machine.  I couldn't make my mind up if I wanted it travelling over water or clouds so I went for a water look but to me it could still be clouds!!!!?

Finished with a nice big stencil - a big whirl as it travels in time!

Mat and layered.

I think he'll like that!

Thanks for stopping by,

Leanne xx