Published Permissions

Showing posts with label sparkle pens. Show all posts

Thursday, 21 December 2017

My Soul Is In The Sky..............


Good morning!

I'm sharing a creation that I made for inspiration for the Sheena's Inkettes challenge this month of "all creatures great and small".

I have used my favourite stamp - the Eagle - from the Call of the Wild set and the foliage and twigs are stamps from the very recent set of fairy stamps by Donna Ratcliffe. I have also die cut some of the feathers from the Call of the Wild set too.

I started this one by using my Vintage Hues sparkle pens to create that big swirl of a background and dried it with my heat tool.  Then the eagle went on and I have lifted a little bit of colour back out of him.  I then added a couple of different tones to the feathers and added colour to the beak and eye area and finished with a touch of white pen to enhance.  When I was happy with the eagle, I added the foliage and lifted colour from those leaves too. Added the sentiment with gold embossing powder and mat and layered up popping some feathers between the mats.

Great fun and very messy fingers as always!!!!

Thanks for stopping by today,
Leanne xxxxx

Saturday, 8 July 2017

Dance............Like no one's watching...............


Good morning!

Well, I'm still on my holly bobs but I've made this card in advance so that I can share it with my Visible Image Facebook friends while I'm away.

I decided to focus on the Born To Perform stamp set this time.

I firstly got the image of the face down using the Face Shape stencil and mask set.  I went around the outside of the face and then worked on the shading of the inside of the face.

Then the first major move was to stamp the beautiful ballerina.  I have stamped this piece using Spectrum aqua markers throughout.  I then masked her with a mask it sheet and stamped the face (Face It! set) - this time keeping those eyes closed (like no one's watching).

I have used feathers (large and small) from the Free Your Imagination Set again using aqua markers to stamp those images.  I love to see feathers with ballerinas, I think the two go together, perhaps because they are light, perhaps because they are dreamy?  So feathers it was to enclose that face and give balance.

I added some frantage to the feathers and some very pale pink embossing powder too.  I have also painted in her costume with a clear overlay pen -you can see this all glistening here:


Hard to pick up on a photo but it's shining!

I finished by just defining her front leg a little with a fine tip pen and the curve of her back.

Mat and layered in black and white and on the white layer I have stamped "Dance" and blended some distress ink on that mat to match the general colour scheme.


I enjoyed this one, - well, I always do enjoy playing with Visible Image stamps!

Hope you've enjoyed your visit today,
Thanks for stopping by,
Leanne xxx


I shall share this with the Visible Image family on Facebook.

I shall enter this in to the following challenges:-

That's Crafty "Anything Goes":-


Monday, 1 May 2017

Imagine the possibilities........


Good morning!

Here is my entry for the current Chocolate Baroque colour swatch challenge:-

My teal blue is coming out rather blue on the photograph but it is indeed the same teal blue as the sky is but the light is making it lighter!!!!!!

I have used Spectrum Noir Sparkle Pens for this project to make the lovely blended background here.  I then stamped Katya right in the middle and lifted out some colour from her face and her head dress with water.

The silhouette palace 1 stencil was used at the bottom and I sponged some Momento red ink through this and shaded it a bit darker with a Momento brown ink pad.

The sun/moon and clouds have been produced using water again and lifting some of that ink and covering the sun/moon with some of the lifted ink so it gives you that lovely positive/negative effect.

The sentiment is from the Chocolate Baroque words of inspiration stamp set and the little birds are from the serenity set

I finished off by adding some white pen dots around the head dress to pop it a bit and I was very happy with this.  

The example of the challenge swatch made me think of a calmness with a dreamy feeling and so, this is what I tried to produce with the Chocolate Baroque products that I have and the colours for the swatch.

Hope you like what you've seen here today and have enjoyed your visit.

I would like to enter this in to the Chocolate Baroque challenge 34 colour swatch challenge:-

Thanks for stopping by,
Leanne xx

Monday, 3 April 2017

For You...........Fly HIGH.


Good morning!

Well, this one kept me busy! Lots of interest and certainly lots of colour going on here!!

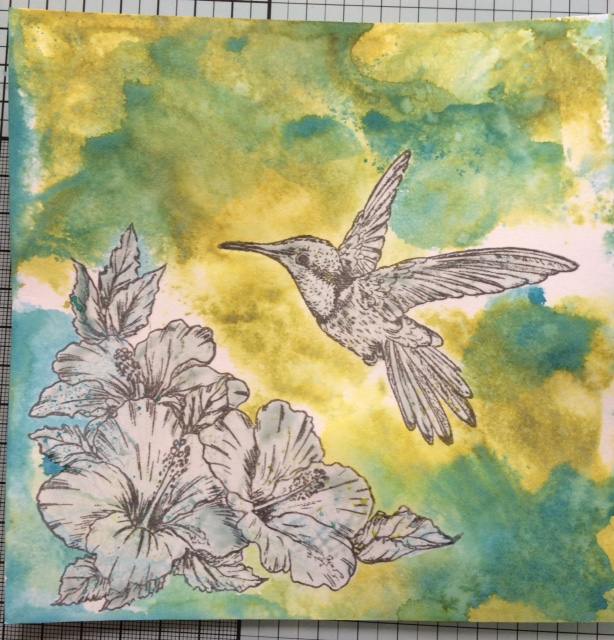
This is my efforts for the Stamps and Stencils challenge theme of "Chirpy Chirpy Cheep Cheep!".  I don't do "cutie" cards and I like to bring my art right in to my work so I've taken lots of photo's along the way with this one so lets take our journey and see just how I got there with this one - hold on tight it's quite a long journey today!


OK, we start with a piece of Bockingford hot pressed card stock (BRILLIANT STUFF). I've stamped the image of the hibiscus flowers and the hummingbird (both by Sheena Douglass) in Archival watering can.


Here I have just covered the stamped images with Pebeo Drawing Gum to mask them off.


A new discovery for me and a new purchase - the new Distress Oxide ink pads! - They are fantastic! They allow you to continue to layer up one colour on top of the other without creating "mud".  You must allow each colour layer to dry though before applying the next layer of colour.  Water must be used to obtain the best effects too.

Here I have smooshed the ink pad on to my glass mat and spritzed with water and then dabbed my card stock in to the colour, sprayed again with water from a spritzer bottle and then heat set with my heat gun. All will become clearer so don't panic!


Woo hooo! Look at this coming!!!! Here comes another colour, this is peeled paint on the first layer and then I have done exactly the same as before but used broken china.  Smooshed the ink pad on the glass mat, spritzed with water and then wiped the card stock in to it - instead of blending in to the peeled paint, it sits on the top of it.  Spray with water and then heat set again with the heat gun.


Exactly the same done again, this time I've used fossilised amber.


OK, with the background set I then went in with some Sheena Douglass stencils and the normal peeled paint distress ink.  I have also stamped the sentiment here too in black archival.


Hibiscus coloured in with spiced marmalade normal distress ink diluted and then I have used a sparkle pen to enhance the centres of the flowers.  The hummingbird has also started to be coloured in using the lovely sparkle pens.


That's got it!  Glossy Accents went over the hummingbird but to bring those wings to life a bit more I have walked a cocktail stick through the Glossy Accents with a couple of shades of drawing ink on it. Some Nuvo drops have also been applied to the stamens and highlights to the sentiments. Some darker leaves were also stencilled on.


Look at that bird glow!

A further two Hibiscus flowers from another set of Sheena Douglass stamps were cut out and coloured in the same way and applied to give depth.


There, told you it was a bit of a long tutorial today! Well, we got there safely and I do hope that you enjoyed the journey.  Nice and bright and jolly.

I would like to enter this in to the Stamps and Stencils challenge "Chirpy, Chirpy, Cheep, Cheep":-

Hope you've enjoyed your visit today,
Thanks for stopping by,
Leanne xx


Monday, 23 January 2017

Five Christmas Cards for January!!!!!!!


Good morning!

Look at me!!! I'm off to a wonderful start with my new years resolution of 5 Christmas cards a month for 2017!!!!

As promised, I will share on one blog each month my 5 Christmas cards for each month and here we are with January's makes.

I haven't got a step by step on these but I have taken individual photo's of each one for you so that you get a closer look at each of them.

Each card being slightly different I shall try to explain the basics to these.  

I have really enjoyed playing with lace through 2016 so I thought it would be super to start my Christmas card adventure using some lace - not very Christmassy? - that depends on how you use it! I believe that most things can become Christmassy if you put your mind to it!

These cards started with a piece of lace being placed over my Sheena Stamping card and sponging through some distress ink.  I didn't stick the lace down, if you are careful you can just hold it and dab gently for a lovely loose effect.  I then used a Woodware poinsettia stamp, some of these are stamped with Archival watering can and others have been embossed with clear embossing powder over it (where I was going to use water colour within the image). I have added some foliage from Clarity Stamp too.

The sentiment is from Clarity Stamp.

OK, let me see if I can tell you one by one how I've coloured the Poinsettias:-


Water coloured with Inktense pencils and die cut into and layered on a fibre mat. Finished with sparkle pens.


Intense pencils here but using them as colouring pencils without water this time and matted on to plain card stock, finished with sparkle pens.


Inktense water colour pencils here and die cut into with bright red mat.  Finished with sparkle pens.


Inktense water colour pencils, bright red mat, no die cutting this time and finished with sparkle pens.


Oh yes, my favourite! Good old Polychromo pencils, look at the intensity of colour that builds up here.  Matted on to a fibre mat and finished with sparkle pens.


I know that the sparkle pens can't be seen on the photo's but look - a super close up shot - it's there..... honest!!!!!


So, there you go, month 1 - mission complete!

Thanks for stopping by,
Leanne xx