Published Permissions

Showing posts with label Die Cuts. Show all posts

Friday, 2 June 2017

Thinking of you.............


Good morning!

Well, I've been having a play with my Crafty Individual stamps and this card is part tribute to my wonderful blogland friend Sandra (who became one of the Crafty Individuals design team members this week) and part entry in to the My Time To Craft current sketch theme challenge.

I have to admit that I have had a new phone this week and I'm still trying to get used to it and the camera on it is very sensitive so bear with me!!!!

Right, so, the sketch that I had to follow was


but you know me, I can't just follow that sketch, that wouldn't be enough for me! No, I had to turn that sketch in to something else!!!!!

So, I started with a piece of square Sheena stamping card and a die cut circle of the same card - both white.

I attached the circle to the square with some repositionable spray adhesive so that I could work straight over the top of both pieces.

I stamped the beautiful house and then extended the wall at either side of it in sepia versafine ink, then covered it in drawing gum.


I then used a clarity stamp brush and blended some green dye ink down across the front of the scene. Next was the sky, which I have used an adirondack stonewashed ink pad and an Inkylicious stencil to colour the sky and form those lovely clouds.  A sun/moon mask had been added and once that was removed I coloured the sun in with a make up sponge and yellow dye ink.

The next step was to add the extra trees in the background, straight over the top of the drawing ink and then I rubbed that drawing ink away. I then water coloured everything in using diluted dye ink pads and stamped the grasses/flowers right at the front of the scene in green dye ink, first and second generation stamping.

I then stamped the grasses on the right hand side (three grasses have been stamped) to match the sketch.

At this point of course, the circle of card was still attached to the back square but now they had to part company.

I used a Tattered Lace circle die to cut the lovely decorative black circle so that I could back the artwork and mounted these on to foam pads to raise it away from the rest of the scene, being careful to ensure that everything lined up (sorry, can't get that to show greatly on a photo!).

I then added the flowers on the left to match the My Time To Craft sketch and I added the butterfly - just because I could really and I thought that it balanced the piece beautifully!

I stamped "Thinking of You" in the centre and then added the text box with "With Love" to also match the sketch.

Mat and layered on white and black mats.

Well, hope you've enjoyed your visit today, I don't often do detailed scenes but I really enjoy it when I do!

A message for Sandra - well done you!

Thanks for stopping by,
Leanne x

I would like to enter this in to the My Time To Craft challenge of Sketchy Time:-


Sunday, 12 February 2017

It's just a number!


Good morning!

It's a new challenge over at Fashionable Stamping Challenges today and the theme is "It's just a number".

REMEMBER - YOUR MAIN FOCAL IMAGE MUST BE A HAND STAMPED IMAGE PLEASE - NO DIGI STAMPS.

OK, my artwork for this theme was started a few months ago on the train to see my daughter up at Durham University!  I took a couple of pieces of artwork to do on the train and the journey went so quickly - it was wonderful!

This stamp is a favourite of mine from Chocolate Baroque.  


Now, I didn't take many photo's (due to being on a train at the time!) so this was as far as I got on the train when I got it home to finish it off! I have done a simple wash of distress ink for the background and have carefully coloured the flowers in with spectrum aqua markers and a water brush.


It was then a case of adding numbers from 30 to 100 (all the "biggies") on to the flowers and using die cut numbers for the mat at the back.  I have stencilled through the negative from having cut out the die cut numbers for the backing card for the sentiment of "It's Just A Number" and on the main background - it's easy to create your own stencils with the negative from your die cuts!.  

I felt I just had to add "Happy Umpteenth Birthday" on there too!

There, a card suitable for any birthday from 30 - 100!!! and as I have said -

"It's just a number!!!!"

Remember, we would love to see your artwork over at Fashionable Stamping Challenges but the main focus of your artwork must be a hand stamped image, we do not accept digital images on this challenge.  We look forward to your creativity and sharing your artwork with us! Good luck!

Thanks for stopping by,
Leanne xx


Friday, 13 January 2017

Take time for all things.........


Good morning!

Thanks for popping in.  I have been having a play with a new Sheena Douglass stamp from her Time Traveller collection.  A whopper of a stamp but stamps beautifully.  I've done a step by step on this one so shall we take a crafty journey today? - Come with me.....


I started with a watercolour block pad (love a professional pad where the edges of the paper are sealed - the paper can't move no matter how much water to throw at it!).  I pencilled in a 7 x 7 square - this just gives me a loose idea of where I am with my design.

OK, I got out my Aqua Tints this time, three colours and using plenty of water, blended them as I went down the page and allowed this to dry naturally so that I didn't lose any of the colour tones.

I then stamped my man using a rocker block (it's such a big stamp, I find a rocker block helps).  I then lifted some colour back off of his face with water.


So, using the same Aqua Tint colours as the background, I enhanced his features slightly, and his hair and brought in a little chalk paint to highlight his face.


I have now added some background detail with an Andy Skinner stencil and used the chalk paints to enhance a  leaf Clarity Stamp stencil. (If you are wondering what on earth is going on in the bottom right hand corner - this is simply where I've used the wet chalk paints on the watercolour paper as a palette but to avoid putting my arm in the wet paint, I simply cut it away! What you can see is a scrap piece of paper to stop me marking the rest of the watercolour pad beneath this one!).


There we go - finished with a Sheena Douglass die cut of a pocket watch and chain.

Mat and layered.

I wanted to bring his face right out of the page and I think I achieved this - pleased with this one!

I would like to enter this in to the Stamping Sensations challenge "Coffee and cream":-

Thanks for stopping by.

Leanne xx


Wednesday, 11 January 2017

Let it snow.......


Good morning!!

Well, I don't think it hurts any of us to go a little bit out of our comfort zone occasionally and try something different that is not our "normal thing" and this was most certainly not my normal thing!!!!!

We know that I love ink, paints, stamping and splatter and this couldn't be further from it!!!

I saw this challenge over at Time Out Challenges with their theme of "Winter with a twist of white on white".  I could have just passed it by but something stayed in my mind and got me thinking about this one, perhaps because it's so far from what I normally do? I enjoy a challenge and I very much enjoy what I do so I thought, you know what, let's do it!  

Well, my usual stamping wasn't going to happen as I just couldn't think of how I could show anything up with the twist of white on white so I opted for die cutting.  You will see from the blog that die cutting does come in to my crafting but usually as an embellishment of some sort or another but this one had to be completely die cutting for me to stand a chance of seeing it on the camera!

So, a pretty straight forward line up really, I started by tearing two pieces of white card stock to layer right at the back to give a bit of depth. I then hand embossed some wavy lines to add a feature to the bottom of the card.  I tucked in the beautiful Christmas Tree (Tattered Lace) between the two layers.  I then cut the three lovely deer and snow flakes (all Sue Wilson Dies). So, once I had the dies all cut I knew I had to stamp the sentiment (the only form of colour that the challenge would allow) so that I knew where to build up from.  I then set about layering everything up with glue and 3D glue gel for dimension.

I added some glue here and there and covered with white glitter dust.

Matted and layered on three white mats.

What a pretty card, hey, that's a Christmas card done for next Christmas already - a great start!!!!

I would like to enter this in to the Time Out Challenges "Winter with a twist of white on white":-

Thanks for stopping by,
Leanne xxx


Friday, 16 December 2016

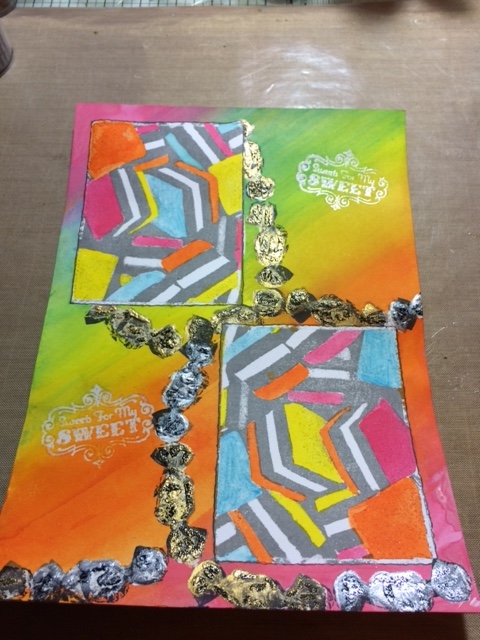
Sweets For My Sweet......


Good morning!

Right, well, I've been having a play with some Darkroom Door stamps for a challenge over at Cards in Envy that I wanted to join in with "Wouldn't that be sweet" - well is this bright enough for you!!!!?

Personally I can't stand Liquorice Allsorts but boy, does this look jolly!

I have done a step by step so you'll be able to see how I got there so lets take our usual journey :-


OK, I started with my blank piece of card and stamped the Allsorts image twice in two different directions. I also stamps some sweeties (also from the same Darkroom Door stamp set).  I also clear embossed the sentiment "Sweets For My Sweet" twice (but you'll notice that I wasn't happy with it twice so I changed that towards the end!). You can see that I have also covered all the images with masking fluid at this stage.


Lots of colour going on now! - and it went all over me and no, I wasn't wearing an apron!
So, I used Aquatints for the background and went straight over the masked off images.  Once happy, I rubbed away all the masking fluid and using the same aquatints, I coloured in the Allsorts and used some Decoart metallic paints to colour in the sweeties. The sweeties were then embossed using either gold or silver embossing powder to give them some depth.  The clear embossed sentiments resisted the Aquatints and popped through.  


I have restamped Staz On ink and the sweetie stamp straight over the top of the sweets - this was experimental to see if I could make them look like they were in cello wrappers and it worked a treat!


Now it was coming together -  I then had to make the Liquorice Allsorts pop off the page so they were coloured in with a black alcohol pen.  I stamped the word "yum" on there too! The sweeties had some glossy accents added to make them shine like a true sweetie wrapper!


I edged around the two Liquorice Allsorts panels with a black pen and I wasn't happy with the two embossed sentiments so I restamped it in black embossing powder on to a piece of card that had been painted with two of the Aquatint colours and die cut it and attached.

Mat and layered and I was done! 

It's a very flat image from the work that I usually produce but that's the name of the game with this stamp - the challenge asked for something sweet so we got sweets!!!!

Hope you've enjoyed this bright and colourful journey - I didn't find this the easiest set of stamps to work with but the final result couldn't be more jolly!!!! (even if I don't like liquorice!!!!).....

I would like to enter this in to Cards in Envy "Wouldn't that be "sweet" card challenge":-

Thanks for stopping by,
Leanne xx


Sunday, 20 November 2016

Nan.....


Good morning!

An extra blog this week again.  This card has been made for my children to give to my mother - it's her birthday on Christmas Eve and yes, (she'll be 70 - be we won't mention numbers anymore!!!).

The card has an almost eerie feeling to it but we must remember that it is for a bang on Christmas birthday and I wanted it to be and feel angelic.

I must admit, I didn't think I would put this on the blog but was so pleased with it's outcome I changed my mind and when I saw a challenge at That's Crafty that it matched perfectly for (but by then, it's too late to think about photo's - oops!!!!!).

This card started as an old background that I had made on the gelli plate using Sheena's stamping card.  You can just about see at the bottom that it was made with the help of acrylic paints and bubble wrap!

So, firstly I stamped my angel (isn't she beautiful and graceful) - by Crafty Individuals.  (so within her you see the original piece of gelli plate painted card and how light it was at first).  I then masked her off with masking fluid.  I needed to tone down this background so I knocked the colour back with some gesso dragged down over it and let that dry.  Then toned it down again with some distress ink (I'm not sure what colour I've used, could be weathered wood?).  Then rubbed away the masking fluid.  Stamped a first generation sentiment of "love"(by Visible Image) at the bottom and a second generation at the top, stamped "Nan" and added die cut numbers.

Backed it on to some of the original gelli plate print ripped in to two strips and then on to a further mat that I have stamped some circles on using old bottle lids and white gesso and gold starlights paint.

Mat and layered with silver card stock and finished with some black glue dots.

How angelic is that! With a bit of glitter it would have been a fabulous Christmas card - no, brain off, I can't use my mums birthday card from my children for a christmas card - or can I??? - NO!!!!!!!

"Happy Birthday Nan" with lots of love from Hayley and Katie xxx

I would like to enter this card in to the That's Crafty challenge "There must be an angel":-

Thanks for stopping by,
Leanne xx

Wednesday, 16 November 2016

Seasons Greetings.....


Good morning!

An extra blog this week!  I completed a milestone a few days ago - I completed my 2016 new years resolution!!!!! (5 Christmas cards a month.....and I did it having got ahead and did Decembers five too!!!!! yay!!!!!). I will feel really good knowing that they are all done.

OK, this is one of the cards made for Christmas - I wanted a tree just like the one I have here at home at Christmastime - nice and big, fat, fluffy and bushy!!!! I took some photo's of how I got there so lets go on our usual journey shall we?


Started with my usual piece of Sheena stamping card and started to stamp the arms of my tree with a couple of different colour distress inks using a pine branch stamp by Stamps by Chloe. So as you will see, this tree started and continued to form from just one, the same one straight pine branch stamp.


Here we go! By now I have added the same stamp with white embossing powder for some of the branches.


Now I have added some stencilling to the background and some die cut ivy hanging down (ivy makes me think of Christmas as it's always evergreen and always there at Christmastime).


ooooh, looking good!!! You will notice now that I have "knocked back" the background to bring the tree forwards to the foreground (so that the tree doesn't get lost in all the colours).  I have stamped an angel (Crafty Individuals) on to some shrink plastic and heated her to shrink her right down for the top of the tree and the baubles are also on shrink plastic from much larger ones by Stamps by Chloe and some glitter has been added to the baubles and the angel.


With some small hole punch circles of mirror card and some Nuvo pearl drops, a stand and some ribbon we were done! Oh, have you spotted the secret ingredient? - yes, matching feather pieces - perfect!

Mat and layered.

I got the exact effect that I wanted, a nice, fat, bushy and fluffy tree!

Hope you like it too,

I would like to enter this in to the Try It On Tuesday challenge "Trees are green... or any other colour":-

Thanks for stopping by,
Leanne xx


Monday, 26 September 2016

Dear Santa, I can explain................


Good morning!

Here I am having another go at a style that is "off piste" for me - clean and simple! 

As those of you will know that follow me, I love my paints and inks and a "full" piece of artwork so leaving white space for the eye to rest does not come naturally to me but that said, I like to have a challenge too!!!!!!

I just love this stamp from Crafty Individuals and even if we don't want to admit it just yet, the "C" word is not that far away so I thought I'd make a start with a Christmas card and keep it CAS.


I needed to mask off the white areas to help me with the clean and simple bit but didn't want to just have plain borders so I die cut some snowflakes in to my masking sheets first before I laid it on my plain piece of card stock (you can see, and I have to admit, I have reused a masking sheet that already had blue ink on it - well, can't waste anything can we?!!!).

I then stamped my santa image and masked that off with masking fluid.  I then ironed on some embossed wax paper over the open area (it hasn't come out that well on the photograph but it is there) and then blended distress ink over the open area to reveal the snowflakes from the wax paper.

I followed with some stencilling and stamped the two sentiments - "Happy Christmas" and "Dear Santa, I can explain.....".

Rubbed the masking fluid off of the Santa image.

Added some die cut snowflakes that I blended matching ink on to and some black ones too to make them stand out a little more.

Matted and layered on to my card.


There, clean and simple (for me anyway!!!!!!!!!!!).

I thought this was really nice and was quite happy with it - now I will have to choose who will receive this at Christmas - who deserves the "Dear Santa, I can explain...." - I have a couple of good ideas - I'm a mother of two daughters????!!!!!!!

I would like to enter this card in to the following challenges:-

That's Crafty - Christmas in September.

Crafty Individuals - Clean and simple.

Thanks for stopping by,

Leanne xx


Sunday, 4 September 2016

Happy Birthday Hochanda!


Good Morning!! Well just a quick extra blog this week so that I could share the card that I made and sent to the television channel Hochanda last week.  I incorporated their logo on to my card and imagine my surprise when..............


I saw my little card sitting on the counter on the television!!!!! 

That did make me smile and thank you Hochanda for awarding all of us who sent in birthday cards with a £10 voucher to spend - unexpected and it made it all the more worth while!

Normal blog will be back on tomorrow morning - just had to share this with you!

Thanks for stopping by,
Leanne x

Sunday, 7 August 2016

No Matter Where You Go In Life..........

Morning!!

I have made this card for Stamping Sensations this month as my contribution as their guest designer for August for the theme "Anything Goes".

Well, I thought, it's the summer so lets go to the summer heat in the Serengeti!!!!

I loved experimenting with this one (I love to experiment all the time and to see what different effects I can get from my products in my stash).

OK, so, I started this card as usual with a blank sheet of card and painted the background with some lovely warm Aqua Tints. Then I stamped in black versa fine ink some foliage and some Serengeti trees at the edges.  Then the rubber stamp comes in to play - this time Elephants from Imagination Crafts Art Stamp range.


Now, this stamp stamps out the background and leaves the main image unstamped so that you can so easily stamp over many mediums and your colours show through - looove these!!!!!!

So, next step was to stamp it on to the background with perfect medium and clear MATT embossing powder.  So no shine and basically no image to be seen at this stage either!!!!!  The elephants are of course not inked when stamping so the background becomes a resist with the matt embossing powder giving you an easy surface to in this case use diluted bleach and bring those beautiful beasts to life.

I added a couple of black frames and some die cut black foliage and the sentiment "No matter where you go in life, it's who you have beside you that makes the journey worthwhile" - in this case, it's a mothers love with her two infants.

Finished with four Creative Expressions black glue dots in each corner.

I thank all at Stamping Sensations for choosing me as the winner of their "Feature a Creature" challenge and their request for me to be a guest designer this month - it has been a pleasure and great fun - thank you all!!!

I would like to enter this card in to :-

Country View Challenges - Hot Summer Days Challenge.
Artistic Stamper - Anything Goes Challenge.
Thats Crafty - Zesty Zing Challenge.

Hope you like this creation, and thanks for stopping by,

Leanne xx

Monday, 25 July 2016

Christmas in July................


Morning!

Well dare I mention the "C" word in July???? - Of course I do!!!!! I've been inspired to create this card for the My Time to Craft challenge of "Christmas in July".

A lot of stamping involved in this one and all starting with a white piece of card.

Firstly I used the Inkylicious large bauble stencil (which comes with an inney and an outey stencil).  I used the inney stencil and blended some distress ink around it so that I knew where I was going and dropped the stencil down a bit to make the bauble a bit larger than it actually is.  Then I stamped the wood cabin stamp (again from Inkylicious) within the bauble and blended the ink with an almost dry paint brush.  Next came an Inkylicious hills and valleys stencil and I brushed some distress ink from the stencil and gave the cabin some hills behind it and in front of it so starting to make a scene.

A small moon mask was added and ink blended around it to get the nice white moon.

Some small trees were then stamped both inside the bauble and out so that the scene spread wider than the bauble.

The sentiment "Merry Christmas" was stamped in versa fine ink for a nice crisp finish.  I die cut some white snowflakes and used the aperture from the die cuts to sponge some snowflakes directly on to the edge of the background with white color box ink.

Added a small stamped family and a couple of small birds from Card-io and then with a fine liner pen just outlined the bottom half of the bauble so you didn't lose sight of it and sprayed the whole image with Goosebumps texture shimmer spray to give the whole card a shiny, bumpy snowy effect.


Darkened the edges to draw you in better and of course, the texture spray acted as a resist and gave further texture and effects at the edge. Added some iced snow to the top of the bauble and on some of the trees and hills and finished with the die cut snowflakes which have had some spray glue and diamond sprinkles added to them.

Quite different I thought? Happy with that, a beautiful wintry scene card.

I would like to enter this card in to the My Time To Craft challenge "Christmas in July"
Sparkles Christmas Challenges "snowflakes".

Thanks for stopping by,

Leanne xx