Published Permissions

Showing posts with label faux bleaching. Show all posts

Monday, 1 May 2017

Imagine the possibilities........


Good morning!

Here is my entry for the current Chocolate Baroque colour swatch challenge:-

My teal blue is coming out rather blue on the photograph but it is indeed the same teal blue as the sky is but the light is making it lighter!!!!!!

I have used Spectrum Noir Sparkle Pens for this project to make the lovely blended background here.  I then stamped Katya right in the middle and lifted out some colour from her face and her head dress with water.

The silhouette palace 1 stencil was used at the bottom and I sponged some Momento red ink through this and shaded it a bit darker with a Momento brown ink pad.

The sun/moon and clouds have been produced using water again and lifting some of that ink and covering the sun/moon with some of the lifted ink so it gives you that lovely positive/negative effect.

The sentiment is from the Chocolate Baroque words of inspiration stamp set and the little birds are from the serenity set

I finished off by adding some white pen dots around the head dress to pop it a bit and I was very happy with this.  

The example of the challenge swatch made me think of a calmness with a dreamy feeling and so, this is what I tried to produce with the Chocolate Baroque products that I have and the colours for the swatch.

Hope you like what you've seen here today and have enjoyed your visit.

I would like to enter this in to the Chocolate Baroque challenge 34 colour swatch challenge:-

Thanks for stopping by,
Leanne xx

Friday, 12 August 2016

We Don't Stop Playing Because We Grow Old..........

Morning!

This card was made for my Father In Law.  I have used distress inks on the background and a slight sprinkling of brusho powders.  Then I have moistened a round sponge applicator and stamped in plain water the circles and lifted off with kitchen towel to give a faux bleached effect to the circles.

A Creative Expressions stamp of the Jive and some musical notes from Visible Image stamped in black with the sentiment of "We don't stop playing because we grow old, we grow old because we stop playing".  Some final work on the edges with some silver embossing powder and top and bottom die cuts by Sue Wilson.  Matted on white card then a black mat.  Underneath that, an  embossed white mat again on a black mat.  Some black Creative Expressions glue dots and I was done.  It was well received and I was pleased with that! Not a small card measuring 8 x 8 inches.

Thanks for stopping by,

Leanne x

Friday, 5 August 2016

Your wings already exist...............


Morning!  I really enjoyed making this card! A great theme from Cards in envy for their challenge "wings".  I wanted to feel that the bird was moving - perhaps landing, I wanted there to be a sense of movement from this theme and I was really pleased with the finished result.  So, here goes with a step by step for you to see how I got there!

I started with my usual blank piece of white card and applied some aqua tints (a favourite of mine) to the background (keeping in mind I needed to use colours that would lift nicely when sprayed through a stencil later on).  I then very lightly stamped my image from Inkylicious just so that I could see roughly where it was going to enable me to start to paint some diluted bleach on to the wing areas.


Then I spread some Pebeo Milton relief paste on my craft sheet and stamped the image in to it and then on to the card (remember to wash your stamp at this stage in soapy water - you don't want the mixtion paste to stick to your stamp!).


Once the paste was no longer white (went clear) I foiled over it with a gold foil sheet.


I also lifted some paint from an area in the bottom right hand corner so that I could stamp my sentiment on there.  I covered the bird and the area in the bottom right hand corner with some pebeo masking fluid and when dry I then laid a stencil over the whole image, spritzed with water and lifted off - WOW!!!  Rubbed off the masking fluid. Then stamped some gold embossed feathers and the sentiment "Your wings already exist all you have to do is learn to fly".


I then applied glossy accents over the bird (you can see that the glossy accents is still wet on the card above - it's still a little blue!) A touch of distress ink to darken the edges and draw you in.


Just a couple of mats to keep within an envy envelope.


All done, quite stunning I thought? Pleased with that "wings".

I would like to enter this card in to the Cards in Envy challenge "wings".

Thanks for stopping by, hope you like it?

Leanne xx


Friday, 29 July 2016

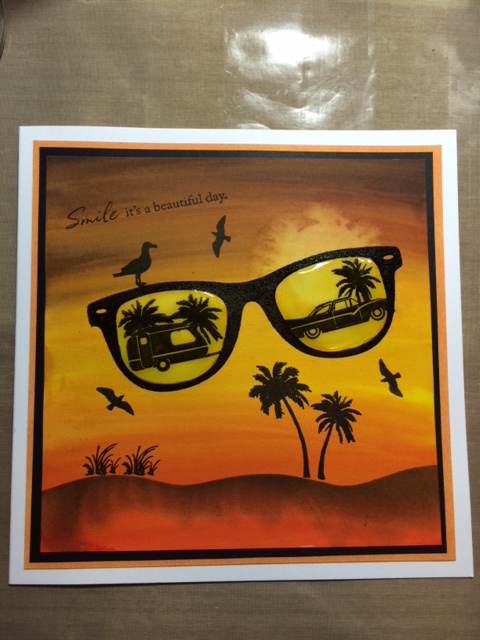
Smile it's a beautiful day..................

Morning!

Well, was this fun or what!!!!!  Inspired by the Cards in Envy "it's a heat wave" and the Sweet Stampin "Outdoors" challenges.   I went for hot colours and summer holidays!!!!!!

Ok, I did a step by step for you on this one so lets start with the background -


I've made my usual start with a blank piece of white card and applied some aqua tints in lovely warm colours.  I've faux bleached out a sun and then stamped the sunglasses in perfect medium and then embossed with black embossing powder.  The stamps used are all from Clarity stamp.


Then in comes the scene! I masked off the glasses and stamped the car and caravan with palm trees within the lenses.  I was thinking warm, heat, holidays!!!!!!

I removed some of the colour from the lenses by adding some water with a paint brush and dabbing with a paper towel.  Stamped the sentiment "Smile it's a beautiful day" and added some more birds then added glossy accents to the lenses to make them nice and shiny.

Ta dah!!! I was really pleased with that!

A really fun card to make and a great theme too!

I would like to enter this card in to the Cards in Envy "It's a heat wave" challenge.
Sweet Stampin "Outdoors" challenge.

Hope you like this one too, thanks for stopping by,

Leanne xx