Published Permissions

Showing posts with label Glossy Accents. Show all posts

Friday, 7 July 2017

Relax! - and I'm published in this month's Craft Stamper magazine!


Good morning!

Third Scheduled blog for you this morning while I am on holiday.

This card was made as my effort for Craft Stamper magazine for their Raspberry Fizz art call - but I didn't hear anything back on this occasion (for the September edition)so I'm posting it here for you to see! I did however make it in to the magazine for the August edition (available from today) - I've popped a sneaky peak at the end of this post.

My thoughts for Raspberry Fizz were bubbles!!!! I thought raspberries? bubbles - BATHTIME!!!! - See, there is absolutely no explanation of how my mind works is there!!!!!

So I went down the route of "relax" - I thought this card would be great for someone who is feeling poorly, someone who has just been over doing things recently, a mum to be or just a relax, chill out message on someones birthday!

There is lots to see on here and as I'm scheduling lots of posts for you while I'm away I'm leaving it to your own eyes to spot what I have done here!!! Check out the ribbon - I even stamped that too!!!!

I can also reveal that I am published in this months Craft Stamper magazine that is available to buy from today. I am in the Deckchairs By The Sea section! Here is a little peak for you.....


Hope you've enjoyed your visit, thanks for stopping by and sticking with me while I am away,
Leanne xx


Wednesday, 5 July 2017

Good Luck Katie!.........


Good morning!

Second scheduled post for holidays and this one is the card that James and I sent to Katie wishing her good luck with her GCSE's.

She has of course now finished her exams and we all have everything crossed for her for results day in the latter half on August.

I first saw this stamp used by Carola over at FSC and I just had to have it!!!!!  It's a De Stempelwinkel stamp and this really could be Katie!!!!!

I have done a nice easy background using distress inks blended nicely together (I chose these colours as they match Katie's bedroom colours and I knew that she liked them).  I stamped some stars on there with the same inks and circles which I have covered in glossy accents.  The stars I have highlighted with a white pen.

The main image has been stamped in a nice juicy versafine black ink and the good luck Katie has been stamped using the Clarity Stamp alphabet set.  "Perform" is from Visible Image.

Matted and layered on to red and craft card.

"Good Luck Katie" - everything's crossed for you!

Thanks for stopping by,
Leanne x


Friday, 26 May 2017

"Hello There".............


Good morning!

I've had a go for the current Rubber Dance challenge of "Rule of Three". 

I didn't take photo's for this one so I'll talk you through how I got there.

Firstly I stamped the three flowers with sparkle pens and them restamped over the top with black ink using my misti and masked them over with drawing gum.

The background was next and has been created using the new distress oxide inks leaving some white space open.

I have then played with some different stencils and stamps and doodled around the background.  I'm loving greys at the moment!!!

Rubbed off the drawing gum, highlighted the lovely dragonfly stencil and some of the stencilling and stamped my sentiment of "Hello There".

Stamped the three butterflies on to old book pages and covered in glossy accents and attached to the card.

Mat and layered.


Finished! - Happy with that!


I would like to enter this piece in to the Rubber Dance current challenge of "Rule of Three":-

Thanks for stopping by today,
Leanne xx


Wednesday, 24 May 2017

Follow Your Dreams............


Good morning!

Here I am with a mid week post with my entry in to this months Clarity challenge of "Up In The Air".     I thought this challenge was at first a very obvious one - up in the air - birds, balloons, aeroplanes, hot air balloons etc so I decided to put my twist on things as usual and think just outside that box again!  My plan - dreams!!! well, I was thinking up in the air ....... bubbles!!!!! Now, I have a rather sad confession as the moment..........I AM ABSOLUTELY OBSESSED WITH BUBBLES AT THE MOMENT!!!!!! Check out my other posts over the past month and you'll see all the different ways I've been having so much fun making a mess - I mean playing with paint and ink!!!!!  So this is where my mind went with this theme, dreams and thought bubbles.....up in the air.

Now, must confess I only took a couple of photo's as I was so deep in thought with this one that I completely forgot to take photo's through most of it! I'll talk you through how I got there though:

OK, started with a piece of 6 x 6 watercolour card stock and used my brayer to bring down that lovely distress ink from the top (here I have used Salty Ocean).  Then I blended again with the brayer,  Mustard Seed distress ink up from the bottom to meet in the middle.  I popped on a moon/sun mask (clarity) and went a little heavier with the blue to give me a nice light moon and then with the outer part of the mask I covered the moon/sun again and blended some of the Mustard Seed colour in with a make up sponge to give me a proper sun.

I then added the girl with the clarity stencil in cobalt blue archival ink.  

The hills were next and they were blended with the clarity blending brush and the Clarity mountains and hills mask.

I then popped the plastic mask of the girl on top of her and just brushed some ink outwards off of the mask around her with a clarity blending brush.

The clouds are a Clarity mask too and they were done using the clarity blending brush - lovely effect.

Stamped the sentiment which is a Clarity Club stamp - perfect for this card.

Stamped a few of the small grasses here and there and then moved on to my bubbles!!!!


Woohoo!!! These are how I formed my bubbles just with the use of an old pot lid, drawing ink and some washing up liquid in the mix!  I always do plenty and then I can take my pick of the best ones!  Allowed to dry overnight.


Once dry I stamped the palm trees (perhaps dreaming of a holiday?), the girl and her dog (perhaps dreaming of a new pet or just of her beloved pet?) and the couple (perhaps dreaming of love?).  I then covered each bubble with Glossy Accents and allowed to completely dry.

I then rubbed some fern green archival ink around the bottom of the bubbles to give a bit of a shadow and cut them out.

Applied to card with some small bubbles that were hand drawn with polychromo pencils.

I really enjoyed making this one, kept me thinking but lots of fun!

I would like to enter this in to the Clarity Stamp Facebook challenge of "Up In The Air".

Thanks for stopping by,
Leanne xx


Friday, 19 May 2017

The World Is Full Of Beauty When The Heart Is Full Of Love............


Good morning!

Well, here is a scene and a half for you this morning!  I fancied having a go for a couple of current challenges both themed around fantasy but fantasy and fairies aren't really my thing!!!  I hope that you like watching how I interpret the different themes for the challenges, I do hope that I inspire you to have your take on them too and have a go!!????

Right, took plenty of photo's along the way with this one, lots of different stages to deal with and I must confess, I did have to plan this one out a bit before I got going.  I knew what I wanted to achieve but had to do some thinking before I put stamp to card stock!  Right, hop on board, let's take our journey this morning:-


OK, I did this quick sketch of what I wanted to achieve in the late of an evening - I even made a note at the top look - as I didn't have a butterfly made by Lavinia Stamps (but I had a fairy that had a good set of wings on her to make one out of!!!!!!).  

So, you can imagine now, it's the next morning, I went in to my craft room, sat at the craft desk, saw this drawing and thought "oh my, where was my mind when I did this!!!!!!!!!!!!!" - I soon came back to where I had left off the evening before and the creative juices were flowing once more! Note the numbers on the sketchy drawings - this is of course, the rough order in which I need to stamp in - a good tip!


OK, I made a start, stamped the poppy on the right first in red and green archival.  Stamped the toadstools next and immediately masked them off, then the bridge (I went off piste here a bit in the order of doing things - but that's ok).  Masked everything over with Pebeo drawing gum.


I wanted this piece of artwork to look like it was two doors opening on what was my vision of a fantasy land so I had to angle the doors of course so I just masked off the top and bottom of the stamp before adding the ink pad. With me so far?


Those side doors are now down in red archival ink.


Doors masked with drawing gum.  I then set on to the sky.  This I have done with the new distress oxides.  I then used a moon mask and gently sponged some white gesso through it to form that moon.


Woohooo! That's put my mark on it!!!  Got out those delicious Spectrum Noir Sparkle Pens and went for it!  I wanted some wonderful, fantasy colours to be seen. I also stamped the trees in behind the bridge. The sentiment was added at this stage too.


Right, where am I, oh yes! The masking fluid has been rubbed away from everywhere here (see the lovely little trees are now BEHIND the bridge.


Out came the Polychromo's and I shaded in the bridge, the water, the toadstools, the vines on the doors and a bit more on the poppy head.  I masked the sentiment just with a piece of paper and stamped the falling vines straight across there.  The fairies have been stamped on to tissue paper (gift tissue) and backed with double sided adhesive paper so that they effectively became stickers for me. I have some lovely little silver scissor embellishments here at home so I used some wire cutters to cut off the finger holes - I have used those as door handles for the fairies here.  Glossy Accents has been added to the toadstools, the river and the fairy wings. Further poppies were stamped down at the front. some dark distress ink was applied around the edges to draw you further in to the picture.


Now, had to make a butterfly!  For the Lavinia Stamp challenge I need to use just Lavinia Stamps so this fairy was needed for her wings!!!  Out came the brayer to reverse one set of wings and bingo! - the job was done!


The butterfly was coloured in using the Polychromos  and the rest of that little pair of scissors (having chopped the finger holes off!) was added as the butterfly body! Well, it's a fantasy land, nothing is real is it?.....................or is it???????????????

I hope you've enjoyed your journey today, there was lots to do on this one, it's very busy, very full of things to look at - those fairies are welcoming you in to their world.............I'd like to go, if only for a day....... wouldn't you?

I would like to enter this in to the following challenges:-

Lavinia Stamps "Make Your Own Vision" - my vision of a land of fantasy:-

Stamping Sensations "Butterflies, Fairies and Fantasy":-


Thursday, 11 May 2017

Dance Like Nobody's Watching for De Stempelwinkel......


Good morning!

Well, it's an extra treat for you this week (that's four posts this week and there will be one at the weekend too!!!! - phew!!!!!).

I have been playing with my stamps by De Stempelwinkel - lovely company and good quality stamps that get your imagination going.  I have made this card for their current challenge of Bright Blue.

I have taken some photo's so lets see how I got there shall we -


OK, this card started life as a piece of smooth Sheena stamping card and I have dabbed on three colours of acrylic paint using a damp baby wipe allowing each colour to dry before adding the next one.


Now, those of you that follow me closely will know that I'm going through a "bubble phase" at the moment!!!! Oh boy, it's so fun and soooo messy!!!!!  Here I have blown my bubbles in a bowl with dark blue drawing ink and caught them on the card and left them to dry - really dreamy!!!!  I then stamped my sentiment which wasn't as easy as it looks because this sentiment actually runs the length of another De Stempelwinkel stamp that I have and is attached to a a girl dancing and listening to music!  I had to very carefully ink the sentiment only and hope for the best - I did well and got it right! I also added some very large bubbles using an old pot lid just dipped in to the bubble solution.


At this point, I have enhanced the large bubbles with some of the drawing ink, a charcoal pencil and then topped with Glossy Accents with some chunky glitter (the card will buckle a bit at this stage but panic not, it sorts itself out in the end).  I also stamped some small flowers that De Stempelwinkel sent me as a small free offering with my order which was very kind of them so I thought that I should put it to good use!

My image of the dancer was also stamped in blue versafine ink for a nice, crisp oily surface and I clear embossed over the top to seal that.

Almost there!


I have added a reversed image of the stamp here.  This is done by stamping the image on to tissue paper (gift tissue) and turning it over to reverse it.

Mat and layered in white and blue and I have blended the actual card to take the starkness of the white away by blending with distress ink around the edges.

Hope you liked our journey today, thanks for stopping by,
Leanne xx

I would like to enter this in to De Stempelwinkel challenge of "Bright Blue":-


Sunday, 9 April 2017

New Challenge at Fashionable Stamping Challenges.......


Good morning!

Well, it's a new challenge today over at Fashionable Stamping Challenges and the new challenge is my choice this time which is from one of my favourite films - The Sound Of Music.  You have the choice to follow the first verse from the theme song:-

Raindrops on roses
And whiskers on kittens
Bright copper kettles and warm woollen mittens
Brown paper packages tied up with strings

These are a few of my favorite things 

Or you can just go with "my favourite things"! - perfect!

I have gone with the choice of Raindrops on Roses!

I have used my favourite rose stamp - the everyday rose by Sheena Douglass. First by stamping the rose and masking with masking fluid and then stencilling all around it with different stencils and distress ink.

I used a mixture of Spectrum Aqua markers and diluted Distress Inks to colour my rose and it's leaves.

The magic had to come when I put those raindrops on the rose!  I have used Glossy Accents for most of the raindrops, there is also some glitter on some of them and I have ringed round a couple with a white pen to highlight. I also added a couple of rather large raindrops on to that background again with the Glossy Accents.


Here is a view taken from the side to see that texture that the droplets have on the petals.


Hope you can join in with this very happy and pleasant theme this month - PLEASE REMEMBER THAT THE MAIN FOCAL POINT OF YOUR ARTWORK MUST BE SEEN TO BE RUBBER STAMPING.

Thanks for stopping by and good luck in the challenge!

Leanne xx


Tuesday, 4 April 2017

It's far better to be "we" than "me".........


Good morning!

I've popped this post on as an extra this week so that I can get it entered in to a couple of challenges.

I must admit, I got totally engrossed in this one and REALLY enjoyed it as it developed.  I have taken photo's of some of the products that I have used so I'll pop those at the end of this post but for now, I'll talk you through where my mind was going when I was doing this piece of artwork.

This is an amazing stencil from That's Crafty - loved it the minute I saw in on their website and just knew that I had to have it! So many possibilities with it....

The stencil is called "Butterfly Wings" but of course is the shape of a man and a womans face outlines so I was going to follow the theme for this months Rubber Dance colour swatch challenge which is dark brown, light blue and white - brilliant colour combination and there is an inspirational photograph to help you with your creation too.

So, I started by sponging distress ink through the main stencil which gave me two beautiful blue wings (or face outlines).  I then had to turn my thoughts in to making those wings not only symmetrical but also looking like two faces.  So, I used the Stampendous stamp called "chilling" but only used the eyes - you see, I needed a stamp with two eyes, a left and a right to make this work.

Here is the stencil.


Here are the stamps used.


So, back to the artwork, the eyes were stamped on by just adding ink to the eye areas only on the Stampendous stamp and hoping that I got them in the right place and inked up correctly - not an easy thing to do!  I then stamped in distress ink (walnut stain) the flowers bending the stalk in opposite directions on each stamping and I decided to use some of this creepy looking tree branches on that stamp around the neck and chin areas of each face/wing.  I wanted to get some texture on there so I passed some structure paste through a stencil to put leaves across the faces (this was also to make the wings look more symmetrical - I didn't want to veer too much away from the fact that this is also a butterfly).  I also added eye brows by painting with the structure paste.

So, I had my main images stamped I then needed to complete the background and to fit in with The Butterfly Challenge this had to be a night sky with "R" to repeat - I have repeated the stamping of the flowers, the branches and the eyes and the stencil work on both wings to ensure the symmetry .  So I blended three different colours of distress ink from darkest at the top, to lightest at the bottom to give me a night sky and I added some stars with white gesso and then topped those with some lovely glitter.

The next task was to make those wings stand out from the background so I placed the masks of the faces back on and used a clarity brush to brush the walnut stain outwards all around the wings.

I needed the perfect sentiment for this card, as it is rather unusual! So the Sheena Douglass "It's far better to be "we" than "me" was superb - not just a single butterfly but a couple.

Now, I had a slight moment of genius I think as I came across these scissor embellishments in a drawer and I thought, if I just clip the fingers rings I could make these in to a butterfly body and stain them gold with gilding wax!

Finally I wanted to bring this design closer to the inspirational photo for Rubber Dance so I used some glue and some white glass beads on the flowers heads, and dotted some black momento ink on them, went over the black dots with a white pen to highlight and then over the top again with glossy accents to look like water droplets as in the inspirational photo.

I will also enter this in to the That's Crafty challenge "Foliage and Flowers" as it shows off their stencil superbly and another favourite of mine, good "ole" Stamping Sensations and "Anything Goes".

Mat and layered in white and navy.


I was pleased with this artwork, very different but very me!

I hope that you have enjoyed how I got there with this piece, I did it over two days.

Thanks for stopping by, I'll pop my next post on Friday as usual for you,
Leanne xx

I would like to enter this in to The Butterfly Challenge:-

Rubber Dance - colour swatch and inspiration photo challenge, dark brown, light blue and white:-

Stamping Sensations - Anything Goes:-

That's Crafty "Foliage and Flowers":-


Monday, 3 April 2017

For You...........Fly HIGH.


Good morning!

Well, this one kept me busy! Lots of interest and certainly lots of colour going on here!!

This is my efforts for the Stamps and Stencils challenge theme of "Chirpy Chirpy Cheep Cheep!".  I don't do "cutie" cards and I like to bring my art right in to my work so I've taken lots of photo's along the way with this one so lets take our journey and see just how I got there with this one - hold on tight it's quite a long journey today!


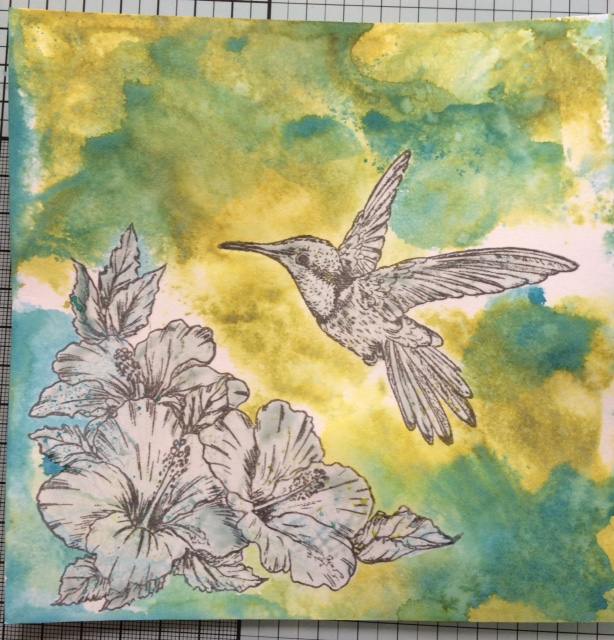
OK, we start with a piece of Bockingford hot pressed card stock (BRILLIANT STUFF). I've stamped the image of the hibiscus flowers and the hummingbird (both by Sheena Douglass) in Archival watering can.


Here I have just covered the stamped images with Pebeo Drawing Gum to mask them off.


A new discovery for me and a new purchase - the new Distress Oxide ink pads! - They are fantastic! They allow you to continue to layer up one colour on top of the other without creating "mud".  You must allow each colour layer to dry though before applying the next layer of colour.  Water must be used to obtain the best effects too.

Here I have smooshed the ink pad on to my glass mat and spritzed with water and then dabbed my card stock in to the colour, sprayed again with water from a spritzer bottle and then heat set with my heat gun. All will become clearer so don't panic!


Woo hooo! Look at this coming!!!! Here comes another colour, this is peeled paint on the first layer and then I have done exactly the same as before but used broken china.  Smooshed the ink pad on the glass mat, spritzed with water and then wiped the card stock in to it - instead of blending in to the peeled paint, it sits on the top of it.  Spray with water and then heat set again with the heat gun.


Exactly the same done again, this time I've used fossilised amber.


OK, with the background set I then went in with some Sheena Douglass stencils and the normal peeled paint distress ink.  I have also stamped the sentiment here too in black archival.


Hibiscus coloured in with spiced marmalade normal distress ink diluted and then I have used a sparkle pen to enhance the centres of the flowers.  The hummingbird has also started to be coloured in using the lovely sparkle pens.


That's got it!  Glossy Accents went over the hummingbird but to bring those wings to life a bit more I have walked a cocktail stick through the Glossy Accents with a couple of shades of drawing ink on it. Some Nuvo drops have also been applied to the stamens and highlights to the sentiments. Some darker leaves were also stencilled on.


Look at that bird glow!

A further two Hibiscus flowers from another set of Sheena Douglass stamps were cut out and coloured in the same way and applied to give depth.


There, told you it was a bit of a long tutorial today! Well, we got there safely and I do hope that you enjoyed the journey.  Nice and bright and jolly.

I would like to enter this in to the Stamps and Stencils challenge "Chirpy, Chirpy, Cheep, Cheep":-

Hope you've enjoyed your visit today,
Thanks for stopping by,
Leanne xx


Monday, 20 March 2017

Learn To Dance In The Rain!


Good morning!

Here is something a bit "fresh" looking for you today!

How is this card to keep you in a positive mind set! " Life isn't about waiting for the storm to pass but learning to dance in the rain" - absolutely! There is too much in life to drag you backwards these days, I'm a very positive person and I always look to the bright side (that glass is always half full!) and when I came across this sentiment stamp in my stash I decided to use it!

Lets take our journey and see how I got there....


OK, I started with a piece of Sheena Stamping card that I'd had a previous play with using my gelli plate.  Here I have used my misti to place down my rubber stamp of some blotches where I wanted it to look like rain was falling. Have to confess, I have no idea the maker of the stamps here!


I have stamped my image of the girl here - Inkylicious - (second generation stamp so that it wasn't too bold - I wanted everything to look a bit "washed out!".  I then placed some blobs of watercolour paint at her feet and blew them outwards with a straw so that it looked like she was splashing in a puddle.  The raindrops were stamped on (Designs By Ryn) and some glossy accents have been added over the top of them. The sentiment was last which matched perfectly (again, Inkylicious). 


A couple of mats and layers and I was done! You can see the glossy accents on the raindrops a bit better here. I have swiped some ink across the page using an ink duster sprayed with water to give that impression of wet ground.

Quite a quick card to produce for me but great fun, quite "loose" work, I achieved what I wanted -  the feeling of water all around.

Hope you've enjoyed todays journey,
Thanks for stopping by,
Leanne xx


Monday, 5 December 2016

Wishing you a magical Christmas.....


Good morning!

Only took a couple of photo's of this one in it's making so I'll talk you through how I got there.

Started with my usual Sheena stamping card and coloured my background using Spectrum Aqua Markers.

I stamped my pine spray and the five baubles (all Stamps by Chloe).  The pine was embossed with white embossing powder.  Two baubles were silver embossed and three were in black archival ink.  I then decided that I wanted more dimension so that the baubles looked more round (they looked too flat to me) so I added glossy accents to each one of them and allowed it to totally dry.  Still wasn't happy so I added some sparkle embossing powder over the top on the black baubles and stamped over again with silver embossing powder on the two silver baubles - yes, I am now stamping on top of dry glossy accents! - When I heat embossed all five baubles again not only did the embossing powders melt but the glossy accents bubbled and made the most realistic effect leaving them "lumpy bumpy"!!

I stamped my sentiment "Wishing you a Magical Christmas" (Stamps by Chloe) and embossed in the silver sparkle embossing powder (Cosmic Shimmer).

Darkened the edges with distress ink and added ribbon bows to three baubles and some dots of Cosmic Shimmer pearl pva.

Mat and layered.


Here you can see the lovely roundness that the baubles have to them.

Happy with that, very pretty.

Thanks for stopping by,
Leanne xx


Friday, 2 December 2016

With Love & Thanks.......


Good morning!

Here's something a bit sweet don't you think? Zinouk du jardin by Carabelle-Studio.

I took a couple of photo's so I'll talk you through it, lets take our journey....


Right, I started with a piece of Sheena stamping card and painted a couple of colours of aquatints on to an acrylic block, mixed the colours up a bit and then laid the stamping card on to the block - aquatints cover so well.  I had a couple of runs but that's fine, I like those! and left it to dry (doesn't take long at all).

I then sprinkled some water from my finger tips, let it soak for a moment and mopped up some of the paint.

Then I stamped all the images from this stamp set and coloured them with alcohol pens and the flowers with sparkle pens too.

I then stamped some bubbles (from old pot lids) and highlighted with a white pen and a charcoal pencil then finished with glossy accents so that they looked like real bubbles.

Added Zinouk and a couple of sentiments "Dream" and "With Love & Thanks" - both Inkylicious - the "& Thanks" are Sentimentally Yours by Phil Martin.


Matted and layered in lovely bright yellow and orange - very happy with that! Nice and sweet and jolly!

Also check out some really lovely new stamps that Crafty Individuals have launched here - well worth a look:-

I would like to enter this in to the Cards in Envy challenge "Thank you":-

Thanks for stopping by,
Leanne x