Published Permissions

Sunday, 5 March 2017

The Sky Is The Limit.................


Good morning!

A quick post this morning to show you this card that I have made for the Cards In Envy challenge of "Red and Blue".

I started this card with a cloud stencil that I brushed with distress ink and just kept moving the stencil down the page until I got this lovely sky full of clouds.

You will see that about 2/3 down the page I changed so that the landscape became hills but kept to exactly the same colour scheme.

I then stamped my planes (For The Love of Stamps - Enjoy the Journey) and painted them in with distress inks.

Using exactly the same distress ink I stamped my compass twice and the sentiment which are again from the same stamp set.

A few splatters and birds and I was done! - another masculine card - brilliant!

Hope you like it too.

Thanks for stopping by,

I would like to enter this into the Cards In Envy challenge of "Red and Blue":-

Leanne x


Friday, 3 March 2017

Inspiration for hand drawing..."Inspire"....


Good morning!

How are you today?  I'm going to take you rather "off piste" today and our journey is down a road we rarely take so I hope that you enjoy it!

Now, I was inspired to have a go at this piece of artwork by Kay at Indigoblu - from her show on Hochanda using Gelatos.  So I thought, lets have a go and see what happens!  Quite a lot happened and I thoroughly enjoyed myself!  So lets see how I got to the finished piece of work:-


OK, I started by marking off a 7 x 7 inch square on my watercolour block pad and I pencilled in the face being careful to try and get everything in to proportion as Kay had showed us how to do.


Don't panic! - All was going very well!!!!  In came the Gelatos and I started to build up the facial colours and leave some open patches where I knew I needed light on the finished result.


The hair had started here and I also started to go deeper with the facial tones.


More work on the hair and the blending of it and further work with the Gelatos on the face too. It's coming together!


Some Imagination Crafts Starlights were added through a stencil here.


Ta dahhh!!!!! Finished! Added a few colour matching gems and the sentiment "Inspire" (Clarity Stamp Alphabet Stamps) then mat and layered and mounted on to an 8 x 8 card.

There, something a bit different but give it a go! It was really motivational to see it coming to life. I hope this has inspired you to have a go drawing your own designs.

No stamping, just purely hand drawn, if I can do it, so can you!

Hope you enjoyed our journey today, down a road we've never been down before.

Thanks for stopping by,
Leanne xx


Monday, 27 February 2017

Five Christmas cards for February!!


Good morning to you!

Well, keeping with my New Years Resolution of 5 Christmas cards a month - as promised, here is February's offering!

Now, although each of these cards is slightly different, in order for me to churn out five cards each month they do have to be pretty much a batch make so I'm happy that although they are very similar, each one is very slightly different.

I can't really do a step by step covering all five cards so I've taken individual photo's for you of each of them below:-


The adorable little robin on his branch and the sentiment are by Sheena Douglass and I've added some snow on to that branch for him to sit in. All cards have been coloured with the help of Aqua Markers and distress ink and matted and layered in various coordinating coloured card stock.

There, that's 10 done now - Month 2 - mission complete!!!

I'll be back towards the end of next month with my offering of Christmas card makes for March.

Thanks for stopping by,
Leanne x


Friday, 24 February 2017

All good things are wild and free...........


Good morning!!!

It's been a long time since I did a farm scene on a card so here is my attempt for the Stamping Sensations challenge of "Animal Magic".

Lets take our journey and see how I built this one up and got to my final design:-


Gosh, it even shocks me sometimes how little there is on the page when you first get going!!!
So, I started by stamping my cow and the lamb and then masking them off with drawing gum. All of the animal and farmyard stamps that you will see today are by Joy! Crafts.


There, that's looking a bit more like it!  OK, the barn has been stamped right on top of the masked off cow.  The sheep has been stamped right on top of the masked off lamb.  This will enable it to look like the cow is standing in front of the barn and the lamb in front of the sheep, the lamb has very nearly disappeared altogether at the moment!  I have added a couple of milk churns, the chickens and have masked off the barn and stamped the trees behind (Inkylicious) and have built up the field scene with the use of the Joy! Crafts hay bales and a separate fence stamp.  A couple more trees have been added on that horizon line too. It's all coming together!


Doesn't it make a difference once you start adding colour?  OK, the masking fluid is still in place at this stage so that I could "swipe" Aquatints across to make the farmyard brown.  I wanted more than just a flat colour here so I also used some distress ink on an ink duster, sprayed the ink duster with water and took the brush across the page to leave me some darker patches.  The sky has been coloured using just some old blue ink that was already on my smoothie and a sky stencil that you keep moving to form the clouds and I've used momento ink and a smoothie to colour in the field.


All masking fluid has now been rubbed off and there is the little lamb!!! Everyone is looking very white so out came my polychromo pencils.


That's better!  I added some patches to make my cow more realistic (I'm not good on my cow breeds I'm afraid), gave the sheep some colour and the chickens and added some depth to the milk churns.  Completed the barn and added some birds (Inkylicious).  

There, animal magic! and as the sentiment says "all good things are wild and free"

Hope you've enjoyed our journey today and how I built up this scene from a blank page.
Here you can see the stamps that I've used.


I would like to enter this in to the Stamping Sensations challenge - "Animal Magic":-

Thanks for stopping by today,
Leanne x


Wednesday, 22 February 2017

Love Is All You Need.........


Good morning!

This is my input for this months Indigoblu challenge of "Love is all you need".

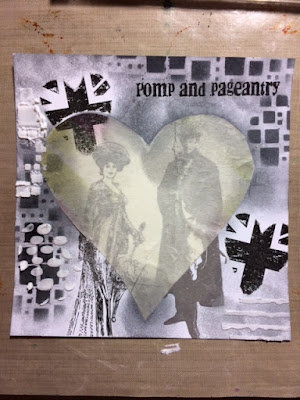
I went for "Pomp and Pageantry"!  I have taken photo's along the way so let's take our usual journey and see how I did this one shall we?:-


OK, first thing to notice is that of course, the man and lady face the same way on the original stamps so my first challenge was to reverse one of them so that they at least looked like they were "together" and a couple (well, wouldn't be good if they were looking away from each other would it!!!!!).


There, with a bit of magic (using my brayer to reverse the image of the lady) we have a "couple" - I was pleased with this.

You will also notice at this point that I have extended her dress (and parasol) quite a way because I thought it would look odd if the gentleman had feet and the lady didn't!

I have then used an Inkables stencil from Bee Crafty to shade in the lovely big heart behind them.  

As is very usual for me, I often start off with one idea for a piece of artwork and then "go with the flow" as it develops.  At this point I was quite happy that this was going to work keeping this piece to a monochrome colour scheme.


Here I have cut a mask out and stuck it over the heart shape so that I could work on that background behind them.


 I wanted to keep to the "pomp and pageantry" theme so I decided that I would make Union Jack hearts using the Union Jack flag stamp from the same set.  So, I masked off a heart shape, inked it while the mask was in position, removed the mask and stamped - it worked very well. I did this twice.


So I've now built up my background using Indigoblu stencils with distress ink and white texture paste.


The sentiment is computer generated.

Backed on to some black card that I'd die cut through and mat and layered up.

What do you think? - Thoroughly a British affair don't you think! - classy!

I would like to enter this in to the Indigoblu challenge - "Love is all you need":-

Hope you enjoyed your journey today,
Thanks for stopping by,
Leanne x


Monday, 20 February 2017

Frozen in Time..........


Good morning!

Well, did I get messy doing this one or what?!!!!! I decided to take up the challenge over at Stamps & stencils of "Texture, Crackle and Paint" - well, it's right up my alley isn't it!!!!!

I've taken some photo's along the way so lets take our journey and see how I got there with this one:-


OK, so I started off with a medium mdf tag and covered it in Decoart black texture paste.  I waited for it to form a skin on the surface and then stamped a couple of lots of cogs (PaperArtsy) and another PaperArtsy border stamp along the bottom to give me some texture at this stage. Left to dry naturally.


On some acetate (this was not heat proof but strong construction acetate) I stamped this image from Ken Oliver Crafts on to it using Staz On ink.  (I couldn't make my mind up if this was an image of a doll or of a baby??!).  I then painted a two step crackle on to the front of the acetate. The first step is to put on the step 1 medium, wait for it to dry clear and then apply the step 2 over the top (both Decoart) and wait for this to dry naturally and the cracks to appear.


I then painted Decoart paint on to the acetate and wiped back quite quickly so that the ink remained in the cracks that had formed.  By now, you will realise that I was trying to achieve a crazed look on a dolls face.  I then painted Pebeo paint on the back (reverse painting) and this of course, made the whole thing pop. Cut out the image.


Those cogs have now been painted with DecoArt paints and some Powertex pigment mixed with a little Powertex varnish to make them shine.  The upper part of the tag has been overlaid with some acetate which has had some hearts stencilled on to it and some Andy Skinner industrial elements nuts and bolts (hard board) that have again been painted with Decoart paints to give a rusted effect, mounted on top of each other to look more realistic and attached to the tag.  The doll (in this case!) image has been attached on to all of those antiqued cogs and the sentiment of "Frozen in Time" (again, Ken Oliver Crafts) has been embossed with cream embossing powder to help it pop off of the grunge of the tag. Fabric ribbons tied to the top of the tag.


Well, can you guess the colour of my fingers after making this one!!!!! - well, I made this four days ago and my fingers still look like they are bleeding (they ended up the perfect blood colour all over them!!!!!) - my mother even asked what I had done to myself!!!!!!!

Messy? - OH YES!!!!!!!!

I would like to enter this into the following challenges:-

Try It On Tuesday - "Lets Get Messy!":-

Stamps and Stencils - "Texture, Crackle and Paint":-

Hope you've like the journey today in to my world of inky fingers!!!!

Thanks for stopping by,
Leanne x


Friday, 17 February 2017

What a bloke!


Good morning!

Well, this is the card that I made for my husband James for Valentine's Day.  I haven't got a step by step on this one so I'll talk you through how I got there.....

I started with my Sheena stamping card and used a heart stencil that had an "inney" and an "outey" section.  I popped the outey section on the card first and smoothed distress ink around that heart so that I knew where I was starting and where I was heading!

Having placed the inney part of the stencil over the heart to mask it, I laid down some distress ink all around it from reds, light brown and orange. Keeping that inney part of the stencil firmly on that heart I stamped my Sheena Douglass Everyday Rose stamp over the top and the small hearts that you see in the top right hand corner.  I also stamped the same hearts in white colorbox ink in the top left hand corner so that they would show over that lovely rich red.

Next, I removed the stencil from the heart and using normal household bleach I took some of the colour out of the roses.  

The outer part of the stencil went back on and I enriched the red within the heart.

When I was happy with the colours I stamped the man and the sentiments (both Sheena Douglass) in versafine black onyx - a great stamp!- love it!

I stamped "My Husband, My Valentine" (Clarity Stamp alphabet) on to parchment paper in versafine ink and set it by adding clear embossing powder then attached to the card.

Mat and layered.


I was pleased with this one and James seemed to be too!

Hope you like it.

I would like to enter this in to the Cards In Envy challenge of "Be My Valentine":-

Artistic Stamper - "Love Hearts":-
Thanks for stopping by today,
Leanne xx