Published Permissions

Monday, 22 August 2016

Exam Success.....Congratulations!


Good morning!! Well, last week (when I made this card) I was a very proud Mum indeed! My daughter Hayley received her A Level results (taken aged 17 - a year early) of A* A* A so hence - this card was produced!!

I've done a step by step so that you can follow how I got there:-

Started with my usual piece of blank white card stock and using a smoothie, sponged over tea dye Distress Ink.


Then I stamped my beautiful owl (Sheena Douglass), his mortarboard hat (Clarity Stamps) and a further branch (Lavinia Stamps) with perfect medium and embossed with matt clear embossing powder.


So, not as shiny as clear embossing powder but enough to give me a resist from further paints.


A better look at the embossing and I've now added some branches (Inkylicious) and leaves (Darkroom Door).


Then, I sprinkled some brushos on to a square acrylic block (orange, dark brown, light brown and sandstone).  Spritzed the block with water and laid my card down on to it to give me a darker background and then of course, the embossing resisted the brusho paints.


I used some of the excess paints on the acrylic block to "paint in" the leaves and some of the lower feathers on my owl. I added some further Distress Inks (aged mahogany, tea dye and rusty hinge) to help balance the colours how I liked them. Then used aged mahogany Distress Ink to sponge through a couple of stencils, embossed his mortarboard hat in black and left the whole thing to dry off.


To finish things off, I used some household bleach to take out some of the colour on my owl (the embossing works a treat to keep the bleach within the image) and got out my Spectrum Noir pencils to finish Mr Owl off so that he looks like he's got feathers!

Added randomly computer generated "Exam Success Congratulations!" sentiment.

Really pleased with that but not as pleased as I was of my daughter Hayley - so proud of her!

I would like to enter this card in to the following -


My Time To Craft - "Embossing"

Thanks for stopping by,
A very proud Mum, Leanne xxx

Friday, 19 August 2016

Hip Hip Hooray!


Good morning!

This card was inspired by the latest Cards in Envy challenge "Hip to be square".

I have done a step by step for this card so you'll be able to see how I got there with this one.


Started with my usual white piece of card and cut some squares of different sizes from post it notes.  Then simply stuck them randomly on the card and brushed black soot distress ink over the edges and then moved the pieces and brushed again as shown below.


You see lots of squares appearing before your eyes! Squares everywhere!  So you keep moving them and keep brushing!


Then I highlighted some boxes by drawing around them with a fine liner pen.


I stamped all the images (all from Clarity Stamp) in black versafine ink so I could get nice solid images - each one within a box and stamped the sentiment "Hip hip hooray!"  on a square piece of card, brushed that with the DI and stamped around that sentiment with a stamp from Creative Expressions.


Then mounted the artwork on a layer of white, then black card.

Happy with that, suitable for a masculine or feminine card or even a wonderful retirement card perhaps - look in to the card, do you see what I see? Sitting on a bench as a couple? Grandchildren playing perhaps? Walking the dog, children or even Grandchildren finding love and moving on in their lives or simply hands in the air - that's it, done that, it's time to retire! Yes, a perfect retirement card the more I look at it!!!! (Didn't see that when I was making it!!!!).

"Hip hip hooray" - it's hip to be square!

I would like to enter this card in to the Cards in Envy Hip to be square challenge.

Thanks for stopping by,
Leanne xx


Monday, 15 August 2016

A technique day.................. brayer mirror image.............

 Morning, well, I've scheduled this blog today as I will be just landing at Gatwick from my holiday so I thought it was an apt opportunity to share a technique I use quite often (and I used and promised a blog on 22nd July when I used it on my under the sea card).

Now, reflections aren't always the easiest of things to achieve and I don't want to teach anyone how to suck eggs either!!!  This is a simple technique that I use when I feel that I need a mirror image of a stamp - sometimes to balance a card, sometimes because I simply want two of a single image and I only have the one stamp!

This works for me and I'm simply using this opportunity to share it with you.......
                                                                     
 These are the two finished pieces, both made with only one rubber stamp but handy when you can make two!

OK, I started with the same fish as I used in my under the sea card on 22nd July.  I stamped it in a nice new Momento Tuxedo Black ink pad.


Stamped the image on to white card stock.


Then simply re-inked the stamp and walked the brayer over it (a firm brayer is best for this).


Then, without delay, walk the brayer over your card stock - ta dah!! Your fish has a friend!!!!


I don't always but sometimes just need to fill in the outline a bit with a fine liner, this is because I am usually messing around with a lot of inks and paints and the image is fine left as it landed. Two fish!!


This time I'm working with a seahorse. Inked it up with a nice juicy ink pad.


A seahorse and his friend (or himself if he's looking in a mirror of course!).


All done, a simple technique that is easy to do with little risk to your artwork.


I hope I've inspired you to have a go?  So, when you've got one stamp and need two - there you go!!

Thanks for stopping by,

Leanne xx


Friday, 12 August 2016

We Don't Stop Playing Because We Grow Old..........

Morning!

This card was made for my Father In Law.  I have used distress inks on the background and a slight sprinkling of brusho powders.  Then I have moistened a round sponge applicator and stamped in plain water the circles and lifted off with kitchen towel to give a faux bleached effect to the circles.

A Creative Expressions stamp of the Jive and some musical notes from Visible Image stamped in black with the sentiment of "We don't stop playing because we grow old, we grow old because we stop playing".  Some final work on the edges with some silver embossing powder and top and bottom die cuts by Sue Wilson.  Matted on white card then a black mat.  Underneath that, an  embossed white mat again on a black mat.  Some black Creative Expressions glue dots and I was done.  It was well received and I was pleased with that! Not a small card measuring 8 x 8 inches.

Thanks for stopping by,

Leanne x

Sunday, 7 August 2016

No Matter Where You Go In Life..........

Morning!!

I have made this card for Stamping Sensations this month as my contribution as their guest designer for August for the theme "Anything Goes".

Well, I thought, it's the summer so lets go to the summer heat in the Serengeti!!!!

I loved experimenting with this one (I love to experiment all the time and to see what different effects I can get from my products in my stash).

OK, so, I started this card as usual with a blank sheet of card and painted the background with some lovely warm Aqua Tints. Then I stamped in black versa fine ink some foliage and some Serengeti trees at the edges.  Then the rubber stamp comes in to play - this time Elephants from Imagination Crafts Art Stamp range.


Now, this stamp stamps out the background and leaves the main image unstamped so that you can so easily stamp over many mediums and your colours show through - looove these!!!!!!

So, next step was to stamp it on to the background with perfect medium and clear MATT embossing powder.  So no shine and basically no image to be seen at this stage either!!!!!  The elephants are of course not inked when stamping so the background becomes a resist with the matt embossing powder giving you an easy surface to in this case use diluted bleach and bring those beautiful beasts to life.

I added a couple of black frames and some die cut black foliage and the sentiment "No matter where you go in life, it's who you have beside you that makes the journey worthwhile" - in this case, it's a mothers love with her two infants.

Finished with four Creative Expressions black glue dots in each corner.

I thank all at Stamping Sensations for choosing me as the winner of their "Feature a Creature" challenge and their request for me to be a guest designer this month - it has been a pleasure and great fun - thank you all!!!

I would like to enter this card in to :-

Country View Challenges - Hot Summer Days Challenge.
Artistic Stamper - Anything Goes Challenge.
Thats Crafty - Zesty Zing Challenge.

Hope you like this creation, and thanks for stopping by,

Leanne xx

Friday, 5 August 2016

Your wings already exist...............


Morning!  I really enjoyed making this card! A great theme from Cards in envy for their challenge "wings".  I wanted to feel that the bird was moving - perhaps landing, I wanted there to be a sense of movement from this theme and I was really pleased with the finished result.  So, here goes with a step by step for you to see how I got there!

I started with my usual blank piece of white card and applied some aqua tints (a favourite of mine) to the background (keeping in mind I needed to use colours that would lift nicely when sprayed through a stencil later on).  I then very lightly stamped my image from Inkylicious just so that I could see roughly where it was going to enable me to start to paint some diluted bleach on to the wing areas.


Then I spread some Pebeo Milton relief paste on my craft sheet and stamped the image in to it and then on to the card (remember to wash your stamp at this stage in soapy water - you don't want the mixtion paste to stick to your stamp!).


Once the paste was no longer white (went clear) I foiled over it with a gold foil sheet.


I also lifted some paint from an area in the bottom right hand corner so that I could stamp my sentiment on there.  I covered the bird and the area in the bottom right hand corner with some pebeo masking fluid and when dry I then laid a stencil over the whole image, spritzed with water and lifted off - WOW!!!  Rubbed off the masking fluid. Then stamped some gold embossed feathers and the sentiment "Your wings already exist all you have to do is learn to fly".


I then applied glossy accents over the bird (you can see that the glossy accents is still wet on the card above - it's still a little blue!) A touch of distress ink to darken the edges and draw you in.


Just a couple of mats to keep within an envy envelope.


All done, quite stunning I thought? Pleased with that "wings".

I would like to enter this card in to the Cards in Envy challenge "wings".

Thanks for stopping by, hope you like it?

Leanne xx


Monday, 1 August 2016

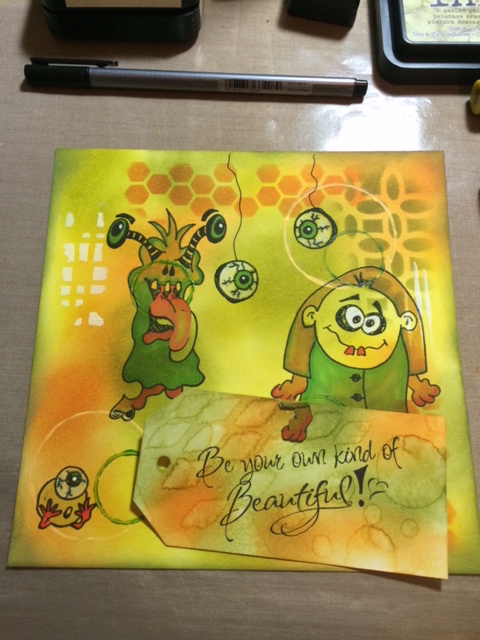
Be your own kind of Beautiful!


Morning! Well I don't mind telling you a little secret.......(this was a bit of a challenge for me!!!! - out of comfort zone here!!!).

As you'll have noticed from my blog, I'm quite a serious crafter, serious subjects and serious colours but monster and or aliens set me a challenge from Moving Along With The Times - I quite enjoyed it actually once I got it straight in my head where I was going with it!


Started with my usual blank white piece of card stock and laid down some distress inks.  Knew that I wanted my aliens to hold the sentiment so inked up a tag in the same colours and stamped the sentiment "Be your own kind of Beautiful!"


Then got out some stencils and using the same colours that I used for the base I inked through those. Used some white acrylic paint to go through a further stencil and an old lid to make some circles. Stamped my alien and monster and the eyes (Dylusions stamps) and gave the eyes a cord to dangle on with a fine liner.  Coloured in with alcohol pens. Note the hand of the monster and tongue of the alien are on here but not stuck down yet (I needed to stamp the hand and tongue twice and colour in twice as I wanted the hand and tongue to be glued on top of the tag).


There, matted the tag on black card to make it pop from the page and stuck the monsters hand and aliens tongue over the top of the tag.

The idea behind this card was to do a card and keep the colours so that it would be suitable for both a child or an adult alike.

Out of my comfort zone here but thoroughly enjoyed the challenge!

I would like to enter this card in to the Moving Along With The Times "Monsters and/or Aliens" challenge.

Thanks for stopping by,

Leanne xx