Published Permissions

Friday, 9 September 2016

Happy Anniversary Husband......


Good morning!

Todays blog is a card made for my husband James for tomorrow 10th September (no, he's not allowed to look at this blog until tomorrow!!!!) - our 22nd Wedding Anniversary.

James loves his cars so I thought this design was rather sweet, so, started with my usual white piece of card stock.   I've stamped the lovely little old car first (Joy Crafts) then I masked it with masking fluid.

The next stage was to use a heart inkable stencil (Inkylicious) and drag in some distress ink around the edges so that I could see the heart and knew where I was going.  

I filled in the top section of the heart with some blue distress ink to sort of give me a sky and then I stamped some trees and grounded those with the same colour distress ink as I had inked the heart with.

Went straight over the top of my masked off car with the lovely green bushy trees (so that they appeared behind the car when I rubbed off the masking fluid.

Added a couple more trees coming up from behind the green trees.

Painted Glossy Accents on the windows of the car for shiny glass, framed the whole design with a lovely brown leather effect card stock frame cut from Sue Wilsons dies and I was done!

Very happy with this one and I hope that James will be too tomorrow!

"Happy Anniversary James" xxx

I would like to enter this card in to:-

Sweet Stampin Challenge - Weddings/Anniversary/Love.

Country View Challenges - September challenge - Travel.

Thanks for stopping by,
Leanne xx


Monday, 5 September 2016

May All Your Dreams Come True......


Good Morning!!! I've been having some fun with some of my Chocolate Baroque stamps this week!
I took my usual blank piece of white card stock and stamped my mushrooms - aren't they fabulous? (for mushrooms!!!!).  I then masked them over with masking fluid and then ironed on some crumpled up wax paper - straight over the top of the masking fluid.  I then blended on some colours (chosen for the Chocolate Baroque challenge 26 colour palette) and it shows up the wax that has transferred beautifully.


Here you can see me getting there! I have now painted in the mushrooms using the same inks diluted with water and stamped my Chocolate Baroque sentiment of "May all your dreams come true!".
This card will go to one of my daughters friends who is going to start University - she will address it to a "fun guy" - fungi - mushrooms????!!!!!!!!


Quite happy with this one and it was really nice and relaxing to do with the blending and colouring in.

I would like to enter this card in to the following challenges:-

Chocolate Baroque challenge 26.

Words 2 Craft By - A Single Step.

Thanks for stopping by,
Leanne xx


Sunday, 4 September 2016

Happy Birthday Hochanda!


Good Morning!! Well just a quick extra blog this week so that I could share the card that I made and sent to the television channel Hochanda last week.  I incorporated their logo on to my card and imagine my surprise when..............


I saw my little card sitting on the counter on the television!!!!! 

That did make me smile and thank you Hochanda for awarding all of us who sent in birthday cards with a £10 voucher to spend - unexpected and it made it all the more worth while!

Normal blog will be back on tomorrow morning - just had to share this with you!

Thanks for stopping by,
Leanne x

Friday, 2 September 2016

Secrets are hidden.............


Good Morning! Thought I'd have a go with my Lavinia Stamps this week.  I just love the mystical feel that they have. I've produced this card with the theme of autumn colours for the Lavinia Stamp challenge this month.  Can you tell where the secrets are hidden??????

The first step I took was to stamp the largest toadstools and seed pod and mask them with drawing gum.  Then I used the wax paper technique to give the whole piece of card some texture and resist.

I then brought in my autumnal colours with distress inks and momento inks - sponging them all over. Then I coloured the seed pod and toadstools with alcohol pens.

I finished off by stamping my little animal friends and the fairy and her dandelion heads and added some glitter to the toadstools and around the seed pod and dandelion heads.

Where do you think the secrets are hidden???? Well, my guess is that they are going up with the dandelion seeds as she thinks of them........

I would like to enter this in to the Lavinia Stamp challenge - Autumn Hues.

Hope you like this one,
Thanks for stopping by,
Leanne xx

Wednesday, 31 August 2016

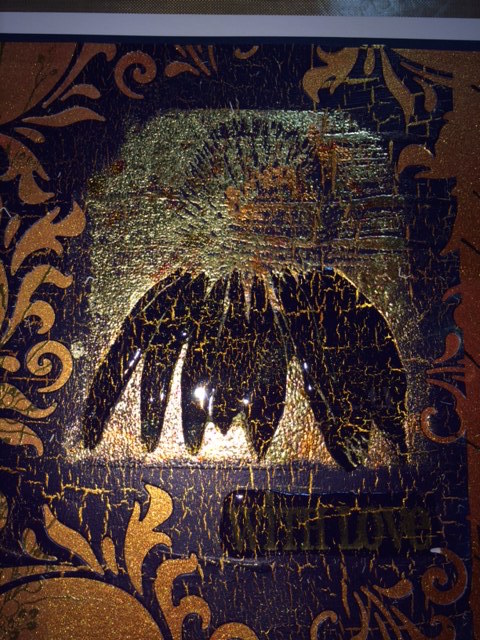
With Love.............


Good Morning!!! I had lots of fun making this card inspired by the That's Crafty Challenge "Get Cracking!".

I took some photo's along the way for you with this one so lets make a start!:-


I painted a piece of white card stock with two colours of Imagination Crafts starlights (really bright and shiny!) Then, when that was dry I painted one coat of Creative Expressions crackle glaze and left that to completely dry.  Over the top of those two coats came a layer of navy blue acrylic paint and I waited for the magic to happen.......BEAUTIFUL cracking revealing the golden starlights beneath.


I stamped my flower image (Imagination Crafts) with sticky embossing powder and covered in gilding flakes.


Then covered the flower petals in Glossy Accents and left to dry.


This shows you the stamp that I was working with.  I used a Sizzix die to put pattern to the edge of the cracked card and layered this on to a further sheet of card that I had painted the starlights on to using my brayer.  I also added some floral stamping (Chocolate Baroque) to both sides, one side in bright gold embossing, the other in blue Versafine ink and clear embossed over the top.


Here you can see the beautiful Glossy Accents over the flower petals and sentiment.


A good look at the amazing crackle that has come through.


Nice and super shiny - very happy with that one!

I would like to enter this card in to the Thats Crafty "Get Cracking" challenge.


 Thanks for stopping by,
Leanne xx


Monday, 29 August 2016

Dream......


Good morning!

Well, for those of you that know my usual style THIS IS WAY OFF PISTE FOR ME!!!!!!!

I was inspired to make this card for the Moving Along With The Times challenge "Clean and Simple".  

Well, a rather simple card for me but I had a clear image in my mind of what I wanted to achieve - my idea of clean and simple!

I like mats and layers and to keep in with the theme I decided to keep to all white so I measured out three mats and layered them on top of each other.  I don't know why, but I was drawn to this stamp by Inkylicious and to the simple sentiment "Dream"which is a part sentiment to the Inkylicious stamp "Dream Until Your Dreams Come True" - I just inked up the word Dream - I felt that was all that was needed and it went so ideally with the image. These were inked in black Versafine ink for crisp permanent images. I stamped the whole sentiment on the inside of the card "Dream Until Your Dreams Come True".

Finished with a lovely deep red velvet ribbon and tied the bow.

There, clean and simple! A lovely card to give to someone perhaps going off to university or setting sail to adventures new.......

I would like to enter this card in to the Moving Along With The Times "Clean and Simple" challenge.

Thanks for stopping by,
Leanne xx


Thursday, 25 August 2016

Beautiful.....


Good morning! Got in a right painty mess with this one!!!!  Inspired by Allsorts Challenge "Fabulous Florals" I set out on a bit of an adventure!!!

I knew the stamp I wanted, I knew the effect I wanted - it was just a matter of how I got there, but get there I did and I'll show you how......


I started with my usual white piece of card and sprayed some yellow and red inks on it.  Then I stamped my rose image in perfect medium and embossed with matt clear embossing powder. I also at this stage added some stencilled leaves and stamped the "beautiful" sentiment in Archival ink.


I had to start to make that rose stand out so I started to darken behind it with some Distress Ink.


It needed to be darker still so I added more......


Then one of my favourite techniques, - bleach!!!!  I needed to remove and lighten between the embossing.


Now comes the magic.  By adding acrylic paints the rose started to come to life!!! I have also added some stencil work at this stage too.


I took this photo for you to see the stamp that I was working with from Imagination Crafts.


I made the very bottom of the stamp very dark to bring the rose out a bit more.....

Happy with that!

I would like to enter this in to the Allsorts Challenge - "Fabulous Florals".

Thanks for stopping by,
Leanne xxx