Published Permissions

Monday, 30 January 2017

Birthday Wishes (with a 60's twist!)....


Good morning!

Well how is this to make you smile first thing in the morning!

Loved making this card for a friend of my daughter Katie. I appreciate it was made for a 16 year old and I have used some of Sheena Douglass' Groovin 60's stamps but hey, it's a "boppy" card so boogie on down!!!!

I must admit to being rather bad at remembering to take photo's as I go along recently but I'll talk you through it as always. I get so engrossed in what I am doing, taking photo's doesn't enter my head - well, not until I've finished that is!!!!

OK, this card started with me sponging some pumice stone distress ink through lace (I love using lace!).  Then I used a Sheena Douglass stencil from her Groovin 60's range and sponged some picked raspberry through it.  

Flowers were stamped in the grey and pink again from Sheena's Groovin 60's range. I decided to use some wow embossing glitter with some of the flowers to give it a sparkle.

Then came the girls dancing stamp - a great stamp and I've used versafine grey ink here to stamp it.  I wanted it to be a bit of a disco atmosphere so was happy for the colours of the flowers and stencils and lace to show through them a bit as they were silhouetted on there.

Used matching stamps to decorate the actual card base and stamped the sentiment twice on the card and once on the actual image.

I love these new stamps by Sheena Douglass and I do stress that I am too young to remember the 60's!!!!! (I'm a 70's baby!!!!!) but I just love the era and all that it brings.


A nice bit of fun today!

Hope you like what you've seen today and thanks for stopping by,

I would like to enter this card in to the Cards In Envy challenge of "Pink and Gray":-

Leanne xx


Friday, 27 January 2017

Friendship......


Good morning!!!

We're going for a bit of colour to brighten the day today!!!!

Inspired by the current Clarity Stamp monthly challenge of "The Animal Kingdom" I've had fun producing this one! (I struggled with the photograph for some reason, I just can't get the birds clear but they are crystal clear on the card).

This piece started out with a piece of coated card stock which I poured pure alcohol on to.  I then dripped three colours of alcohol ink in to the pool of alcohol on my card stock and moved the card about enough (just by tipping the card one way then the other) for the colours to blend together.  Once I was happy, I dried it off quickly with the heat tool. This left some areas of white space but that's ok - I like that!

I then stamped the frame and masked it off using some post it notes.  The Love birds were stamped in the centre and were masked off too with a paper mask.  The trees were then stamped behind the birds.


I decided at the last minute to continue the picture outside of the frame so I masked off the frame with large post it notes and stamped the trees either side.  

The colouring has been done with Spectrum Aqua markers (undiluted) and some little birds stamped around the scene.

The sentiment of "Friendship" fitted perfectly within the frame so I stamped this in versafine ink and embossed it with clear embossing powder.

Mat and layered on to a single black mat.

Really colourful and cheerful!

I have given this card to a special lady on her birthday that brightens my day every time she contacts me, she knows who she is and I appreciate her and her continuous kind words very much.


I would like to enter this in to the Clarity Stamp Challenge of "The Animal Kingdom" on Clarity Worldwide Facebook.

Thanks for stopping by,
Leanne xx


Monday, 23 January 2017

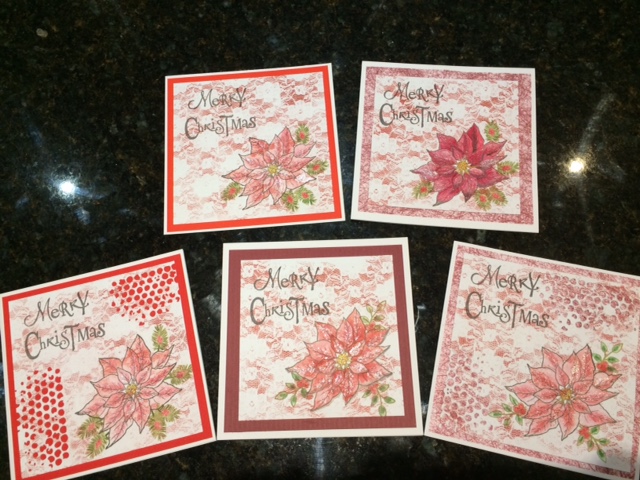
Five Christmas Cards for January!!!!!!!


Good morning!

Look at me!!! I'm off to a wonderful start with my new years resolution of 5 Christmas cards a month for 2017!!!!

As promised, I will share on one blog each month my 5 Christmas cards for each month and here we are with January's makes.

I haven't got a step by step on these but I have taken individual photo's of each one for you so that you get a closer look at each of them.

Each card being slightly different I shall try to explain the basics to these.  

I have really enjoyed playing with lace through 2016 so I thought it would be super to start my Christmas card adventure using some lace - not very Christmassy? - that depends on how you use it! I believe that most things can become Christmassy if you put your mind to it!

These cards started with a piece of lace being placed over my Sheena Stamping card and sponging through some distress ink.  I didn't stick the lace down, if you are careful you can just hold it and dab gently for a lovely loose effect.  I then used a Woodware poinsettia stamp, some of these are stamped with Archival watering can and others have been embossed with clear embossing powder over it (where I was going to use water colour within the image). I have added some foliage from Clarity Stamp too.

The sentiment is from Clarity Stamp.

OK, let me see if I can tell you one by one how I've coloured the Poinsettias:-


Water coloured with Inktense pencils and die cut into and layered on a fibre mat. Finished with sparkle pens.


Intense pencils here but using them as colouring pencils without water this time and matted on to plain card stock, finished with sparkle pens.


Inktense water colour pencils here and die cut into with bright red mat.  Finished with sparkle pens.


Inktense water colour pencils, bright red mat, no die cutting this time and finished with sparkle pens.


Oh yes, my favourite! Good old Polychromo pencils, look at the intensity of colour that builds up here.  Matted on to a fibre mat and finished with sparkle pens.


I know that the sparkle pens can't be seen on the photo's but look - a super close up shot - it's there..... honest!!!!!


So, there you go, month 1 - mission complete!

Thanks for stopping by,
Leanne xx


Thursday, 19 January 2017

Dream canvas.


Good morning!

Well, this is indeed a more complex piece of artwork but I had a ball with it!!!!!  I let my creative side just take over!

I am very grateful Cec and all the team at Stamps and Stencils challenges
stampsandstencils@blogspot.co.uk for asking me to be their Guest Designer this month.  Their new theme is "swirls, whirls and flourishes" - it's a brilliant theme and there is lots of scope there to include a swirl, a whirl or a flourish on your piece.

As you will see, I went the whole hog and got swirls, whirls and flourishes on here so shall we take our usual journey and see how I got there?


OK, I started off with a piece of tissue paper (gift tissue) and with some cut n dry foam applied some Archival watering can ink through the stencilgirl stencil.


Then it started to get messy (my favourite place!!!) I stuck the tissue paper to a 12 x 12 inch canvas using Powertex napkin glue and allowed that to completely dry. Then I applied some modelling paste through two stencils - a swirl and a whirl!.


Here I have sprayed some yellow Powertex Bister Spray to start the background colour.


Now we have some drama on that background, I've used green and yellow Bister Sprays now, I added some lace that I've applied with Mod Podge and sprayed with the ink sprays too.  The flourishes are Sue Wilson Dies and the small paper flowers I have had in my crafty stash for so long, I have no idea where they originally came from!

Now, the problem I saw was that the girls face was too lost on the canvas and I needed to bring her completely forward so I made a start on completely enhancing her face and her hair.


There! What fun I had!  I used the modelling paste to change her hair to bring her forward and the face I enhanced to bring out that nose and mouth and particularly the eyes. I have used Pebeo gilding wax (silver) to highlight all of the swirls and flourishes and gold gilding wax to highlight her hair.

I stamped the sentiment of "Dream" from Clarity Stamp on there and I was very happy with this.

If nothing else, this project shows you how you can adapt your stencils in to anything you wish them to be.  Use your stencil to start your piece off and build on it from there as I have in this piece.


This is all the ingredients apart from the stencilgirl stencil which you can see in the first photo.


Hope you like what you see and that you have enjoyed our crafty journey today.

Don't forget to pop along to Stamps and Stencils and join in their new challenge of "Swirls, whirls and flourishes".

I would like to enter this piece in to current That's Crafty challenge of "Silver and Gold":-

Thanks for stopping by,
Leanne xx


Wednesday, 18 January 2017

A Starry Night...............


Good morning!

An extra post this week (look out for a special post tomorrow - 19th January - very exciting!).

I have been inspired to make this card for this months challenge over at Lavinia Stamps (I just love fantasy and mystical stamping and I have a large collection of stamps from Lavinia Stamps). The theme? - "A Starry Night".

I wanted this card to be mystical but also have a feeling of a little bit of "creepiness" mixed with my love of animals at night.  I live on a farm in open land and it's wonderful to hear the noises of all of the animals in their kingdom at night time when all is at it's quietest. The stillness, the coolness and the thought of how many little pairs of eyes are on you if you venture outside in to their world.

I started by placing down a mask of a moon shape and then started smearing on some distress ink for the sky, I blended a bit of water with it to get a nice smooth sky but left the very centre very open of colour.

I tore some copier paper and inked in my hill.

When I was happy that all was dry, I removed my moon mask and stamped the beautiful hare in versafine ink.  I then stamped my foliage using the same distress ink as the sky so that it was nice and dark and then went over again with some perfect medium and gold embossing powder. I just felt that there had to be some shimmer on their somewhere in the moonlight! 

I stamped the lovely Lavinia sentiment.


My stars were next in the sky with the same versafine onyx black and then stamped them around the hare with the distress ink that I had blotted before I stamped so that those stars were paler and so that they didn't distract us from the hare.

Pleased with that - I think I've captured what I wanted to.

I'd like to enter this in to the Lavinia Stamp Facebook Challenge "A Starry Night":-

Penny Black and More Challenge - "Anything Goes":-


Hope you've enjoyed your visit today, thanks for stopping by,
Leanne xx


Monday, 16 January 2017

Memories are our own Time Machine............


Good morning!

I have made this card for a friends birthday next month - had a good play with another of Sheena Douglass' Time Traveller stamp collection.  Forgot to take photo's for this one so I'll explain how I got there.

Started off with a piece of watercolour paper and used Aqua Tints to lay down the background colour.  Stamped the Time Machine but wasn't happy with how much ink I got down on to the paper (it's harder to lay down the ink from the stamp on to watercolour paper, often because of texture and fibres in the paper).  So I knew I had to enhance the stamped image myself (which is great fun).  I have used a combination of Inktense watercolour pencils and Spectrum illustrator markers on the Time Machine.  I couldn't make my mind up if I wanted it travelling over water or clouds so I went for a water look but to me it could still be clouds!!!!?

Finished with a nice big stencil - a big whirl as it travels in time!

Mat and layered.

I think he'll like that!

Thanks for stopping by,

Leanne xx

Friday, 13 January 2017

Take time for all things.........


Good morning!

Thanks for popping in.  I have been having a play with a new Sheena Douglass stamp from her Time Traveller collection.  A whopper of a stamp but stamps beautifully.  I've done a step by step on this one so shall we take a crafty journey today? - Come with me.....


I started with a watercolour block pad (love a professional pad where the edges of the paper are sealed - the paper can't move no matter how much water to throw at it!).  I pencilled in a 7 x 7 square - this just gives me a loose idea of where I am with my design.

OK, I got out my Aqua Tints this time, three colours and using plenty of water, blended them as I went down the page and allowed this to dry naturally so that I didn't lose any of the colour tones.

I then stamped my man using a rocker block (it's such a big stamp, I find a rocker block helps).  I then lifted some colour back off of his face with water.


So, using the same Aqua Tint colours as the background, I enhanced his features slightly, and his hair and brought in a little chalk paint to highlight his face.


I have now added some background detail with an Andy Skinner stencil and used the chalk paints to enhance a  leaf Clarity Stamp stencil. (If you are wondering what on earth is going on in the bottom right hand corner - this is simply where I've used the wet chalk paints on the watercolour paper as a palette but to avoid putting my arm in the wet paint, I simply cut it away! What you can see is a scrap piece of paper to stop me marking the rest of the watercolour pad beneath this one!).


There we go - finished with a Sheena Douglass die cut of a pocket watch and chain.

Mat and layered.

I wanted to bring his face right out of the page and I think I achieved this - pleased with this one!

I would like to enter this in to the Stamping Sensations challenge "Coffee and cream":-

Thanks for stopping by.

Leanne xx


Wednesday, 11 January 2017

Let it snow.......


Good morning!!

Well, I don't think it hurts any of us to go a little bit out of our comfort zone occasionally and try something different that is not our "normal thing" and this was most certainly not my normal thing!!!!!

We know that I love ink, paints, stamping and splatter and this couldn't be further from it!!!

I saw this challenge over at Time Out Challenges with their theme of "Winter with a twist of white on white".  I could have just passed it by but something stayed in my mind and got me thinking about this one, perhaps because it's so far from what I normally do? I enjoy a challenge and I very much enjoy what I do so I thought, you know what, let's do it!  

Well, my usual stamping wasn't going to happen as I just couldn't think of how I could show anything up with the twist of white on white so I opted for die cutting.  You will see from the blog that die cutting does come in to my crafting but usually as an embellishment of some sort or another but this one had to be completely die cutting for me to stand a chance of seeing it on the camera!

So, a pretty straight forward line up really, I started by tearing two pieces of white card stock to layer right at the back to give a bit of depth. I then hand embossed some wavy lines to add a feature to the bottom of the card.  I tucked in the beautiful Christmas Tree (Tattered Lace) between the two layers.  I then cut the three lovely deer and snow flakes (all Sue Wilson Dies). So, once I had the dies all cut I knew I had to stamp the sentiment (the only form of colour that the challenge would allow) so that I knew where to build up from.  I then set about layering everything up with glue and 3D glue gel for dimension.

I added some glue here and there and covered with white glitter dust.

Matted and layered on three white mats.

What a pretty card, hey, that's a Christmas card done for next Christmas already - a great start!!!!

I would like to enter this in to the Time Out Challenges "Winter with a twist of white on white":-

Thanks for stopping by,
Leanne xxx


Sunday, 8 January 2017

A Christmas Thank you.......


Good morning!!

Well, it's a new challenge over at Fashionable Stamping Challenges today and our new theme is 
"Winter or Spring". Please remember that the main focal point of your artwork MUST BE A STAMPED IMAGE AND NOT A DIGITAL ONE.

I'm sending out my Christmas thank you's at the moment so I'm sharing this one with you today.  I took some photo's along the way so shall we take our usual journey?


Let me introduce you to "Angel" - another outstanding rubber stamp by Pollyanna Pickering. Here I have started with my usual piece of Sheena stamping card and stamped the image with Archival ink and masked over with masking fluid.


Ok, I have soaked the paper with water and added some black india drawing ink to form the sky and added some hills in the background. I then rubbed away the masking fluid.


Here I have stamped some tree tops (Inkylicious) in black and then restamped over the top with some white embossing powder.  I have painted in angel using Spectrum Aqua markers diluted as paints and I have added some white modelling paste to the branches.


What a beauty! I added some Diamond Ice crystals with some glue to all the branches for snow and printed my sentiment on to vellum.

Mat and layered.

Really pleased with this one, perfect for a wintry thank you.

Don't forget to have a go at our new challenge over at Fashionable Stamping Challenges "Winter or Spring" REMEMBER we must see the focal point of your project as rubber stamping - we love to see how creative you all are!

I would like to enter this in to the following challenges:-

Moving Along With The Times Challenge - "Something in the air":-
http://movingalongwiththetimes.blogspot.co.uk/2017/01/36-something-in-air.html

Artistic Stamper - Anything goes
http://theartisticstampercreativeteam.blogspot.co.uk/2017/01/january-2017-creative-team-challenge.html

Cards in Envy - Snow birds
http://cardsinenvy.blogspot.co.uk/2017/01/snow-birds-card-challenge.html

Country View Challenges - Anything goes
http://countryviewchallenges.blogspot.co.uk/2017/01/january-2017-anything-goes.html

That's Crafty - Anything Goes:-
http://thatscraftychallenges.blogspot.co.uk/2016/12/anything-goes-2016-challenge.html

Craft Stamper - Anything Goes:-
http://craftstamper.blogspot.co.uk/2017/01/take-it-make-it-challenge-january.html


Thanks for stopping by,
Leanne xx

Friday, 6 January 2017

Sometimes in the winds of change.................


Good morning!

Well, this card has been made from the heart really.  Tomorrow I shall close one of my businesses (a very large local pet shop) due to Pets At Home having moved in to the town last March where from it has been removing my customers ever since!  Not too much of a drama as I've obtained planning permission for a change of use so what was a lovely independent pet shop with full animal licence - it will now be flats! - Thats the local council for you!!!  So, after 30 years of trading in our family and although it is sad, I think I'm ready to let the hard work go now and take the rental income instead and so this card was made while I thought to the future really.  

I must admit, while my mind was a bit elsewhere, I did forget to take the photo's as I went along but I'll talk you through it as always.

I think you can see from this artwork (or at least I can) that my mind has been unsettled for a while as I had to make some rather large decisions.  The air is stormy, the colours quite dark and the sentiment was perfect.

I started with my usual piece of Sheena Stamping card which had been sprayed with some bister spray inks and left to dry.  I then turned the card until I could see how I could get my stamped images on there and looking right.  So I then stamped the man and the tree (both Clarity Stamp) in black Momento ink.  I grounded them both using a piece of torn paper and some sponged distress ink.  Using the same torn paper and distress ink I added the hill in the distance.  The clouds have been done by just smoothing over some gesso gently and then enhancing with a soft charcoal pencil.  The grasses at the front are from Inkylicious and I just had to ensure that they were leaning over in the same direction as the wind was blowing!  

The final touches are a few spots of water, just dripped from my fingertips and the colour removed with a piece of kitchen towel and the shadow put in with the charcoal pencil from the mans legs with some white pen to highlight around him and the tree.

A sad time for me and my staff at Pettifers Pet Shop in Rushden, Northants.  (I do have other businesses) - this was a much loved shop but too smaller fish to compete against the larger chain.  At least with the rental income from the completed flats, I won't have to get out of bed to earn the same income. - Do you sense bitterness? - yes, do you sense sadness? - yes, do we pick ourselves back up, brush ourselves down and carry on and make the best of what we have got - YES WE DO!!!!

"Sometimes in the winds of change - we do find our true direction",

Thanks for stopping by,
Leanne xx


Wednesday, 4 January 2017

Are my family telling me something??!!!!...


Good morning!

A short extra post this week as I thought I'd share a couple of my Christmas presents from my husband and my children with you.  Oh no, it's not lovely new stamps, no, it's not beautiful stencils or paints or inks or card stock......no, it's a box of rubber gloves and a desktop Henry hoover!!!!!!!!!!!😂

Are they trying to tell me something????!!!!!!

OK, yes, my hands and fingers are usually different colours most days of the week and never a normal skin colour.  Yes, my desk is usually covered in embossing powder that you cannot see but can feel on all your card stock or rubbings from rubbing off masking fluid- so I guess I give them 10 out of 10 for trying to tidy me up?!!!

I must confess, they did treat me to some Powertex (SO I'M GOING TO GET SUPER MESSY!!!), stencils and stamps from Clarity Stamp and stencils from Sheena Douglass and 120 polychromo colouring pencils so I am really grateful for some super crafty goodies.......just have to try and find room to put them in the craft room now!!!!!!

Thanks for stopping by, see you on Friday as usual.....
Leanne xx


Monday, 2 January 2017

A hook at one end, an optimist at the other.......


Good morning and Happy New Year to you!!!!

Well, as promised on Friday, here is the second of two pieces of artwork that were produced from pieces of card stock that had been used to clean off my brayer! The other piece is here on the blog post for last Friday.


OK, so we are now concentrating on the green and yellow brayer clean up card at the top here.

Once I've got my card and finished the artwork that I've been doing, I turn to the piece of card that I've used to clean off my brayer.   I love to turn it around and around and try and see what i can see in the ink - this is where you do need a bit of imagination but believe me, it's a challenge and it's great fun - especially as you carry on working with it.


So my journey with this piece found me starting with the image of water - I could see height on the right and perhaps water on the left - do you see it? It's really quite strange how one person sees one thing and someone sees something quite different!  I've tried this with my family and we all see totally different things!!!

OK, so I tore a piece of paper and sponged some black distress ink on to the right hand corner and I had a riverbank in my view.   From here, my mind did the rest!


This was so simple! I had to make that riverbank look more like one (and I think Ive done this using some Inkylicious stamps here) and with a moon, the water horizon line just enhanced a little bit and a man in his rowing boat - it just emerged off of the page!

Such a simple technique out of a piece of waste card - again, bouncing off of the back of another piece of artwork that I had done and just the cleaning off of my brayer!

Hope you've perhaps seen something new here  and if not, I really hope that you enjoy letting your eyes and your mind see what can come from a piece of brayered card stock!


A reminder of what we started with over the last two posts here on the blog. - I think it's amazing!

Ok - on a different note - 

Have you got a new years resolution?  I'm sticking with the same one that I had last year - so come on followers, we can do this, it's not hard and it gives you an excuse to get in that craft room and think of something festive and jolly once a month - FIVE CHRISTMAS CARDS A MONTH!!  I CHALLENGE YOU - I'll do it and once a month, I'll blog my five cards!  There a promise!!! So look out for my efforts appearing on here throughout 2017!

Thanks for stopping by and enjoy the rest of your new year celebrations. I wish you all a very happy and healthy 2017.

Leanne xxx