Published Permissions

Monday, 31 October 2016

Dance in the Moonlight..........


Good morning and Happy Halloween folks!!!!!!

Well, todays post just had to be a Halloween card didn't it??!!!!!

I took photo's along the way so shall we take a spooky journey today?


OK, started with a piece of Sheena stamping card and soaked it in water and dotted on some black india drawing ink and allowed that to dry.


Then I knew that I wanted the effect of cobwebs in the top of the artwork so I took an embossing folder and made a stamp out of funky foam! (where there's a will, there's a way!!!).


So I inked that up and stamped the top right hand corner with it - perfect!


I inked up a further piece of white card exactly the same way and when dry I stamped tree branches (Chocolate Baroque) all around it and backed it with black card stock.


So I went back to the main central piece and stamped the bats, witch and graveyard stamps (if you notice, it's the graveyard tree that I stamped all around the outer edge).  All of these stamps are Chocolate Baroque.  Put a bit of lightening in there with a white pen and tinged it a bit yellow to lighten the sky from the lightening strikes.

Assembled all the mats and layers and used a pen to draw an outline around the main panel.

Very happy with that!

I would like to enter this in to the following challenges:-

That's Crafty - Friday the 13th part 2 challenge.

My Time To Craft - Autumn colours or halloween challenge:-


Hope you like it too!

Thanks for stopping by,
Leanne xx


Friday, 28 October 2016

Just For You.......Happy Birthday.............


Good morning!

This card was made very recently for a friend of my daughter who is at uni (Yes, I have to send my creations to University!!!).

I only took a couple of photo's as I didn't think about blogging the card at all until Hayley said "Mum, you've got to put it on your blog!" so I'll talk you through it and we'll take our usual journey.....

This creation is highly sparkly but that was almost impossible to pick up on the camera so unfortunately it has come out a lot darker than it actually glistened - you get more of a feel for the shine on the second photo!

OK, I started with a piece of yupo paper this time (the central piece that you see here) and dropped three colours of alcohol ink on to it, let them bleed and then added a tiny amount of blending solution to make the ink move around a bit then left it to dry (which doesn't take very long at all).

I then cut my white mat and then a larger mat from sheena stamping card.  The second mat I wanted to leave white and the third one I have blended distress inks around it and stamped with the same distress ink some little butterflies so that they sort of blended in with the background.

With me so far?

As you can tell, this card had lots of separate components so it was a matter of making each part as I went and assembling everything together at the end!

I then stamped the number 21 all along a lovely piece of teal ribbon.

Now for the main butterfly, this is a stamp from Daliart and it's so intricate - it's really beautiful.  First of all I wanted it to have some texture so I ironed some Angelina Fibres to roughly the same shape as my butterfly.  The stamp isn't deep enough to get a crisp image on the fibres but I did use it to flatten the fibres to the desired shape. I used three different colours of fibre, two blues and a silver.

I then stamped my image on to acetate with stazon ink and glittered the individual parts of the butterfly from behind. (This does take longer to dry as the glue cannot be absorbed by the acetate and prolongs the drying time - I actually gave it an extra day to ensure it was dry).  I then used some glitter glue (cosmic shimmer twinkles) and popped a few drops in a couple of different colours on the top of the butterfly too.

When I was happy the butterfly was dry I glued that to the fibres and cut and teased around the butterfly shape.

I added some pearl glue down the centre of the butterfly and added glitter to the top of that and some glitter glue up the antennae of the butterfly.

A few small butterflies were stamped out - again Daliart and cut around and glittered.

Phew - there was a lot of work in this one by the time I was approaching the final hurdle!!

It was now a case of assembling everything together and attaching the silver peel offs showing the number 21 and stamping the sentiment of "Just For You" at the top and "Happy Birthday" (Phil Martin Sentimentally Yours) at the bottom.


There, I think you can pick up a bit of how shiny this was from this side shot.


So there you go, this card was posted quite a long way, received unscathed and (I'm told) very much liked!

Quite a few techniques thrown in to one card here but when you are asked for pretty - what choice have you got!!!!

"Happy Birthday Sarah" - I hope you had a wonderful day!

Thanks for stopping by and seeing what I'm up to,
Leanne xx


Monday, 24 October 2016

For a gentleman......


Good morning!

This was a card made while I was messing about and doing a bit of experimenting really!

Lets take our usual journey.....


I started with my blank piece of Sheena stamping card and stamped the image of the man (Viva Decor) and covered him in masking fluid.


Then I decided to experiment a bit with Gelato's so I had a scribble with three different colours (one was gold) and applied water with a paintbrush and blended them completely together and allowed them to dry naturally.

Then I brought in another of my favourite techniques which is the use of drawing inks.  So I blended some drawing ink across the page VERY DILUTED which looked good so I thought, what will happen if I apply bleach with some drawing ink (because as we know, gelato's are permanent once mixed with water and dry) well, the result was a bit of a shock - a nice one at that!  - The drawing ink split! Hence you will see what looks like ageing on the background and black marking specks but thats the drawing ink in the bleach which didn't lift any of the gelato's because they were permanently fixed!!! That was something new for me anyway!!!

So I continued stamping, the lightbulb (again Viva Decor) with the chain which is actually the watch chain from the same stamp set as the man. I stamped the numbers which I think are visible image, the splats which are also Visible Image I think and the words and borders which are again Viva Decor.

I painted the lightbulb in with Imagination Crafts gold starlights which is perfect for the glisten that I needed and some circles from old bottle lids.

The sentiment was stamped "for a gentleman.....Golden Memories" - Viva Decor.

I added some Sizzix die cut cogs from brown card stock and applied those.


What a vintage look! I think that drawing ink in the bleach was brilliant and aged it very well indeed!

Hope you like what you see,

Thanks for stopping by,
Leanne xx


Friday, 21 October 2016

Best of Luck.............


Good morning!

Let me introduce you to another of my favourite stamps again from Pollyanna Pickering - everyone in blogland, this is Ralph the squirrel, Ralph, this is everyone in blogland!  I made this card for my daughter Hayley when she left for University early October and thought I'd share it with you all. It sits proudly in Hayleys room at Uni now.....

Shall we take our journey?

I started with my usual piece of blank white Sheena stamping card.  
My first task was to stamp out all of my leaves (Inkylicious) in a nice Autumn wreath shape and mask them off one by one so that they over lapped each other in lovely Autumn distress colours.

Then came Ralph in the middle.  I didn't need to mask him off as I shaded him in with distress inks straight away.

I then shaded in around Ralph with more diluted distress ink using plenty of water to flood the area but not quite going up to Ralph.

The background, outside the wreath has been done using brusho's.  I have sprinkled them directly on to the card stock (not being too careful as the leaves were masked off at this stage) and spritzed with water until I got the effect that I wanted. I stamped some acorns in the corners and shaded those in as well.

Then I allowed this all to dry naturally.


When everything was dry, I rubbed away all the masking fluid and shaded in my leaves. I stamped "Best of Luck" and then chose random leaves to have Glossy Accents applied to them so that they seemed even more raised off of the page.


Matted and Layered.


I thought this was a lovely Autumnal card for Hayley as she set sail to pastures new and a new chapter in her life.....Where did all the years go?  

I think the hardest part of being a mother, is having to let them go......

We love you so much Hayley and we always will..........

Hope you like this one, a bit of a personal peak really but nice to share with my bloggy family.

I would like to enter this in to the Stamping Sensations challenge - "Autumn":-
http://sirstampalotchallenge.blogspot.co.uk/2016/10/october-autumn.html

Thanks for stopping by,
Leanne xx


Monday, 17 October 2016

For Someone Special............


Good morning!

Something a little "different" today for us!

I just love stencils and to work with stencils as high quality as this one is just brilliant! This is from Stencilgirl working on tissue paper - so shall we take a journey as to how I got there? - let's go!

Now, even to me, it's not that obvious where I started on this piece of artwork! Well, I actually started with my usual blank white piece of stamping card (Sheena Douglass stamping card) and laid down some Brusho's in a couple of tones of green and spritzed gently with water. (I should have taken a photo at this point but must confess, was so deep in thought I totally forgot - quite usual!!!!).

I then painted on a layer of Americana Decoupage glue sealer and laid my tissue paper (gift tissue) down and sealed again over the top. (Are you with me so far?) - good! I let this dry completely.

So, I placed my stencil on the tissue to see how it would look with the green coming through the open areas and liked what I saw! So, I had to reverse the stencil to do this (as naturally you would put a colour through the open areas and this would have left the face green!!! No no no, I didn't want that!!  

So, I mixed gesso with glycerin (purchased from a chemist, often used in skin products and totally harmless to your skin) to prolong the drying time of the gesso., Then brayered the gesso mix on to the stencil and flipped it on to the tissue paper and pressed down using a piece of copier paper.

Now, the coloured area with white gesso is actually the "solid" area of the stencil. (We are effectively stamping with our stencil here).

I sponged some Dusty Concord distress ink around the edge and again, left it all to dry completely.


I primed the edges again with some more gesso so that I could take the edges a step deeper with the Dusty Concord distress ink and stamped two birds (Inkylicious) and shaded those with diluted distress inks. At this stage I also highlighted the eyes a bit more with a white pen.


 Time to tidy up a bit I think!


Using the same American Decoupage glue I fixed my artwork to  layer of white card stock and tidied the edges of the tissue slightly - I still wanted a rather rough look though.


A mat was made sponging the same Dusty Concord distress ink.


I then stamped my sentiment "For Someone Special" and matted and layered the card up.

An unusual colour scheme but kept "thin" these colours work extremely well together and can be really rather pretty and peaceful looking.

Happy with that!

I would like to enter this in to the Cards in Envy challenge - "Purple and Green":-
http://cardsinenvy.blogspot.co.uk/2016/10/purple-green-card-challenge.html


Thanks for stopping by,
Leanne xx


Friday, 14 October 2016

Happy Birthday Daughter.........


Good morning!

This card is what it says - Happy Birthday Daughter.  I made this card for my daughter Hayley, she was 18 on 28th September, the week she left for Durham University! I hadn't had a "slot" yet for it on the blog and saw the current Chocolate Baroque challenge and colour swatch and it matched perfectly!

I took some photo's along the way so come with me, we'll take a journey......


I started with my usual blank piece of white card stock, stamped my image (Chocolate Baroque) and then covered that with masking fluid. I went for the shaving foam technique for the background which again, tied in beautifully with the current Chocolate baroque challenge inspirational photo (the ocean) and goes so well with the colour swatch.  When the background was dry I rubbed away the masking fluid.


My next task was to colour in the image and then work on my background papers.


As you can see, I inked my own background card with Adirondack stream colour, two layers of stream and a white in between.


I added glitter to the tail and wings, die cut some number 18's and covered those in glitter too (Hayley likes "shiny"!), inked through a couple of stencils (I particularly liked the idea of enhancing that beautiful tail with the extra stencilling around it).  I stamped "Congratulations" and "Happy Birthday Daughter" and finished with a bow of two tones of ribbon and assembled on the mats and layers.

I'll let you into a secret, Hayley actually set me the challenge of this, her birthday card.  She actually asked for these colours, glitter and a ribbon! She did seem pleased when she received it!

This card fits in perfectly with the current Chocolate Baroque challenge 27, the inspirational photo and colour swatch so I would like to enter this card in to it.

and into Cards 4 Galz - use at least one die cut.

Hope you like what you see, I was pleased with it, nice and fresh colours,

Thanks for stopping by,
Leanne xx


Tuesday, 11 October 2016

Life is a Journey..........


Good morning!

I thought I'd have a go at the current Moving Along With The Times challenge - "sketch".  I always think this kind of challenge is rather fun and have endless possibilities.

I have taken some photo's along the way so lets take a journey shall we?


I started with my usual piece of white card stock, this time it is Sheena Douglass' stamping card.  I've drenched the card with water and used a current favourite of mine - drawing ink and let it bleed. This is sunshine yellow.  Don't panic about the card stock rolling up, (you could tape it down with low adhesive tape or stencil tape) - it will flatten out as it dries off.


There you go!


I having been itching to use this new stencil from Stencilgirl so I inked some distress inks through it, looked at it and thought, "it needs something to bring it to life!" - so in went an eye rubber stamp from Stampers Anonymous Classics.  That did it for me!  I then die cut around it with a Tattered Lace    
die.


I cut three strips from the same stamping card and used the same water and drawing ink technique, this time with some nut brown colour as well and left those to dry naturally.


This was me laying it all out to see how I was doing.  Was I getting to where I wanted to be? Yes, I think I was!  I cut the rectangular piece of card and stained that in the same way as the others, this time using a tad more nut brown and went through the stencil again with distress ink trying to ensure that I would be around the original circle piece with it.  I stamped a sentiment "Have a wonderful day" on the lowest card strip and prepared my backing card with the gelli plate.  I over loaded the gelli plate with acrylic paints so that when I pulled the print off I got that "sucked" look texture on the card - it is a lovely warm effect on the backing card. Then left that to dry naturally too.


Then it was time to assemble.  

I added "Life is a Journey" and a buzzy bee from Chocolate Baroque to fly in on to the flower!

Got the sketch theme right I think and really enjoyed making this one.  That eye makes the flower come to life don't you think? 

Life is a journey so always keep one eye on that road!

I would like to enter this in to the Moving Along with the Times challenge - "Sketch".

Thanks for stopping by,
Leanne x


Sunday, 9 October 2016

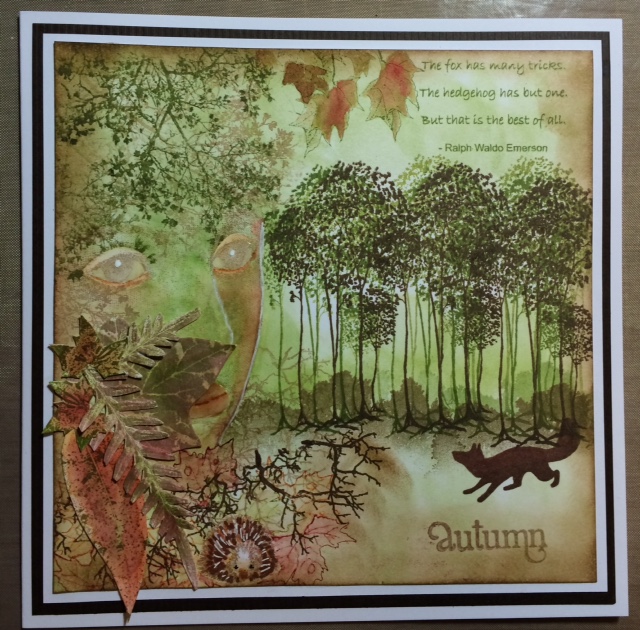
Autumn...........


Good morning!

Well, this is a bit of an announcement for me! I'm really excited to share the news that I have been requested to be part of the Fashionable Stamping Challenges design team (and I'm thrilled!).

My first design team challenge is launched today over at FSC http://www.fashionablestampingchallenges.com so hop over and take a look at the brilliant inspiration by all of the DT members.  The challenge this month is "trees" so go on........ show us what you can do with all those lovely Autumnal colours and stamps that you've got hidden in those drawers - or use it as an excellent excuse to order some!!!!!

OK, I took a couple of photo's along the way with this one so without further ado, lets take our journey shall we - a "design team members journey"!


OK, there was rather a lot of work to this piece of artwork but it was lovely to see it grow and progress.  I started with my usual plain piece of white card stock (good quality - I have used Sheena douglass stamping card here) and stamped the face - a favourite of mine - (stampers anonymous) not inking close to the edge of the face.  

I used some masking fluid to mask off areas of the face where I didn't want ink to land - I wanted the face to show through the branches.  I then stamped branches (Inkylicious and Visible Image) and popped the little hedgehog down at the front (he is a friend of "Fleabag" by Polyanna Pickering).


OK, don't panic, it starts to look a little out of control at this stage but I've got this - don't worry!!!!

So, I carried on building my woodland using leaves from Inkylicious, branches from Polyanna Pickering and trees again from Inkylicious.  I've stamped these trees in different shades of distress inks and stencilled in some bushes again in different distress inks for ground foliage.  I popped Mr Fox there as I thought it would be fun - (I think he may be from Clarity Stamp and their woodland creatures set).


So here we are, all drawing gum removed, I've shaded in the face and the open areas and stamped a lovely sentiment "The fox has many tricks, the hedgehog has but one, but that is the best of all" (to crawl up in a ball).

I finally added some leaves that I stamped, painted in and fussy cut around again, to make it appear that she is peeking through.

I was pleased with this one, (hope Fashionable Stamping Challenges are!!!???).

"A forest with it's woodland queen".

Thanks for stopping by and good luck for the challenge!
Leanne x


Friday, 7 October 2016

Wicked......


Good morning!

Well, we are on the "dark side" again! Well, it is October after all - we're allowed to be!!!!

There are lots of creepy challenges out there this month and I personally love something a little "different" and having a choice to get away from cute and cuddly for a while!

I took photo's along the way so lets take a journey this morning shall we?

This card started with a piece of good quality watercolour card stock.


Now, one of my favourite mediums at the moment is drawing ink, I know lots of people shy away from it as with watercolour painting but believe me, it's really quite forgiving, just have the confidence to give it a go and the next time and the next will be better and better!  I soaked my watercolour card and dripped some yellow drawing ink on to it to make it bleed and followed that with some black india drawing ink.  When I was happy that it had spread enough I dabbed with a paper towel and lifted off the excess which lightened it to where I wanted it to be - nice and dirty looking.


Next came my stencil, this one is from Stencilgirl - isn't it fabulous! I thought she looked rather mean and ideal for a bit of a creepy card.  I went through it with black soot distress ink and then diluted some of the distress ink and painted in the right hand side of her face to give it shadow. I then stamped the drips (Designs by Ryn) on her face, neck and from the top of the image and coloured in with distress markers and topped with Glossy Accents (you can just see the tinge of blue at the top here as it wasn't dry when I took the photo).  I then stamped around the edge with some funky foam that had been embossed from a folder (another technique I've mastered recently) and stamped in spiderweb designs around her.


Here is the Sheena Douglass embossing folder that I turned in to a stamp!


I stamped the suitable sentiment "Wicked" - Chocolate Baroque.

To finish I mounted on to black card stock, framed with a gold die cut frame (Sue Wilson Pierced Squares) and mounted that on to a white 8 x 8 card which I blended the black soot distress ink all around.

I didn't want to add anything more as I felt it was complete just the way that it was.

Happy with that and if my 16 year old daughter says it's cool - then I'm happy!!

I would like to enter this in to the following creepy challenges running this month:-

Dream in Darkness - 31 days of Halloween:-

Country View Challenges - All Things Spooky:-

Dark 'n' Daring Challenges - Anything goes :-

Cards in Envy - Frame it:-

Once again, I hope I haven't frightened you off! We have to get in to the spirit don't we!!!!

Thanks for stopping by,
Leanne x


Tuesday, 4 October 2016

Friend........


Good morning!

Well, I got top three for the last Indigoblu challenge so here I am as a guest designer - I am really chuffed!!!!

I took photo's as I went along so shall we take a journey? -


First of all, I started with my usual white piece of card stock.  I stamped the ferns as a wreath and covered in drawing gum, one by one.


A few days ago (you'll see from my blog for Friday 30th September 16) I discovered that I could turn an embossing folder into a stamp using funky foam (new to me, might not be to you?!!!!).  So I masked off the central area just with a piece of copier paper and inked up my funky foam and stamped the outside area to give it a nice wood effect.


Here you can see my funky foam and how I did it! (at this point when I took the photo I had already stamped my hedgehogs and masked them but see photo below also).


Now, I of course only had one hedgehog and had the idea that I needed two!!! So, I reverse stamped the image using my brayer (see Monday 15th August 16 on my blog of how to do this technique) of the reversed hedgehog first, then from wherever that "lands" you can stamp your nice original stamp next to it!!! Then masked off both hedgehogs with drawing gum.

The mushrooms came next, they were stamped so that they sat behind the hedgehogs and then I rubbed away all of the drawing gum.


I painted in the mushrooms and hedgehogs with diluted distress inks and shaded the background too.

The sentiment of "friend" was then stamped in - this is from the Indigoblu funny bird set - originally it says "in a friend" but I have only inked up the "friend" part.

I inked around the edge, matted and layered and added a lovely round frame to make the central image "pop" for me.


I was really pleased with this, suitable for any friendship don't you think?

This has been designed for Indigoblu as their reminder for half way through this months challenge.  I am grateful to them for choosing me as a top 3 winner and hope you liked the journey you took with me.

Please be reminded of the current Indigoblu challenge which is "Autumn wildlife"- go on, have a go!!!! It's a really enjoyable subject but please remember to use your Indigoblu stamps only.
http://indigoblublogchallenge.blogspot.co.uk/2016/10/september-challenge-reminder-autumn.html

Thanks for stopping by,
Leanne x