Published Permissions

Friday 29 July 2016

Smile it's a beautiful day..................

Morning!

Well, was this fun or what!!!!!  Inspired by the Cards in Envy "it's a heat wave" and the Sweet Stampin "Outdoors" challenges.   I went for hot colours and summer holidays!!!!!!

Ok, I did a step by step for you on this one so lets start with the background -


I've made my usual start with a blank piece of white card and applied some aqua tints in lovely warm colours.  I've faux bleached out a sun and then stamped the sunglasses in perfect medium and then embossed with black embossing powder.  The stamps used are all from Clarity stamp.


Then in comes the scene! I masked off the glasses and stamped the car and caravan with palm trees within the lenses.  I was thinking warm, heat, holidays!!!!!!

I removed some of the colour from the lenses by adding some water with a paint brush and dabbing with a paper towel.  Stamped the sentiment "Smile it's a beautiful day" and added some more birds then added glossy accents to the lenses to make them nice and shiny.

Ta dah!!! I was really pleased with that!

A really fun card to make and a great theme too!

I would like to enter this card in to the Cards in Envy "It's a heat wave" challenge.
Sweet Stampin "Outdoors" challenge.

Hope you like this one too, thanks for stopping by,

Leanne xx

Monday 25 July 2016

Christmas in July................


Morning!

Well dare I mention the "C" word in July???? - Of course I do!!!!! I've been inspired to create this card for the My Time to Craft challenge of "Christmas in July".

A lot of stamping involved in this one and all starting with a white piece of card.

Firstly I used the Inkylicious large bauble stencil (which comes with an inney and an outey stencil).  I used the inney stencil and blended some distress ink around it so that I knew where I was going and dropped the stencil down a bit to make the bauble a bit larger than it actually is.  Then I stamped the wood cabin stamp (again from Inkylicious) within the bauble and blended the ink with an almost dry paint brush.  Next came an Inkylicious hills and valleys stencil and I brushed some distress ink from the stencil and gave the cabin some hills behind it and in front of it so starting to make a scene.

A small moon mask was added and ink blended around it to get the nice white moon.

Some small trees were then stamped both inside the bauble and out so that the scene spread wider than the bauble.

The sentiment "Merry Christmas" was stamped in versa fine ink for a nice crisp finish.  I die cut some white snowflakes and used the aperture from the die cuts to sponge some snowflakes directly on to the edge of the background with white color box ink.

Added a small stamped family and a couple of small birds from Card-io and then with a fine liner pen just outlined the bottom half of the bauble so you didn't lose sight of it and sprayed the whole image with Goosebumps texture shimmer spray to give the whole card a shiny, bumpy snowy effect.


Darkened the edges to draw you in better and of course, the texture spray acted as a resist and gave further texture and effects at the edge. Added some iced snow to the top of the bauble and on some of the trees and hills and finished with the die cut snowflakes which have had some spray glue and diamond sprinkles added to them.

Quite different I thought? Happy with that, a beautiful wintry scene card.

I would like to enter this card in to the My Time To Craft challenge "Christmas in July"
Sparkles Christmas Challenges "snowflakes".

Thanks for stopping by,

Leanne xx

Friday 22 July 2016

You Cannot Discover New Oceans.......


Morning! This card was inspired by the Fashionable Challenges July challenge "Under The Sea".  What a brilliant challenge!

OK, I've done this one as a step by step (as there are soooo many steps in making this card!).

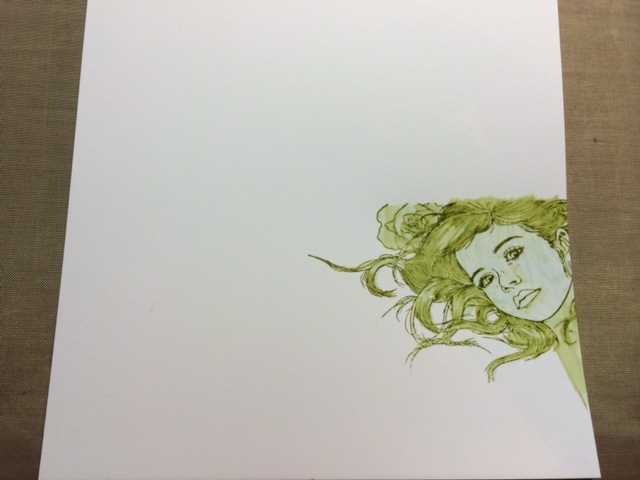
So, started with my usual blank piece of card and with an image in my head that I was trying to achieve! Think Leanne, what do you need in the forefront of the card - the mermaids face....


This card is all about rubber stamping and the skill of getting the right stamps stamped in the right order and then mask, mask, mask!!!! The mermaid is in place and covered in Pebeo masking fluid.


Then add some sea weeds with distress ink, blend with an almost dry brush and cover with masking fluid.


Stamp some sea shells within the weeds (for this card I have largely used Indigoblu under the sea stamps), blend the distress ink and cover with masking fluid.


Add the sentiment "You cannot discover new oceans, unless you have the courage to lose sight of the shore".  Blended over that with some distress ink and then masked over that.  Stamped one fish (only had one fish stamp so reversed it with the help of a brayer - a technique I'll try and blog another day for you) that makes two opposite facing fish!  Blend in the distress ink on them and mask off with masking fluid - the picture is building!

Add a couple of seahorses and some bubbles and keep masking over the images.

Stamp some swirls behind the fish and to fill in the background I pressed some distress inks on to a large acrylic block, sprayed with water and pressed card down on to the block - having masked all of the images I knew that they were protected.

Filled in areas that had "missed" and then rubbed away all of the masking fluid from all of the images. Added glossy accents to all of the bubbles and through the mermaids hair.

Added some tiny sea shells to the mermaids hair and a paper flower under one of them.

Mat and layered in black, a green mat inked to match the greens and blues and another layer of black on a white 8 x 8 card.

There, "under the sea" like fairies at the bottom of the garden, there are mermaids at the bottom of the sea!

Happy with that....

I would like to enter this card in to the following challenges:-

Fashionable Challenges - "under the sea"
Words 2 Craft by - "just keep swimming"

Thanks for stopping by,

Leanne xx

Monday 18 July 2016

A Mustang Happy Birthday..........


Morning!!

Here is what I call a "powerful" card!  Made for my daughters boyfriend - a mechanic and car nut - you wouldn't have guessed it would you!

Lots going on here, started with my usual blank white sheet of card. Stamped out the Mustang cars in black archival ink and covered with masking fluid (I needed the cars to "pop" from the page). Then laid down some brushos in blues and red and spritzed straight over the top.  Where the Brushos hadn't  quite covered all the background area I blended in some blue distress inks and gave it a quick spray with some blue spray ink.

Some white gesso was wiped through a stencil and some black embossing powder applied to the edges to draw you in to the whole thing.

I stamped the number 18 and glittered that up with some chunky dark blue glitters and "Happy Birthday" was stamped as the sentiment and highlighted with a white pen.

Some tyre tracks were stamped across the card - have to have tyre tracks with cars!!!!.

Once all the "messy stuff" was done, I rubbed off the masking fluid from the cars and where I thought they were a bit too stark, I blended over some distress inks to match (to tone the whiteness down a bit!).

My final touch was to cover the cars in Glossy Accents to make them shine through and I was done!

Very happy with that - it's nice when you have an idea in your head and you get it right with the final result!!!

Thanks for stopping by and seeing what I've been up to,

I would like to enter this card in to the following challenges:-

Moving Along With The Times - No Designer Papers
The Craft Stamper - Anything Goes
Sweet Stampin' - wheels

Leanne xx


Friday 15 July 2016

A Heart That Loves Is Forever Young......


Morning!

I was inspired to make this tag for the Crafty Individuals July "mini's" challenge.

Love making tags and this one is such a sweet stamp.

I firstly die cut my tag and stamped the sentiment "A Heart that Loves is Forever Young" on it.  Covered that sentiment with masking fluid and then stamped the main image which is Crafty Individuals stamp CI - 402.  Then sponged some Momento inks around the background and edges and rubbed off the masking fluid.

Added some watercolour pencils to colour in and then brayered some perfect medium straight over the top and added clear embossing powder to give the whole thing a shine.

Finally added some archival hearts around them and I was done - a nice "mini" piece of artwork.

I would like to enter this in to the Crafty Individuals July Challenge "Mini's".

Thanks for stopping by,

Leanne xx


Monday 11 July 2016

May A Gentle Breeze Blow Your Way........


Morning! Had great fun making this card, lots of different stages and I've given you a step - by - step of how I got there!

I was inspired by the My Time To Craft Challenge Blog to do a triple stamped card and it just developed from there really - found myself once again in that little world where time forgot me, forgot the dinner, forgot the dogs..........!!!!!!

I started by cutting my three pieces of white card stock and then sponged on to all three Momento Bamboo Leaves and Pear Tart (wonderful colours).

I attached all three layers together using removable tape at the back.

With Archival Watering Can ink pad I stamped the face from Stampers Anonymous Classics SCF005 across all three layers and the bird from the Stampers Anonymous Bird Feather CMS180 set. I stamped the bird again and made a mask of it and covered it over.

Masking fluid was painted over the eyes, nose and mouth of the face and the Stampendous Tree Poem was stamped straight over the top of the face, then the masking fluid rubbed away to show the clear eyes, nose and mouth. A few birds were also stamped around the large bird and an Inkylicious sentiment of "May a gentle breeze blow your way and bring with it a Special Day" was added.


I made a further mask and covered the whole face (as you can see, it has been used before!) and added some colour box white circles with a round applicator tool.


Removed all the masks and added some charcoal pencil to the circles for depth.


Separated the layers (looks a bit different now!!! - don't panic at this stage!!!!).


Mounted each layer on a piece of dark green card stock and attached with mounting foam for dimension. Wrapped some seam binding ribbon around the middle layer and attached a ribbon bow.


Happy with that!  Came together very nicely indeed!

Thanks for stopping by,

I'd like to enter this card in to the following challenges:-

My Time To Craft Challenge - Triple Stamping
Country View Challenges - Have Fun With Circles
Stamping Sensations Challenge - Anything Goes with A Stamp and Ribbons.

Leanne x


Friday 8 July 2016

Sing With Stripes!


 Morning!  Well, I got so engrossed with this one I completely lost track of time, the kids dinner, the dogs dinner, the cats dinner - have you ever been there - it's a wonderful place!!!!!!

I was inspired to make this card for the Cards In Envy latest challenge "Stripes".

I remembered to take photo's of this technique as I went along (that's good for me!) so that I could explain what I've done with pictures to help you see.  Cards in Envy have to be no more than 1/4" thick so as to fit in an American Envy envelope i.e no bulk - no ribbons, buttons, excessive layering etc - so what you see here is an optical illusion and is all on ONE PIECE OF CARD with one single backing of rich plum card - I impressed myself with this one I have to admit!!!!!

Ok, here we go with my step by step:-


Firstly I stamped the Visible Image Stamp of the woman singing and some Visible Image musical notes. I masked her dress only with masking fluid. Then masked around the edge to fit her into a nice square with the notes and applied removable tape in stripes across. 

I used Momento inks with Inkylicious ink dusters to apply colour between the strips of removable tape.

Then removed the strips of tape and reapplied them over the inked areas - with me so far? This left again, white strips.

Then inked these areas too and removed all the tape and stamped some stars to jazz it up a bit.

Now I had to work on the background (I had an image in my head - just needed to sort it in my head!!!!). So I masked off the whole inner square area with a cut down masking sheet and applied the removable tape in the opposite direction - keeping up with me?

Then inked in-between the tape.

Moved the tape to cover the inked areas (as in the third photograph) and inked in-between again. Then removed all the removable tape. This picture shows the tape removed just leaving the masking sheet in place so that you can see the great reveal coming.

Ta Dah!!!!!  This made me really happy to see that it had worked well!  I rubbed off the masking fluid from the girls dress to reveal nice white stripes on her dress.


The final reveal!  To finish off and to make that centre "pop" without giving the card any depth - I edged around the centre square with a ruler and a fine liner black pen. Stamped the sentiment "sing" again from Visible Image.  Mounted the whole piece of card on to some lovely Creative Expressions Rich Plum card stock and mounted on to the 8 x 8 card.

VERY happy with that!

I would like to enter this card in to the current Cards In Envy "Stripes" challenge.

Thanks for stopping by,
Leanne x


Monday 4 July 2016

Phantom of the Opera Theme........In Dreams He Came........

Morning!!!  This is a card that I made for my daughters birthday.  Last year she won a major school singing competition (music theatre) having sang the theme from Phantom of the Opera - a superb evening and so I set to on a birthday with this theme!

Now, thinking back I knew that it had to be dark and very classical so the background is a Stampendous stamp of a cobwebbed candelabra embossed in gold. I coloured the candles with a white gel pen. Layered on top of that is a further black mat mounted on gold mirri card which is again gold embossed with musical notes this time (this was a very old wooden mounted stamp that I had tucked away).

I tore a piece of plain copier paper with a computer generated "In Dreams He Came" on it then (swiped some gold ink across it). The reason for having In Dreams He Came on it was because her Godmother had made her a birthday cake with the opening line of "In sleep he sang to me" so I continued with the second line on my card! - are you all singing along?!!!


Right, where was I , oh yes, the card!!!!!

A stamped rose in red and green card was added and then if you look closely a bowed acetate layer was applied domed right over the top - you can just see it if you look carefully at the top.

I added a daughter stamped sentiment embossed in gold and then finished the whole thing off with phantoms' mask stuck to the acetate on the top so that it looked like it was floating there.

Hayley was thrilled with both her card and her cake (equally impressive) as was we with her singing performance along with her singing partner Richard.


A bit of a private peek but it helps explain the reason for the making of the card. It was quite a challenge but I think I got there as well as I was ever going to!

Thanks for stopping by,

Leanne xx